Fresh Fall Fun is the theme this week at Stampendous. We are featuring fall projects from the new catalog. Here is my project for today:
MATERIALS
Build A Wreath Cutting Die Set DCP1007
Falling Leaves Stencil DWLL3004
Birthday Assortment Clear Stamps SSC1115
Acrylic Stamping Handle
Gold Embossing Paste
Paste Spreader DWLM5010
Pearl Lustre Embossing Powders in Carnelian and Jade
Opaque Embossing Powders in Ruby Red and Honey
Embossing Heat Tool HT400
Dreamweaver Palette Knife
My Colors Card Stock in Goldenrod, Parrot, Brown Eyes, Sky, Mandaring and Harvest Orange
Manual Die Cut Machine
Versafine in Toffee
Removable Tape
Burlap
Fabri-Tac Glue
Awl
Tapestry Needle
Hemp Ribbon
Adhesive--I used Zip Dry
DIRECTIONS:
1) Use the leaf die from the Build a Wreath set to cut out leaves.
2) Stamp words on the leaves and distress the edges with the Versafine.
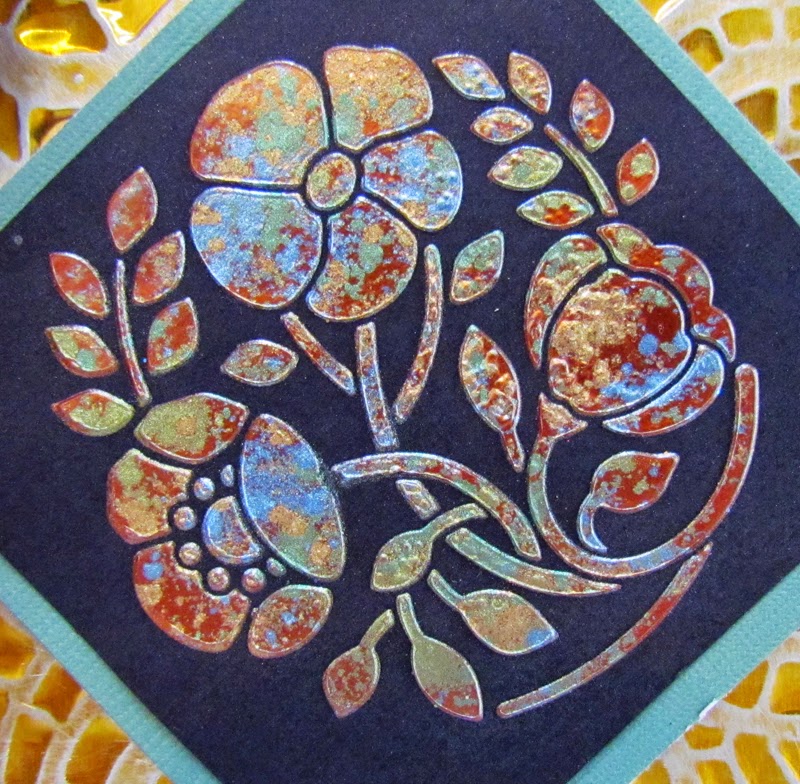
3) Tape the stencil over the blue card stock. Be sure to tape one piece across the top of the stencil that you will use as a himge when you remove it. Tape all the way around the stencil.
4) Use the palette knite to remove the paste from the container and place it on the bottom of one side of the paste spreader.
5) Place the spreader on the top edge of the stencil. Be sure the paste side is facing you.
6) Pull the spreader towards you, treating it like a squeegee. The spreader should maintain contact with the stencil at all times and will deposit the paste into the wells.
7) Remove the excess paste with the palette knife and replace it into the container.
8) Remove the tape from the stencil everywhere except for the top.
9) Gently lift the stencil, using the tape as a hinge. Then, remove the stencil entirely.
10) Sprinkle the top of the paste with the various embossing powders while it is still wet. The let it mostly dry.
11) When the paste is mostly dry (about a half an hour or so), use the heat gun to heat it from underneath first, and then on the top. The paste and powders will bubble.
12) When the project is completely dry, adhere it to the mat.
13) Use the fabric glue to adhere the burlap to the background paper and the mat to the burlap.
14) Use the awl to punch guide holes into the mat and through the burlap and background paper.
15) Use the needle and hemp to sew the project.
16) Adhere the project to the card base.
17) Adhere the leaves to the card.
Here are the other posts for today. Take a look at some of the other great stencils in the newest Stampendous Catalog:
Showing posts with label birthday card. Show all posts
Thursday, July 28, 2016
Thursday, March 24, 2016
Gearing Up for Fran's Embossing Book
Thanks for stopping by today. This week, the Stampendous Design Team is playing with Fran's embossing book, "Embossing Powder Techniques from A to Z". I am using one of my favorite go-to techniques, "Molten Magic" also known as Technique P from page 32 in the book.
Materials:
8
½” by 5 ½” Base Card
Removable
Tape
Embossing Powders in Jade Pearl, Evergreen Opaque, Sterling Silver Opaque, Detail Gold, Aged Copper Enamel, Aged Gold Enamel, Aged Black Enamel, Detail Black Opaque Embossing Powder, Pirate Gold
May Arts Ribbon
May Arts Ribbon
Shrink
Plastic
Prismacolor
Pencil—Gold
Black
Ultra Fine Sharpie
Heat
Tool
Scissors
Sandpaper
Big
Bite—Hole Punch
Adhesive
My
Colors Card Stock in Brown Eyes and Spanish Moss
Thanks again for stopping by. Check out the rest of the posts for the day:
Labels:
birthday card,
embossing,
Molten Magic Technique
Thursday, January 14, 2016
A Dragonfly Birthday Card
Materials:
My Colors Card Stock in Cloak GreyHeidi
Swapp Minc Foil in Holographic and Teal
Instructions:
1) Fold your base 5 ½” by 8 ½ ” card stock, creating a top fold card.
2) Either soap the back of all three stencils or cover them with Versamark. You need to create a light film across the back that makes the stencils easy to remove from the adhesive on the mounting paper.
3) Cut the mounting paper to match the sizes of each of the stencils.
4) Remove one side of the coverings on the double sided mounting paper and place the stencils, soap or Versamark side down, on the paper.
5) For the Happy Birthday and the Dragonfly stencils, place the Minc foil, dull side down, over the open places on the stencils and rub lightly.
6) Use the embossing tool to rub over the top of the foil, pressing it down into the wells of the stencils.
7) Remove the foil, and rub a little of the Micro Black Glitter over the foiled sections.
8) Use the stencil brush to brush off the excess glitter. Do this thoroughly.
9) Place the foiled projects upside down on a flat surface and carefully peel the mounting paper off of the stencil.
10) Cover the newly revealed sticky paper with Crystal Multi Glitter.
11) Push the Aged Aqua Embossing Enamel into the wells on the Mosaic Swirls Stencil. Do not brush off the excess.
12) Carefully place the project upside down on a flat surface and remove the double sided mounting paper.
13) Use the heat gun to emboss the Aqua Enamel.
14) After the embossing has cooled, pour the Detail Black Embossing Powder over the exposed sticky surfaces.
15) Heat Emboss
16) Assemble the card, using the Tombow Tape to raise the sentiment.
Thanks for stopping by today. I hope you enjoyed my card.
Check out the rest of the posts for today:
Louise Healy
Alison Heikkila
Kristine Reynolds
Pam Hornschu
Stampendous Blog
Sunday, December 13, 2015
Happy Birthday, Laura! A Pretty Bearded Iris Card.
Today is a VERY special birthday! Laura Weed, our fearless leader, is celebrating another year on this planet. In celebration, her team is having a Birthday Blog Hop!
HAPPY BIRTHDAY!
Here is how I created this birthday card:
Materials:
DWLL516 Bearded Iris Stencil
Glossy White Embossing Paste
Paste Spreader
Dreamweaver Palette Knife
HAPPY BIRTHDAY!
Materials:
Glossy White Embossing Paste
Paste Spreader
Dreamweaver Palette Knife
Cardstock by Bazzill Basics Paper®
Core'dinations Card Stock
Small Glue Dots
Amplify in Electric Yellow
Spectrum Markers in LV2, LV3, CG1, CG2 and DG3
Scotch by 3M 1/2" Adhesive
May Arts Ribbon
Removable Tape
Embossing Heat Gun
Paper Trimmer
Core'dinations Card Stock
Small Glue Dots
Amplify in Electric Yellow
Spectrum Markers in LV2, LV3, CG1, CG2 and DG3
Scotch by 3M 1/2" Adhesive
May Arts Ribbon
Removable Tape
Embossing Heat Gun
Paper Trimmer
Instructions:
- Cut the base card stock 8 1/2" by 5 1/2" and fold on the side.
- Tape the Bearded Iris Stencil over green card stock with removable tape. Use a tape strip all the way across the top of the stencil that will act as a hinge later. Then tape both of the sides and bottom.
- Use the palette knife to remove the Glossy White Embossing Paste from the container and place on the paste spreader. Place a strip of paste on the spreader that is as wide as the Iris image.
- Set the paste spreader on the stop of the stencil and pull it towards you, maintaining contact with the stencil, and filling in all the wells.
- Carefully remove the tape from the bottom and sides of the stencil.
- Using the top tape as a hinge, lift the bottom of the stencil carefully up and then away from the project. Let dry completely.
- Color the Iris image with the Spectrum Markers.
- Squeeze the Amplify onto the iris to create the "beards" and heat with the embossing gun until it puffs up.
- Assemble the card, using a Glue Dot to adhere the knot in the May Arts ribbon.
Here are the rest of the folks wishing Laura a Happy Birthday today:
Thursday, January 29, 2015
The Fifth Thursday
It is the fifth Thursday of the month, so the whole team is playing this week. Of course, our theme is still birthdays, but I always prefer a nice, all occasion type card for birthdays. I feel better when I can write in anything I want.
For this card, I used two different techniques. First up, I pasted LM2011 Poppy Circle with Metallic Copper Embossing Paste. While it was still wet, I sprinkled on some Metallic FX in http://www.stencilwithstyle.com/accessories/fxpins.html, FX 10 Kiwi, and FX 17 Navajo Sky. I let them dry for awhile, but then got a little impatient, and used my heat gun to speed the process. It caused a few little bubbles on the surface, but I really liked it. When everything was completely dry, I rubbed off the excess Metallic FX with a Swiffer refill. Here is a little detail shot:
While the paste dried, I ran the LJ 901 Mosaic Swirls Stencil through my Cuttlebug with yellow coated aluminum and the Stamping Details Rubber Embossing Mat. After the embossing, I simply sanded off a little of the gold color.
With the addition of some May Arts ribbon and a little card stock, I was finished.
Thanks for stopping by today. Try making something yourself and upload it to the Dream It Up! Blog for your chance to win a great prize. For inspiration, be sure and check out the other team members this week at the following links:
Thursday, January 15, 2015
Birthday Cards and New Adventures
This month at Dreamweaver, we are celebrating birthdays. It seems appropriate, then, that the company is celebrating a rebirth of sorts this month as well. Dreamweaver Stencils has been purchased by Stampendous! This should open new creative options for our stencils. It is a very exciting time! You can learn more about the new plans by visiting the Dreamweaver Stencil Blog.
As for the Dreamweaver Design Team, we are still going strong, so continue joining in on the fun. You never know what sort of special things are in store during this exciting time.
For my birthday post, I chose to create with a couple of different techniques. I ran the LJ 901 Mosaic Swirls Stencil through my Cuttlebug with metal and the Stamping Details Rubber Embossing Mat. After the embossing, I colored it with alcohol inks and then sanded it.
The words are just cheap letter stickers. Everything else is card stock.
Labels:
birthday card,
dreamweaver stencils,
flock.,
foils,
lizard,
metal
Thursday, January 1, 2015
The Birth of a New Year, and a special message
HAPPY BIRTHDAY, LYNELL!
Our theme this month, in honor of the birth of a new year, is "Happy Birthday"! Since Lynell, the Queen of Stencils has a birthday this week, many of us have decided to use our birthday card to wish her a great year on our blogs. Here is my Lynell Birthday Card:
The butterfly was created with the Double Glitter Technique. For this technique, you need Double Sided Mounting Paper, a Large Stencil Brush, a stencil, and, of course, lots and lots of glitter! It is one of my favorite techniques! (Aside from metal, of course.....) You can see how glittery this card turned out in this close up. The Silver Metallic paste is plain on the left side of the picture and glittered on the right.
Well, I hope I could inspire you to get a head start on all of those birthday cards for the year. If so, be sure to add a link on the Dream It Up! site for your chance to win! Using Dreamweaver Stencils will give you an extra chance, so give it a try! You never know what you could do unless to make the effort.
Thursday, February 6, 2014
February Flutters
Are you ready for the new Dreamweaver challenge for the month of February? It will be a short month of posts for the Dream Team, but we're pretty excited to share with you our versions of "February Flutters", meaning anything that flutters. Heart flutters, wings that flutter, breezes, sails, etc. So, come along for the ride and link your own "flutterings" to the Dream It Up! blog for a chance to win the stencil of your choice. Meanwhile, here's my "fluttering" for the week:
Here is how it was done:
MATERIALS:
A Piece of Suede to Work On
May Arts Ribbon
Sanding Block or Sand Paper
Cotton Swab
Card Sock
Adhesive
Manual Die Cut Machine with Cutting Mats
DIRECTIONS:
1) Run the gold coated aluminum through your manual die cut machine with the background stencil and the rubber embossing mat. The "sandwich" for the Cuttlebug is A Plate, stencil (face UP), metal (face UP), rubber embossing mat, and two B Plates. This is technically debossed, because the metal is being pressed into the stencil. Leave the metal on the stencil.
2) With the metal still over the stencil, sand lightly to uncover the silver color where the stencil remains.
3) Remove the stencil.
4) Run the metal through the manual die cut machine again. This time, use the butterfly stencil and place the "sandwich" this way: A Plate, stencil (face DOWN), metal (gold side DOWN), rubber embossing mat and to B Plates. This way, the metal is pushed down into the back of the stencil, as if the color is being pushed out and through. This is embossing.
5) Place the metal face down on the suede and use the ball tool to press the metal out and give the butterfly dimension.6) When the butterfly is nice and "poufy", place right side up on a hard, smooth surface. Go around the edges of the design with the Teflon Tool and refine them. Also make sure to use the "deerfoot" side of the tool to flatten out where the metal bent around the edges of the butterfly stencil.
7) When you have the effect you want on the butterfly, flip it gold side down and full the cavities with the MercartUSA Filling Paste. You just squeeze it into the holes and let it dry a couple of hours.
8) When the butterfly is dry and hard, flip it back to the front and use a cotton swab to gently apply color to the raised area. I used Blue Velvet and Sugar Plum on the wings and Black Beauty on the body and antennae.
9) Run the Blue Coated Aluminum through the machine with the words. You will be debossing, so put the stencil and the metal both face UP before you run it through. Leave the metal on the stencil.
10) With the metal still on the stencil, use the Teflon Tool to push the metal into the letters a little further.
11) Add a little Sugar Plum Color Solutions in the letters if desired.
12) With the metal still on the stencil, vigorously sand the blue and purple off of the areas over the stencil.
13) Remove the stencil.
14) Assemble the card.
Be sure to leave me some encouragement before flitting over to the "A" team blogs:
Thursday, September 5, 2013
Art Glitter and Dreamweaver Present an Awesome Autumn
Welcome to the Art Glitter and Dreamweaver Collaboration! (So, I guess I am collaborating with myself!) The theme this month is Awesome Autumn. Here is my first post:
It is a birthday card for a friend. The technique used is Double Glitter. Here are the materials that I used:
Dreamweaver Stencil LL 429 Long Sunflower
Dreamweaver Stencil LS 1010 Small Happy Birthday
Double Sided Mounting Paper
Handmade Hawaiian Soap
Large Stencil Brush
Art Glitter Ultrafine Opaque 357 Wintergreen
Art Glitter Ultrafine Opaque 109 Cavalado
Art Glitter Ultrafine Opaque 114 Leaf
Art Glitter Ultrafine Opaque Neon 222 Electric Light
Art Glitter Microfine Opaque 521 Cayman
Art Glitter Ultrafine Opaque 350 Butterscotch
Art Glitter Ultrafine Transparent 206 Wildwood
Art Glitter Ultrafine Opaque 59 Teak
Art Glitter Ultrafine Opaque 231 Copper Canyon
Art Glitter Ultrafine Transparent 197 Flax
Graphic 45 Printed Paper
Card Stock
Raffia
I used multiple colors in each part of the sunflower. You really don't need to do the same if you don't want to.
This month features the Art Glitter lead Kristi Parker as the Dreamweaver Guest Designer. As if that weren't enough, Art Glitter is featuring a 20% off sale on all regular retail items! Use the code DW20. Stencil with Style is ALSO offering a 20% off sale. Their coupon code is SWS20.
Check out the other players this week, get inspired and send a photo of your Awesome Autumn project to Lynell@Dreamweaverstencils.com. You could win a wonderful prize!
Thursday, September 27, 2012
Another Inky Metals Piece
It is the last week of the theme "Getting Inky with Stencils". I couldn't let the month end without putting up just one more alcohol ink project. This one was VERY easy, but uses just a slightly different technique.
MATERIALS:
Dreamweaver Stencil LX7014 Daisy Background
Dreamweaver Stencil LS1010 Happy Birthday
Manual Die Cut Machine (I used Cuttlebug)
Stamping Details Embossing Mat
Mercart Metal Aluminum (any color--we will use the back)
Ranger Alcohol Ink in Watermelon and Denim
Craft Sheet
Sandpaper
Cardstock
Ribbon
Adhesive
DIRECTIONS:
1) Use the manual die cut machine to emboss the metal. This is the sandwich for the Cuttlebug: A Plate, Stencil (face down), metal (silver side down), Details Embossing Mat, Two B Plates. Emboss both stencils this way.
2) Lay metal on craft sheet, silver (embossed) side up. Drip the two colors of alcohol inks randomly onto metal. Quickly swirl around the color a little by tipping the metal or by dipping a QTip into it and pushing it around. Let dry.
3) Sand the embossed pieces.
4) Assemble.
This was as easy as can be. You should give it a try. If you do, photo it and either email it to Lynell@dreamweaverstencils.com or upload it anywhere online and link it to the blog, www.dreamweaverstencils.blogspot.com.
This month we will have just a bit different twist on our monthly challenge ... we are letting you choose any stencil you would like as your prize if you win. Yep, any Dreamweaver stencil you "so desire". We will still have two winners, one for best interpretation of the challenge and one for best usage of Dreamweaver products. Enter now, before it is too late!
Labels:
alcohol ink,
birthday card,
dreamweaver stencils,
embossing,
metal
Subscribe to:
Posts (Atom)