Thursday, January 29, 2015

The Fifth Thursday

It is the fifth Thursday of the month, so the whole team is playing this week.  Of course, our theme is still birthdays, but I always prefer a nice, all occasion type card for birthdays.  I feel better when I can write in anything I want.
 
 For this card, I used two different techniques.  First up, I pasted LM2011 Poppy Circle with Metallic Copper Embossing Paste.  While it was still wet, I sprinkled on some Metallic FX in http://www.stencilwithstyle.com/accessories/fxpins.html, FX 10 Kiwi, and FX 17 Navajo Sky.  I let them dry for awhile, but then got a little impatient, and used my heat gun to speed the process.  It caused a few little bubbles on the surface, but I really liked it.  When everything was completely dry, I rubbed off the excess Metallic FX with a Swiffer refill.  Here is a little detail shot:


 While the paste dried, I ran the LJ 901 Mosaic Swirls Stencil through my Cuttlebug with yellow coated aluminum and the Stamping Details Rubber Embossing Mat.  After the embossing, I simply sanded off a little of the gold color.
     With the addition of some May Arts ribbon and a little card stock, I was finished. 
     Thanks for stopping by today. Try making something yourself and upload it to the Dream It Up! Blog for your chance to win a great prize.  For inspiration, be sure and check out the other team members this week at the following links:

Thursday, January 15, 2015

Birthday Cards and New Adventures

This month at Dreamweaver, we are celebrating birthdays.  It seems appropriate, then, that the company is celebrating a rebirth of sorts this month as well.  Dreamweaver Stencils has been purchased by Stampendous!  This should open new creative options for our stencils.  It is a very exciting time!  You can learn more about the new plans by visiting the Dreamweaver Stencil Blog.
As for the Dreamweaver Design Team, we are still going strong, so continue joining in on the fun.  You never know what sort of special things are in store during this exciting time.
For my birthday post, I chose to create with a couple of different techniques.  I ran the LJ 901 Mosaic Swirls Stencil  through my Cuttlebug with metal and the Stamping Details Rubber Embossing Mat.  After the embossing, I colored it with alcohol inks and then sanded it.

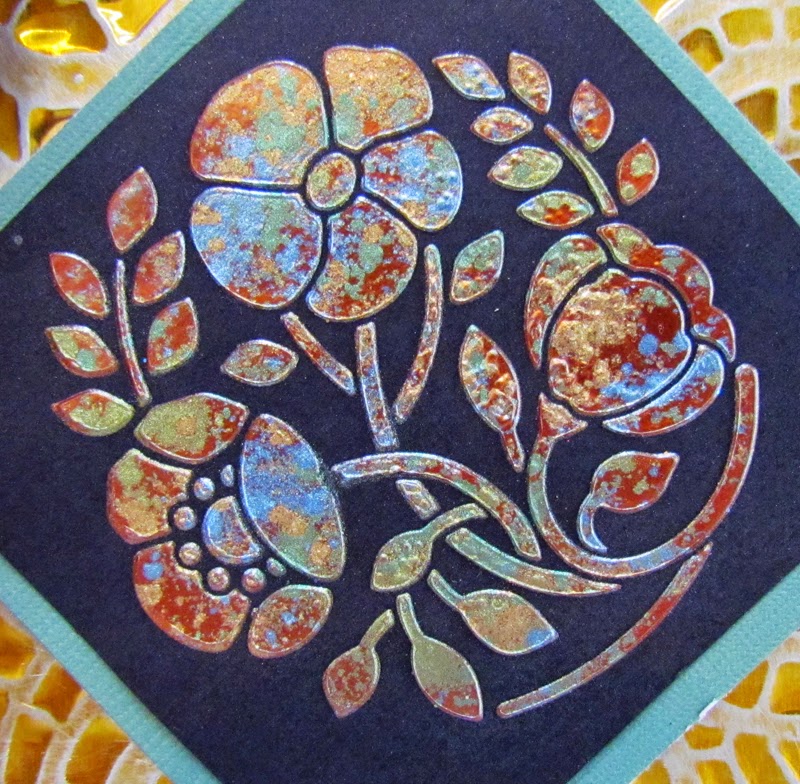
I created the gecko using a modified Double Glitter Technique.  First, I soaped the back of the Lizard Stencil LM2004 with Hawaiian Coconut Soap.  Then, I brushed off the excess with a large stencil brush.  I placed the stencil, soap side down, on one side of the Double Sided Mounting Paper.  I pressed red, gold and copper foils in the exposed areas using my fingers and the Small Embossing Tool. Once I had all of the foil I needed, I pressed black flock into all the "wells" of the stencil.  Then, I thoroughly brushed off the excess materials.  I carefully removed the stencil by placing it face down on a table and gently peeling off the paper.  Then, I covered the whole thing in white glitter.
The words are just cheap letter stickers.  Everything else is card stock.


I really enjoy working with this technique.  I hope you were inspired to create a project of your own.  If you do get a chance, link it over to the Dreamweaver Stencils Blog for your chance to win something wonderful!

Thursday, January 1, 2015

The Birth of a New Year, and a special message

HAPPY BIRTHDAY, LYNELL!

Our theme this month, in honor of the birth of a new year, is "Happy Birthday"!  Since Lynell, the Queen of Stencils has a birthday this week, many of us have decided to use our birthday card to wish her a great year on our blogs.  Here is my Lynell Birthday Card:
 
 
 I used three stencils:  LX 7001 Damask, LJ 916 Butterfly, and LM 150 Happy Birthday. I pasted the Happy Birthday with Glossy Black Embossing Paste and the Damask with Silver Metallic Embossing Paste, which I sprinkled with a microfine teal glitter in spots while the paste was still wet.  When pasting, you need to tape the stencil down with the Removable Tape and use the LM 2010 Paste Spreader to move the paste over the stencil.
The butterfly was created with the Double Glitter Technique.  For this technique, you need Double Sided Mounting Paper, a Large Stencil Brush, a stencil, and, of course, lots and lots of glitter!  It is one of my favorite techniques!  (Aside from metal, of course.....)  You can see how glittery this card turned out in this close up.  The Silver Metallic paste is plain on the left side of the picture and glittered on the right.

 
Well,  I hope I could inspire you to get a head start on all of those birthday cards for the year.  If so, be sure to add a link on the Dream It Up! site for your chance to win!  Using Dreamweaver Stencils will give you an extra chance, so give it a try!  You never know what you could do unless to make the effort.