Let me start by saying, this is NOT the post to reply to if you are looking for blog candy. If that is your reason to comment, scroll down two posts until you see the hair clips with my cute niece models. Post on THAT one for blog candy.
This is a bonus post for a couple of reasons. First, I just COULDN'T stop making the cute metal butterflies. Second, the photos just would not post to the right spot when I was posting the hair clip post. Finally, I entered a Reminisce contest (using a Dreamweaver stencil, mind you) with a blog post and then I realized that it knocked my hop post down a post. It occured to me that perhaps it wasn't the best week to move my non-card metal post down one, so I thought maybe I should make a post out of my bonus metal piece. It is a pin.
This is a bonus post for a couple of reasons. First, I just COULDN'T stop making the cute metal butterflies. Second, the photos just would not post to the right spot when I was posting the hair clip post. Finally, I entered a Reminisce contest (using a Dreamweaver stencil, mind you) with a blog post and then I realized that it knocked my hop post down a post. It occured to me that perhaps it wasn't the best week to move my non-card metal post down one, so I thought maybe I should make a post out of my bonus metal piece. It is a pin.
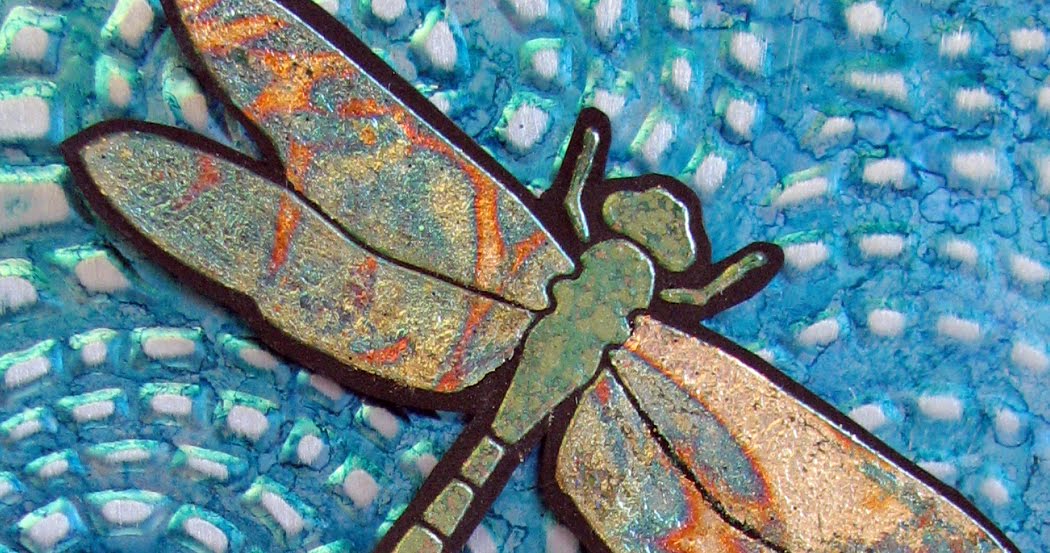
I made this piece in much the same way that I made the hair clips. I started with blue coated aluminum. I placed it over the Dreamweaver Scallop Butterfly Stencil LM 255. I used a large blending stump (an art supply material) and ran it over the top of the stencil to get a rough idea of where everything was. Then, I used the Mercart Metal teflon tool (also available from Dreamweaver Stencils) to push the metal deep into all of the crevices in the stencil. I used a sanding block while the stencil was still under the metal to sand off the blue from the raised areas. I removed the metal from the stencil. I attached the backing aluminum to a piece of chipboard. I then measured and marked hole spots from a purchased pin back. I used my Big Bite to make the appropriate holes. I then used brads to attach the pin back. I adhered the metal butterfly to the pin and trimmed around it. Finally, I used Ranger Glossy accents in the holes that I wanted to add glitter. I threw Woodware glitter in the areas. After it dried a little, I covered some of the glitter with a top coat of Glossy Accents. Then, I let it dry completely.
 rough idea of where everything was. Then, I used the Mercart Metal teflon tool (also available from Dreamweaver Stencils) to push the metal deep into all of the crevices in the stencil. I used a sanding block while the stencil was still under the metal to sand off the blue from the raised areas. I removed the metal from the stencil. I attached the backing aluminum to a piece of chipboard. I then measured and marked hole spots from a purchased pin back. I used my Big Bite to make the appropriate holes. I then used brads to attach the pin back. I adhered the metal butterfly to the pin and trimmed around it. Finally, I used Ranger Glossy accents in the holes that I wanted to add glitter. I threw Woodware glitter in the areas. After it dried a little, I covered some of the glitter with a top coat of Glossy Accents. Then, I let it dry completely.
Once again, this piece is NOT part of the hop. That blog post is two down and includes girl models. If you would like to comment anyway, fantastic--I love comments! You won't win blog candy for it, but you would make me feel good. Stop by again on Thursday for more ways to win and more posts for the hop. See you then. Oh yeah--I love to get followers, too!
 And my take, horizontal, and with the beautiful Harvest line by Reminisce is here:

 For my Dreamweaver Stencils fans, you will notice that the Sentiment is LM 251. It was pasted with Matte Orange Embossing Paste. The other thing that I had tons of fun with was the turkey image. I cut three of them out of the paper. Then, I layered pieces with 3D Dots in between the layers. I occasionally added a little bit of regular adhesive to parts (like the head) and squeezed it down to the previous layer, so that I had a couple of different layers. I also used the top portions of the papers to make the smaller stripes. This is something that I really appreciate about the recent Reminisce papers--the part that holds the scan bars on one side has patterned bits on the other so that it is still useful paper.
 The first two pieces that I am going to post are both hair clips. All of the "findings" that I will be mentioning (the actual clips and pins that I used) were purchased without anything on them from a local craft store. The tool that I used was a double sided teflon tool from Mercart Metals that is available in a kit from Dreamweaver Stencils as well.


 You might be able to see on this bottom card, but on both I scraped off the covering to expose the beautiful Red Glossy Paste underneath. See how the edges on this one appear drawn on? In real life, it is bright red on those edges. I did the same on parts of the top one, but being that that has red glitter on it, it shows up a little less bright.


