Thursday, June 28, 2012

The Last Week of a Wonderful Collaboration


 AND


ARE TEAMING UP THE ENTIRE MONTH OF JUNE TO BRING YOU AN AMAZING CREATIVE COLLABORATION MIXING DREAMWEAVER STENCILS AND ART GLITTER. COME ALONG FOR THE RIDE...WE PROMISE IT WILL BE A SPARKLING ONE!
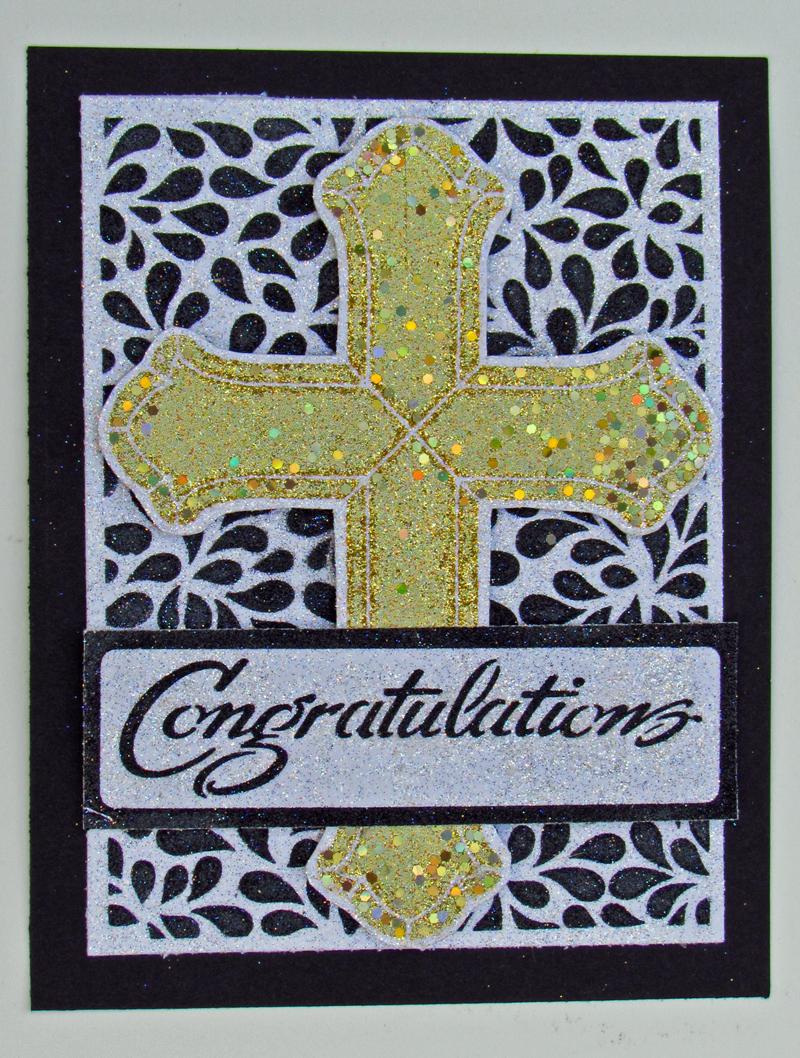
This is my creation for the week.  It could be considered a wedding card (the theme for the month) and is definitely a double glitter card.  Check out the technique with the link below.  I used Art Glitter Microfine Opaque 507 Black Wing on both the background and the words to give them nice, crisp edges. The gorgeous background stencil is LJ 899 Petals Background. The word is stencil  is LS 22 Congratulations.  I used LJ 918 Open Cross with my new "Triple Glitter" technique.  The open areas on this are just perfect for the technique.  It is started the exact same way as the Double Glitter Technique, but I call it Triple Glitter because I included one extra layer of glitter.  First, I laid down the Art Glitter Dazzlers D4 Jackpot Funky on the adhesive paper.  This is a little different than the last time, because this particular Dazzler has many different sized pieces already.  I still wanted to add some sharpness to the edges.  Therefore, I put a little Art Glitter Microfine 516 Gold Tone right on the stencil and pushed it into the openings with my finger.  I brushed the excess off completely before removing the stencil and adding Ultrafine Transparent 85 Crystal to the background.  I used this beautiful clear glitter behind all of the stencils.  Because the Dazzler has some much larger glitter pieces on it, it is extremely flashy.  The best way for me to illustrate this is to show you a second picture where it appears that the gold glitter is a completely different color.  Take a look.


I hope you become inspired to try this great technique for yourself.  It is really easy and addictive.  The best part about it?  The sale listed below includes most of the Dazzlers, too!  But act quickly, because the sale ends Saturday.

Visit the Art Glitter blog and the; Dream It Up! blog for fabulous inspiration from both talented design teams. We are encouraging all of you to play along with the challenge of creating with Dreamweaver Stencils and Art Glitter*, preferably using the Double-Glitter Technique with a wedding theme. Just link your creation to the Mr. Linky on the Dream It Up! blog, or email pics to lynell@dreamweaverstencils.com, for an opportunity to win one of four fabulous glitter and stencil prize packages. One winner will be chosen each week. (US and Canada only, please).


For more inspiration from the Art Glitter design team, please visit their blog for a complete list of players throughout the month.

For more inspiration from the Dream Team, here's the blog list for this week:


*For the month of June Art Glitter is selling 1 oz jars of glitter for $5.98 (regular price $7.32)! Get the deets HERE!;

Sunday, June 24, 2012

Connie Crystal Bookmark

For this Connie Crystal post, I have created a special bookmark.  This would make a great gift and was fairly easy to assemble.  Let me tell you how I did it.
First, I found a lovely embroidered trim and a coordinating grosgrain ribbon at Joann.  I purchased a quarter yard of each, but really only needed about 10" of the trim and about 11" of the red grosgrain.  Of course, the size you make depends on the length of bookmark that you want. 
I ran the red ribbon (because it was slightly narrower) through my Xyron 1.5" Create-A-Sticker with permanent adhesive in it.  I attached it to the green trim, leaving about 1/2" ribbon on the top and the bottom.  Then, I folded the extra up twice and attached it with a little Art Institute Fabric Dries Clear Glue to the bottom of the trim.  I carefully sewed the red down with Kreinik Metallics Balger Cable 002P Gold, trying to follow the zig zag type pattern that was on the sides of the trim.  When I say carefully, I mean that I did not go all the way through to the back of the bookmark with my stitching.  I came directly from the bottom of the bookmark (out of the folded area) and in right over the top of the red, just stitching through the green trim.
Next, it became time to attach the beautiful Connie Crystals.  I used the same Balger Cable and knotted it, hiding the knot inside the fold.  I then did the top row.  I strung the small green crystal from the green suncatcher, a long crystal, and another green crystal.  I ran a quick stitch through the folded red, and ran it through the opposite way, making a double thread through the beads.  I ran this through the red fold and began to make my spacers by using hemp macrame stitches.  They were all what I believe is called half hitches.  Basically, I ran a loop around the two threads and caught it with my needle before it closed, making a knot around the threads.  I ran three or four of these on each side of the green crystals to create the spacing.  The last rows were made the same way.  I added the red bead from the Connie Crystal red suncatcher and a small drop from the bottom of the Connie Crystal red suncatcher.  There were 8 stitches on either side of the red bead.  That was it.  It took very little time to create this lovely gift.  Keep in mind that you could create this bookmark in any length you like and not add any time.  While I used crystals on only one side, you could easily add them on both sides.  You could make a personalized bookmark to add to any very special book.  Give it a try.  I will warn you, it is addictve (and reasonably priced when you make it with Connie Crystals!).

Thursday, June 21, 2012

The Case For Transparent Glitter


 AND


ARE TEAMING UP THE ENTIRE MONTH OF JUNE TO BRING YOU AN AMAZING CREATIVE COLLABORATION MIXING DREAMWEAVER STENCILS AND ART GLITTER. COME ALONG FOR THE RIDE...WE PROMISE IT WILL BE A SPARKLING ONE!

Visit the Art Glitter blog and the; Dream It Up! blog for fabulous inspiration from both talented design teams. We are encouraging all of you to play along with the challenge of creating with Dreamweaver Stencils and Art Glitter*, preferably using the Double-Glitter Technique with a wedding theme. Just link your creation to the Mr. Linky on the Dream It Up! blog, or email pics to lynell@dreamweaverstencils.com, for an opportunity to win one of four fabulous glitter and stencil prize packages. One winner will be chosen each week. (US and Canada only, please).


For more inspiration from the Art Glitter design team, please visit their blog for a complete list of players throughout the month.

Now here is my post:  The Case for Transparent Glitter
With all the flashy glitter out there (scroll down and see my last post for something REALLY flashy), you might wonder, why would you use transparent glitter?  I have two reasons.  One is if you want some of the original colors or image to show through.  The other is shown here:

You can color on transparent glitter.  Yes, I said color.  You can use any pigment ink, a stencil brush, and the Picasso Stencil LL 332.  But, I get ahead of myself.  Let me start at the beginning. 
First, you soap up the back of a really fantastic stencil.  This one is the gorgeous LJ 888 Hydrangea Stencil.  You brush off all of the "hanging chads" of soap.  Then, you put it soap side down on the exposed adhesive side of Double Sided Adhesive Paper.  Then, you fill it with really great transparent glitter.  I used Art Glitter Ultrafine Transparent 284 French Lilac in the purple parts and Art Glitter Ultrafine Transparent 287 Arbor in the green sections.  Why did I bother with a color if I am going to paint it anyway?  Well, you want a nice base color and don't want to push the glitter too far.  You need a great color showing through.  After the glitter was on, I left the stencil attached and used the Picasso Stencil LL 332 to mask off the areas that I did not want to paint on.  When you move the stencil around, you can use the edges to block off just about any area.  I used a stencil brush and Tim Holtz Adirondack Pigment Inks in Bottle, Stream, Purple Twilight and Eggplant.  After I got it to look the way I wanted it, I patted it with paper towel and carefully removed the paper from the stencil.  I placed the stencil face down on the table for this and lifted the paper off while I "walked" my fingers along the stencil.  I let it dry just a little (you know pigment inks.....) and covered it in Art Glitter Ultrafine Transparent 85 Crystal.  Then, I was done.  It was as simple as that.  I am hoping that you are inspired to enter a project yourself this week. 

For more inspiration from the Dream Team, here's the blog list for this week:


*For the month of June Art Glitter is selling 1 oz jars of glitter for $5.98 (regular price $7.32)! Get the deets HERE!;

Tuesday, June 19, 2012

Double, um, Triple, um Quadruple Glitter

Welcome to the Art Glitter/Dreamweaver Stencil Cross promotion month. We have paired up with this wonderful company to show you how our glitter can be used with these beautiful and detailed stencils. All of our designers will be using the Double Glitter Technique! Make sure and check out Dreamweaver Designers (including me) every Thursday! You can find all their designers at http://dreamweaverstencils.blogspot.com/
Make sure and play along all month with this fun challenge. Make sure and LINK to the Dreamweaver site to be eligible for 1 of 4 prize packages featuring stencils and glitter! You may even get your creation featured on Art Glitters' Blog!
I hope everyone will play along with this fun challenge. If you don't know how to do the Double Glitter Technique please head over to http://www.youtube.com/watch?v=Foyo09lKpw4 to see Lynell Harlow demonstrate.


Here is my post for Art Glitter.  I am so excited by it, because through trial and error (mostly on the Dragonfly, which is on the Art Glitter blog), I developed a twist on the featured technique of the month--Double Glitter.  You can find the basic technique HERE. I used glitter that I would have never Double Glittered with before--Dazzlers.  I layered it with other glitters to create a bright and flashy result.  Here is another picture of the card, with different lighting, so you can hopefully see how it shimmers in the sun.


I first soaped up the back. Then, I placed the soaped side down on the Double Sided Adhesive Paper.  For the background, I used LJ 838 Waves Stencil.  I filled it with D38 Blue Eyes Dazzlers, concentrating on the wide open areas, and pushed it down very well.  Then, I brushed it hard with my large stencil brush.  This broke off some of the excess from those big flakes.  These flakes leave lots of untouched adhesive.  I covered the whole thing with Art Institute Ultrafine Transparent 85 Crystal and filled in many of the gaps.  After removing the stencil, I covered the now exposed adhesive with Ultrafine Opaque 24 Royal Wink and then a little Microfine Opaque 504 Blue Diadem
For the fish, I used stencil LG 613 Koi.  The fish were created using D54 Roman Coin Dazzlers and D51 October Dazzlers. I tried to keep the individual colors in their own wells and away from the tips of the fins to the best of my ability, but some crossover was fine. Both colors are Hexi Dazzlers, which means a lot of bare space around them.  It looked like dots at this stage.  I needed to fill in the blank spaces, so I used a color that appears in both of the multicolored Dazzlers.  I used one of my absolute favorites--Ultrafine Opaque 62 Copper Canyon (itself a blended color).  Then, I placed Microfine Opaque 501 Monarch on top of the stencil and pushed it into the wells.  This created a sharper edge than I would normally have had with the Ultrafine, and added a little extra depth of color to the fish.  You can see the look most distinctly in the tail of this fish.  Finally, I used Ultrafine Transparent 85 Crystal on the exposed areas.  The eyes are sequins from Dazzlers D15 Sea Nymph and were glued on with Art Glitter Designer Dries Clear.
This twist on the technique was so much fun!  I would love you to give it a try.  The great news?  For the month of June Art Glitter is selling all 1 oz jars of glitter for $5.98 regular price $7.32! This INCLUDES Dazzlers!  The 1 oz size includes a lot of glitter.  Hope even if you don't play along with the challenge you will take advantage of the great price of glitter in June! http://artglitter.com/

Thursday, June 14, 2012

Dreamweaver and Art Glitter Month!


AND


ARE TEAMING UP THE ENTIRE MONTH OF JUNE TO BRING YOU AN AMAZING CREATIVE COLLABORATION MIXING DREAMWEAVER STENCILS AND ART GLITTER. COME ALONG FOR THE RIDE...WE PROMISE IT WILL BE A SPARKLING ONE!

Visit the Art Glitter blog and the Dream It Up! blog for fabulous inspiration from both talented design teams. We are encouraging all of you to play along with the challenge of creating with Dreamweaver Stencils and Art Glitter*, preferably using the Double-Glitter Technique with a wedding theme. Just link your creation to the Mr. Linky on the Dream It Up! blog, or email pics to lynell@dreamweaverstencils.com, for an opportunity to win one of four fabulous glitter and stencil prize packages. One winner will be chosen each week. (US and Canada only, please).

For more inspiration from the Art Glitter design team, please visit their blog for a complete list of players throughout the month.
Here is my project for the week.
I imagined this to be more of a Silver Anniversary card than a wedding card.  I created it with the Double Glitter Technique and stencil LG 745 Tree Line.  I really love this new stencil and have seen it used so many ways already that I know it is extremely versatile.  This time, I used it with Transparent Glitters 145 Blue Boy, 270 Chesapeake, and 172 Calypso in the background.  I put a little of each color directly on the adhesive paper and spread it around with my finger, blending the colors.  I used the lightest color near the top and the darkest near the bottom.  After I brushed the excess off and removed the paper from the stencil, I did the same thing with three Opaque Glitters:  84 Shiney Silver, 354 Hematite and 77 Pewter.  This time, I used the lightest color at the bottom of the leaves.  I took many pictures of this one.  This picture is fairly true to the colors, but just as an interesting side note, I have included the outdoor picture as well.  It shows how blue the colors appear when glitter reflects outdoor light.  I found it pretty, too, just not at all true to the color.
I hope you have been inspired this week with my very quick and easy card.

For more inspiration from the Dream Team, here's the blog list for this week:


Laura Drahozal--This is me!


*For the month of June, Art Glitter is selling 1 oz jars of glitter for $5.98 (regular price $7.32)! Get the deets HERE!

Sunday, June 10, 2012

A Steampunk Artifact with Crystals


This week's Connie Crystal post is a little different for me in two ways.  First off, it is a jewelry project, and secondly, it is vintage.  After all, every once in a while, a girl has to try something (or a couple of somethings) unexpected.  So, I used two gorgeous Connie Crystals.  One is a round crystal and the other is the bottom drop of a suncatcher
The chain was purchased from the local big box.  The gear pieces are all Piccolo pieces from Globecraft Memories.  The large copper piece in the center was modified to create a hole for the crystal.  I layed the crystal on it and traced around it. Then, I used my craft knife to cut out the space. As I did this, I imagined the staff piece that Marion wears around her neck in Indiana Jones and the Lost Ark.  At that moment, it became for me a secret Steampunk artifact. I felt the desire to make it an imperfect conglomeration of gears. I created extra holes with my Big Bite.
I decided to make it a variety of colors.  I used Globecraft Memories embossing fluid and Piccolo embossing enamels in Victorian Bronze, Vintage Copper, Vintage Gold and Vintage Silver.  I embossed two coats on each side of the smaller pieces and three coats on each side of the larger ones.  When embossing these pieces, it is EXTREMELY helpful to have one of those pairs of tweezers with the long, pointy tips to hold it as you heat it.  Otherwise, the embossing powder on the back tends to smear.
When it became assembly time, I used various colors of jump rings to attach the gears.  The large drop was hung from a gear that was attached to a large jump ring surrounding the chain.  The round crystal fit snugly into the cut circle, but I still added a small bead of Art Institute Glitter Designer Dries Clear, just to keep it secure.  I also used some oval jump rings in the two holes to not only keep it in place, but also to add to the overall industrial look.
I hope you enjoyed this project as much as I enjoyed creating it.  Thank you so much for looking.

Thursday, June 7, 2012

Dreamweaver and Art Glitter Month!


AND

ARE TEAMING UP THE ENTIRE MONTH OF JUNE TO BRING YOU AN AMAZING CREATIVE COLLABORATION MIXING DREAMWEAVER STENCILS AND ART GLITTER. COME ALONG FOR THE RIDE...WE PROMISE IT WILL BE A SPARKLING ONE!
So, here is my creation for the week.  As you can see, I have created a double glitter wedding card, but it could also be congratulations card for some other event.  I used the beautiful LG 644 Cherry Blossom Stencil and LS 22 Congratulations Stencil.  Obviously, I used the featured Double Glitter Technique.  The white glitter on both parts (the flowers and the Congratulations background) is Art Glitter Ultrafine #85 Crystal.  The blue on the background of the flowers is Ultrafine Opaque #32 True Blue.  I used almost the same color on the Congratulations word, but wanted it to be very clear.  Therefore, I used the Microfine Opaque #512 Bahaman Blue on the word.  For more information on how Microfine Glitter is different than the Ultrafine, check out my Art Glitter Blog post Here.


Visit the Art Glitter blog and the Dream It Up! blog for fabulous inspiration from both talented design teams. We are encouraging all of you to play along with the challenge of creating with Dreamweaver Stencils and Art Glitter*, preferably using the Double-Glitter Technique with a wedding theme. Just link your creation to the Mr. Linky on the Dream It Up! blog, or email pics to lynell@dreamweaverstencils.com, for an opportunity to win one of four fabulous glitter and stencil prize packages. One winner will be chosen each week. (US and Canada only, please).


For more inspiration from the Art Glitter design team, please visit their blog for a complete list of players throughout the month.

For more inspiration from the Dream Team, here's the blog list for this week:


Laura Drahozal--This is me!


*For the month of June Art Glitter is selling 1 oz jars of glitter for $5.98 (regular price $7.32)! Get the deets HERE!

Tuesday, June 5, 2012

Art Glitter and Dreamweaver Wedding Month

Welcome to the Art Glitter/Dreamweaver Stencil Cross promotion month. We have paired up with this wonderful company to show you how our glitter can be used with their beautiful and detailed stencils. All of our designers will be using the Double Glitter Technique! Check out the Dreamweaver Designers every Thursday! (Including me!)
You can find all their designers at http://www.dreamweaverstencils.blogspot.com/

Make sure and play along all month with this fun challenge. Remember to LINK to the Dreamweaver site to be eligible for 1 of 4 prize packages featuring stencils and glitter! You may even get your creation featured on Art Glitter's Blog!

I hope everyone will play along with this fun challenge. If you don't know how to do the Double Glitter Technique please head over to http://www.youtube.com/watch?v=Foyo09lKpw4 to see Lynell Harlow demonstrate.
Also for the month of June Art Glitter is selling all 1 oz jars of ultrafine glitter for $5.98 regular price $7.32! Even if you don't play along with the challenge, you should take advantage of the great price of glitter in June! http://artglitter.com/

Here is my creation for today.  It follows both the Double Glitter Technique theme AND the Dreamweaver Wedding Theme for the month. 
I know that I love the look of a variety of glitter colors.  I think many people are intimidated by the idea because they are nervous about which colors to put together or maybe they don't want to purchase large containers of each color.  If that is your case, I have the solution in three simple words:  PEE WEE KITS!  Yep, an Art Glitter Pee Wee Kit consists of several small containers of coordinating colors.  No decisions necessary and no storage of big glitter containers.  It is what I used here.  All of the glitter is from the Elements Pee Wee Kit
Let's begin at the beginning.  First, I soaped up the back of stencil LJ 899 Petals Background.  I brushed off the "crumblies" of soap.  Then, I placed the stencil soaped side down on Dreamweaver Double Sided Adhesive Paper.  Then, I opened my Elements Pee Wee Kit.  I used the darkest colors first. Dark here is sort of a relative term, since all of these colors are transparent. I just sprinkled a very little of each color EXCEPT the clear white in various places over the open stencil.  Just a little, mind you.  Then, I pushed the glitter down on the background paper, starting on each clump of color and pushing out towards the other colors.  When I was done, I brushed off the excess.  See the mottling of color, particularly on the background?  That is because of the variety of colors I used.  It looks sort of vinatgey because the colors seem to fade in and out of the background.  I made sure there was glitter over all of it.  Then, I placed it stencil side down on a flat surface and carefully peeled the paper off of the stencil.  I poured the clear white glitter over the now exposed adhesive surfaces. 
I did the heart (stencil LL 318 Leaf Heart) the same way, but only used the four darkest colors.  I wanted the heart to appear a little more prominent, which I think you can see it is. 
After that, I attached the heart to plain white cardstock and cut around it.  I mounted both pieces on brown and cut around them.  A little brown ribbon went around the background and the ends through two holes on the heart that I punched with my Big Bite.  Then, the heart was popped up with 3D Dots, the ribbons tied and the card was complete!
Check out the other double glitter wedding card that I did with stencils.  It is completely different than this one, even though it was done with the same technique.  It is on the Art Glitter Blog today.
Then, come back and check out this site and all the Dreamweaver Designers on Thursday for more double glitter fun!  Play along and see what you can win!