Showing posts with label double sided adhesive paper. Show all posts

Thursday, January 17, 2013

A Truly Fresh Start

You don't normally find me making baby cards, but these two stencils were perfect for each other, and pink seemed like the right color scheme--so a baby card it is!  Although, I would be comfortable using this combination (perhaps in different colors) to congratulate someone on their very first musical or drama performance as well.

MATERIALS:
Dreamweaver Stencil LX 7017 Stars
Dreamweaver Stencil LS 1012 A Star is Born
Double Sided Mounting Paper
Dreamweaver Handmade Hawaiian Coconut Soap
Large Stencil Brush
Embossing Tool
Stampee Foil in Pink
Art Glitter Mircofine Opaque 508 Silver Moon
Art Glitter Ultrafine Transparent 85 Crystal
Pink Cardstock
White Cardstock (use behind the words)
3D Dots

DIRECTIONS:
1)  Soap the back of the star stencil until it appears to have a cloudy film over it.
2)  Use stencil brush to brush off the soap crumblies that have attached themselves to the stencil.
3)  Remove one side of the mounting paper and attach to the soaped side of the stencil.
4)  Press the foil over the star sections of the stencil.  Rub a little with your fingers.
5)  Use the embossing tool to go around the edges of the stars as well as possible.
6)  Repeat the first five steps with the word stencil.  Leave a little extra mounting paper around the outside of the stencil.  Put the foil in the words and around the edges of the stencil.
7)  Cover both stencils with the silver glitter.  Press in a little with your finger.
8)  Brush off the excess silver glitter.
9)  Place stencils face down on a flat surface and carefully remove the mounting paper, leaving the stencils flat.
10)  Cover with crystal glitter.
11)  Brush off excess glitter and assemble card.

This card is a "fresh start" because it is for a baby, but it also uses one of the brand new stencils!  If you have a "fresh start" card, enter our challenge.  You only have to photograph it, and send it to Lynell@dreamweaverstencils.com. You could win $25 worth of Dreamweaver stencils!  Check out the other blogs for more inspiration, and give it a try!

Tuesday, January 15, 2013

Coloring on Art Glitter

People often want the look of many glittering colors, but don't want to purchase or store various colors of glitter.  (Personally, I don't have that problem, preferring to indulge in a huge selection of gorgeous Art Glitter colors!)  Did you know that you can color Art Glitter?  Well, you can.  The secret is the use of transparent colors.  I only used two glitter colors here.  REALLY!
Drop on by the Art Glitter Blog and see how I did it!

Thursday, November 22, 2012

More CAS Dreamweaver Christmas

Clean and simple?  Absolutely!  This is one of my absolute favorite Christmas stencils, second only perhaps to the single holly sprig.  Here is how it was done:
MATERIALS:
Dreamweaver Poinsettia Stencil LG700
Dreamweaver Double Sided Mounting Paper
Handmade Hawaiian Soap
Large Stencil Brush
Small clear gemstones
Art Glitter Ultrafine Opaque 356 Grape Nector
Art Glitter Microfine Opaque 527 New Wine
Art Glitter Ultrafine Transparent 85 Crystal
White Cardstock
Magenta Patterned Paper
Ribbon
Adhesive

DIRECTIONS:
1)  Cut a piece of Double Sided Mounting Paper to the size of the stencil
2)  Rub soap on the back of the stencil to create a film over it.  This will act as a resist so the stencil can come off later.
3)  Brush off the extra bits of soap that cling to the stencil.
4)  Remove one side of the covering from the adhesive paper and place stencil soap side down on top.
5)  Place gems into the holes for "seeds".
6)  Cover with Grape Nector glitter.  Brush off excess.
7)  Cover with New Wine Microfine glitter.  This glitter is extremely fine, almost like a dust.  Rub in with your fingers to fill in all the spaces and create crisp edges.  Brush off excess.
8)  Put project face down on a flat surface and carefully pry up edge with finger.
9)  Remove adhesive paper by pulling it off of the stencil while leaving the stencil on a flat surface and walking your fingers along it.
10)  Pour Crystal glitter over the whole project.
11)  Assemble card.

Simple, right?  Check out the rest of the blogs (listed on the left side) for more inspiration.  Now create a CAS card yourself, take a picture and send it to Lynell@dreamweaverstencils.com.  You could win this month's prize!

Thursday, November 8, 2012

A Holly Jolly Ranger Christmas!


We've now had four weeks of festively distressed fun playing with the Ranger/Tim Holtz Distress Powders along with our wonderful line of Dreamweaver Stencils and products. Huge thanks to Tim Holtz and the fab people at Ranger for sharing these four collaborative weeks with us, and providing the yummy shades of Distress Powders for us to create with. We've been inspired by the process, and we hope you have, too!

If you haven't won one of the prize packages yet, you still have one more opportunity this week as the set below is up for grabs to a random commenter on one of the Dream Team blogs.


If you've been following along each week, you've seen some gorgeous creations with these stencils and powders, so you should be all fired up to get distressed! If you've missed the first three weeks, check them out once you've made the rounds today:


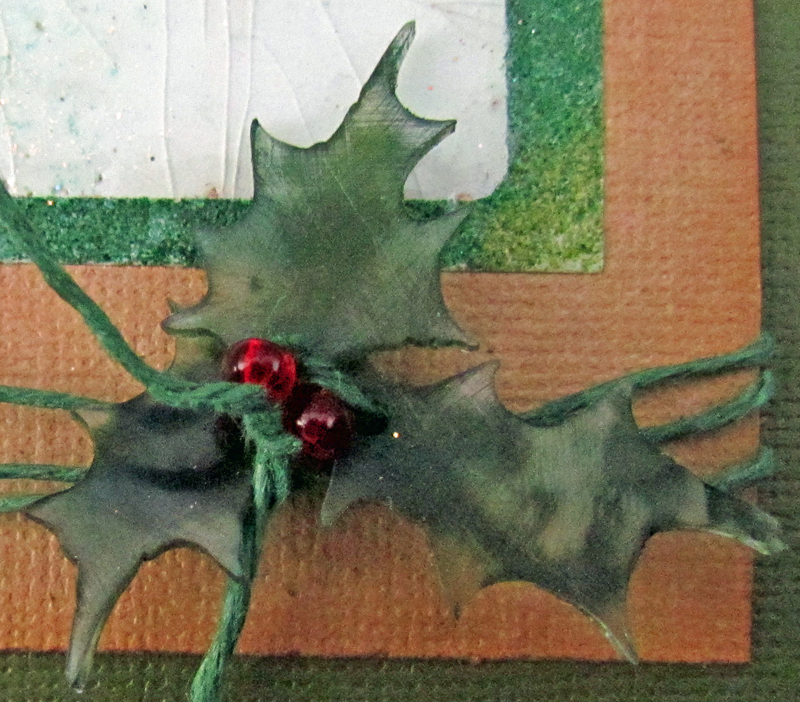
My festively distressed project for this week is this:

MATERIALS
Dreamweaver LL 3005 Holly & Berries Stencil
Dreamweaver Double Sided Mounting Paper
Dreamweaver Large Stencil Brush
Handmade Coconut Soap
Ranger Distress Powders in Pine Needles and Peeled Paint
Distress Embossing Ink (optional)
Ultra Thick Embossing Enamel
Dry Stickles in Eucalyptus
Vintage Photo Distress Ink
Ink Blending Tool
Tim Holtz Alterations Holly Die Cut
Inkssentials Shrink Plastic
Manual Die Cut Machine, such as the Vagabond
Heat It Craft Tool
Stickles in Christmas Red
Archival Ink in Olive and Library Green
Big Bite
Sandpaper
Cardstock in Kraft and green
Green Scrappers' Floss
Two Red Beads
Adhesive
Paper Towel

DIRECTIONS:
1) Soap the back of the stencil.
2)  You will find that the soaping leaves little fragments clinging to the stencil.  Brush those off.
3)  Remove one side of the mounting paper.  Attach stencil soap side down onto mounting paper.
4)  Pour some of the Pine Needles Distress Embossing Powder onto the stencil.  Use your finger to push it into the wells around the edges.
5)  Pour some Peeled Paint Distress Embossing Powder onto the stencil and push into the wells.  Run it right over the top of the Pine Needles, because that helps it blend in those areas.  Be sure to rub it in well.  Don't forget the edges.
6)  Brush off the excess powder.
7)  Place stencil side down on a hard surface and carefully peel mounting paper off of stencil.
8)  Heat the embossing powder until it melts.  Don't overheat.
 

9)  Cover newly exposed adhesive paper with Ultra Thick Embossing Powder.  Rub in a little.

10)  Heat UTEE (Ultra Thick).  While still warm, sprinkle with a little Dry Stickles.
11)  Either reheat the UTEE portion and pour more Ultra Thick on, or touch area with Embossing ink and cover with Ultra Thick.  Brush off of green areas.
12)  Heat again.  Place in freezer a few moments.
13)  Remove from freezer and "crack"
14)  Use blending tool to rub on Vintage Photo Ink.
 
15)  Wipe with damp towel.
16)  Add Stickles to berries.  Let dry.
17)  Use die cut machine and Tim Holtz die to cut out holly leaves from shrink plastic.
18)  Use Big Bite to punch holes in leaves.
19)  Sand one side of leaves.
20)  Rub sanded side on Olive Archival Ink Pad.  Rub tips of leaves on Library Green pad.
21)  Heat and shrink.
22)  Assemble card.
Okay, so maybe it isn't exactly CAS, but it was really fun!  And I loved the results.


Don't forget to leave me some love before hopping to the rest of the Dream Team blogs:


Please remember to continue to follow the team through the Dream It Up! blog as we bravely go where no stenciler has gone before, to like us on our Facebook page, and to learn from our fabulous weekly Thursday Tutorials on Paper Craft Planet as well.

Thursday, August 23, 2012

Christmas Hearts in August--Woodware Blog Hop Day Four


All of this week, the Dream Team and the Woodware UK teams are celebrating the release of the new holiday designs from Dreamweaver Stencils. Of course, no celebration is complete without prizes...and there are some fabulous ones for those commenting on both sides of the "pond".

Each team will be providing the opportunity to win four prize packages of stencil designs, perfect for the holidays. Just leave your comments each day on each players' post as well as the Dream It Up! and Woodware UK blogs, and the Dreamweaver and Woodware Facebook pages. Two random commentors will be chosen from the batch of weekday posts, one each from the DW and WW Facebook pages, and from the big hop on Saturday...from each side of the pond!* That's a total of eight prize packages up for grabs! Here's what you could win:


My post today is very easy.  The Stencil does most of the work.  Here are the materials and directions:
MATERIALS
Cardstock in brown and red
Ribbon
 
DIRECTIONS
1)  Soap the back of the stencil
2)  Brush off the excess soap fragments that are stuck to the insides of the stencil
3)  Remove the paper from one side of the Double Sided Mounting Paper and place stencil on it, soap side down on the adhesive.
4)  Start with the Hot Pink Stampee Foil.  Place dull side down on top of the hearts. 
5)  Rub gently with fingers in the center of the heart. 
6)  Remove foil and replace with the red foil, also dull side down.
7)  Rub around the edge of hearts with the embossing tool.
8)  Apply colored glitter as follows:  Place a little glitter on the stencil near the area that you want the color.  Gently shove into the holes with finger and rub down a little.  I used Microfine Glitter to get into all of the tiny areas.
9)  Brush off the excess glitter. 
10)  Place a little gold glitter over the stencil and rub into ALL the holes--including the heart area.
11) Brush off excess glitter.  Be thorough.
12)  Carefully remove the paper from the stencil by placing the stencil face down on a flat surface and pulling the paper off while "walking" your fingers across the stencil to keep it flat.
13)  Cover the entire paper with the Ultrafine Crystal and brush off excess.
14)  Remove the paper from the other side of the Double Sided Mounting Paper to adhere to cardstock mat.
15)  Assemble card.
 
It was simple, really.  This card took very little time and made a complete picture with only one stencil.  Give it a try yourself!
 
Don't forget to leave me some holiday cheer as you move on to the other players for today:

Remember to follow along with the challenges on the Dream It Up! and Woodware UK blogs for more prize opportunities, and more crafty inspiration, as well as "liking" DW and WW on Facebook.
*Winners selected must be from USA/Canada/UK only.


Thursday, August 2, 2012

Christmas in August!

Welcome to Christmas in August!  For this new challenge, I am using a brand new stencil.  First released at this Summer CHA, this stencil is bound to become a hit.  Here, I used it with a modified Double Glitter Technique, which I call "Triple Glitter" because it uses different kinds of glitter in the same stencil wells.  Here is a video on the basics of double glitter, by our stencil queen, Lynell.  I soaped up the back of Stencil LJ 921 and Stencil LS 92 Merry Christmas.  I brushed off all the excess soap crumbles.  Then, I placed them soap side down on the Double Sided Adhesive Paper.  For the hearts, I used an Art Glitter Dazzler called D4 Jackpot Funky.  It has a combination of very chunky pieces and ultrafine pieces.  If I had only used this, I would not have super sharp and crispy edges that I wanted. I can get that crispness with Microfine Glitters, so I added #516 Gold Tone Microfine Opaque to the hearts.  I put it on the stencil and pushed it into the wells all around the sides. Since the other openings are so small, I used Microfine on most of the card.  The ornament hangers are #508 Silver Moon Microfine Opaque.  The needles are a combination of #519 Reed Microfine Opaque and #514 Bavarian Forest.  The Bavarian Forest is also used in the words.  I didn't need the branches to be sharp and crispy, so I used Ultrafine Opaque #58 Brown.  Now here is the best tip in this post:  to get the colors of glitter where you want them, put a pinch of glitter on the metal stencil next to the area where you want the color.  Then, gently shove it into place with your finger.  This works especially well with the Microfine glitters, as they need to be "burnished" (rubbed in) anyway.  When the colors are in place, brush the excess off and remove the adhesive paper from the stencil.  The stencil needs to remain flat on a hard surface as you peel the paper off of the it.  After the paper is off, the background adhesive is exposed.  Cover that with a layer of glitter.  I used Ultrafine Transparent Crystal #85.  Then, I just assembled the card.
So, now it is your turn!  Our challenge is Christmas in August, so get a head start on some special cards.  Put them online and link them to the Dreamweaver Blog or just email a picture to Lynell with some brief directions.  Find her email address on the blog.  You could be featured and even win a prize!  Give it a shot.  In the meantime, check out all the blogs (linked on the left) and get inspired with Dreamweaver Stencils.  Merry Christmas in August--see you next week!

Thursday, July 12, 2012

Alice's Mushrooms and a Summer Fun Challenge

Okay, I confess.  I started this project months ago at the Winter CHA.  I was playing around with some of the Stampee Foils and wasn't paying any attention to the placement and colors that I used.  When I was finished, I declared them to be "Alice in Wonderland mushrooms", and I really liked them.  So I took them home.  When this "Summer Fun" challenge came up, it seemed like a perfect fit.  Here is the card I made.
The process is very simple.  First, I soaped up the back of the Dreamweaver Stencil LL 3025 Mushrooms.  I used the Handmade Hawaiian Soap because it was easy to cover the stencil with it.  I brushed off any soap "chads" that were hanging from the stencil.  Then, I placed the stencil soap side down onto a piece of Double Sided Mounting Paper that was about an inch larger than my stencil in each direction.  Then, the color fun started.  I used various colors of Stampee Foils on the project.  I placed them dull side down onto the adhesive.  Then, I rubbed them with my finger.  I ran the small side of a Double Ended Embossing Tool around all the edges.  The variance in color is created by layering the foils.  You only use one at a time, but you can place another over the same area after you remove the first one.  Everywhere that the foil did not stick to the adhesive, the new color will.  You can use the foil until all of the color is gone and only the clear backing remains.  In fact, you can create gorgeous blended colors by using the small remnants of color off of used foil.  You can create this look with new foil by crinkling it up before you use it.  Usually after I get the foil on, I coat everything with colored glitter or flock to get into all the grooves that the foil misses.  This time, I didn't have any handy, so I just peeled the backing off of the stencil and hoped for the best.  Then, I covered the whole thing with transparent glitter. 
After several months at the bottom of my "remnants" bin, I discovered the mushrooms a little scratched up.  I thought I couldn't use it until I came up with a new idea.  I used a little Art Institute Designer Dries Clear to create spots all over the mushrooms.  I let the glue dry until it was just clear and tacky.  Then, I covered it with Gold Stampee Foil and rubbed down.  It covered the scrapes and created a whimsical pattern. 
So, as I mentioned, it is Summer Fun month at Dreamweaver Stencils.  You could win a brand new (not yet released) stencil if you play along.  It is so new, in fact, that I can only show you a portion.
Trust me, it is gorgeous and you want to win it!  All you have to do is create a Summer Fun project (preferrably with Dreamweaver Stencils) and photograph it.  Then, either email it to Lynell at Dreamweaver Stencils or put it online and link it to the Dreamweaver Stencils Blog.  It is as simple as that.  Looking for more inspiration?  Check out the links on the left of this page.  Get inspired!  I will see you next week. 

Thursday, June 28, 2012

The Last Week of a Wonderful Collaboration


 AND


ARE TEAMING UP THE ENTIRE MONTH OF JUNE TO BRING YOU AN AMAZING CREATIVE COLLABORATION MIXING DREAMWEAVER STENCILS AND ART GLITTER. COME ALONG FOR THE RIDE...WE PROMISE IT WILL BE A SPARKLING ONE!
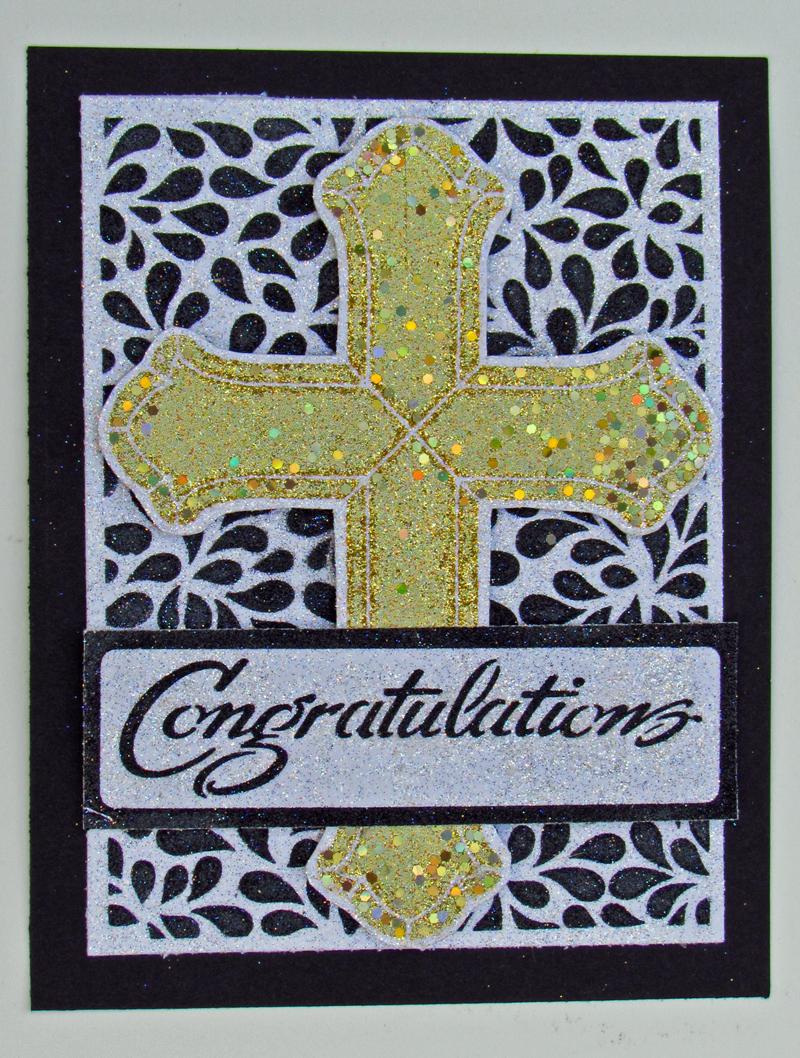
This is my creation for the week.  It could be considered a wedding card (the theme for the month) and is definitely a double glitter card.  Check out the technique with the link below.  I used Art Glitter Microfine Opaque 507 Black Wing on both the background and the words to give them nice, crisp edges. The gorgeous background stencil is LJ 899 Petals Background. The word is stencil  is LS 22 Congratulations.  I used LJ 918 Open Cross with my new "Triple Glitter" technique.  The open areas on this are just perfect for the technique.  It is started the exact same way as the Double Glitter Technique, but I call it Triple Glitter because I included one extra layer of glitter.  First, I laid down the Art Glitter Dazzlers D4 Jackpot Funky on the adhesive paper.  This is a little different than the last time, because this particular Dazzler has many different sized pieces already.  I still wanted to add some sharpness to the edges.  Therefore, I put a little Art Glitter Microfine 516 Gold Tone right on the stencil and pushed it into the openings with my finger.  I brushed the excess off completely before removing the stencil and adding Ultrafine Transparent 85 Crystal to the background.  I used this beautiful clear glitter behind all of the stencils.  Because the Dazzler has some much larger glitter pieces on it, it is extremely flashy.  The best way for me to illustrate this is to show you a second picture where it appears that the gold glitter is a completely different color.  Take a look.


I hope you become inspired to try this great technique for yourself.  It is really easy and addictive.  The best part about it?  The sale listed below includes most of the Dazzlers, too!  But act quickly, because the sale ends Saturday.

Visit the Art Glitter blog and the; Dream It Up! blog for fabulous inspiration from both talented design teams. We are encouraging all of you to play along with the challenge of creating with Dreamweaver Stencils and Art Glitter*, preferably using the Double-Glitter Technique with a wedding theme. Just link your creation to the Mr. Linky on the Dream It Up! blog, or email pics to lynell@dreamweaverstencils.com, for an opportunity to win one of four fabulous glitter and stencil prize packages. One winner will be chosen each week. (US and Canada only, please).


For more inspiration from the Art Glitter design team, please visit their blog for a complete list of players throughout the month.

For more inspiration from the Dream Team, here's the blog list for this week:


*For the month of June Art Glitter is selling 1 oz jars of glitter for $5.98 (regular price $7.32)! Get the deets HERE!;

Thursday, June 21, 2012

The Case For Transparent Glitter


 AND


ARE TEAMING UP THE ENTIRE MONTH OF JUNE TO BRING YOU AN AMAZING CREATIVE COLLABORATION MIXING DREAMWEAVER STENCILS AND ART GLITTER. COME ALONG FOR THE RIDE...WE PROMISE IT WILL BE A SPARKLING ONE!

Visit the Art Glitter blog and the; Dream It Up! blog for fabulous inspiration from both talented design teams. We are encouraging all of you to play along with the challenge of creating with Dreamweaver Stencils and Art Glitter*, preferably using the Double-Glitter Technique with a wedding theme. Just link your creation to the Mr. Linky on the Dream It Up! blog, or email pics to lynell@dreamweaverstencils.com, for an opportunity to win one of four fabulous glitter and stencil prize packages. One winner will be chosen each week. (US and Canada only, please).


For more inspiration from the Art Glitter design team, please visit their blog for a complete list of players throughout the month.

Now here is my post:  The Case for Transparent Glitter
With all the flashy glitter out there (scroll down and see my last post for something REALLY flashy), you might wonder, why would you use transparent glitter?  I have two reasons.  One is if you want some of the original colors or image to show through.  The other is shown here:

You can color on transparent glitter.  Yes, I said color.  You can use any pigment ink, a stencil brush, and the Picasso Stencil LL 332.  But, I get ahead of myself.  Let me start at the beginning. 
First, you soap up the back of a really fantastic stencil.  This one is the gorgeous LJ 888 Hydrangea Stencil.  You brush off all of the "hanging chads" of soap.  Then, you put it soap side down on the exposed adhesive side of Double Sided Adhesive Paper.  Then, you fill it with really great transparent glitter.  I used Art Glitter Ultrafine Transparent 284 French Lilac in the purple parts and Art Glitter Ultrafine Transparent 287 Arbor in the green sections.  Why did I bother with a color if I am going to paint it anyway?  Well, you want a nice base color and don't want to push the glitter too far.  You need a great color showing through.  After the glitter was on, I left the stencil attached and used the Picasso Stencil LL 332 to mask off the areas that I did not want to paint on.  When you move the stencil around, you can use the edges to block off just about any area.  I used a stencil brush and Tim Holtz Adirondack Pigment Inks in Bottle, Stream, Purple Twilight and Eggplant.  After I got it to look the way I wanted it, I patted it with paper towel and carefully removed the paper from the stencil.  I placed the stencil face down on the table for this and lifted the paper off while I "walked" my fingers along the stencil.  I let it dry just a little (you know pigment inks.....) and covered it in Art Glitter Ultrafine Transparent 85 Crystal.  Then, I was done.  It was as simple as that.  I am hoping that you are inspired to enter a project yourself this week. 

For more inspiration from the Dream Team, here's the blog list for this week:


*For the month of June Art Glitter is selling 1 oz jars of glitter for $5.98 (regular price $7.32)! Get the deets HERE!;

Tuesday, June 19, 2012

Double, um, Triple, um Quadruple Glitter

Welcome to the Art Glitter/Dreamweaver Stencil Cross promotion month. We have paired up with this wonderful company to show you how our glitter can be used with these beautiful and detailed stencils. All of our designers will be using the Double Glitter Technique! Make sure and check out Dreamweaver Designers (including me) every Thursday! You can find all their designers at http://dreamweaverstencils.blogspot.com/
Make sure and play along all month with this fun challenge. Make sure and LINK to the Dreamweaver site to be eligible for 1 of 4 prize packages featuring stencils and glitter! You may even get your creation featured on Art Glitters' Blog!
I hope everyone will play along with this fun challenge. If you don't know how to do the Double Glitter Technique please head over to http://www.youtube.com/watch?v=Foyo09lKpw4 to see Lynell Harlow demonstrate.


Here is my post for Art Glitter.  I am so excited by it, because through trial and error (mostly on the Dragonfly, which is on the Art Glitter blog), I developed a twist on the featured technique of the month--Double Glitter.  You can find the basic technique HERE. I used glitter that I would have never Double Glittered with before--Dazzlers.  I layered it with other glitters to create a bright and flashy result.  Here is another picture of the card, with different lighting, so you can hopefully see how it shimmers in the sun.


I first soaped up the back. Then, I placed the soaped side down on the Double Sided Adhesive Paper.  For the background, I used LJ 838 Waves Stencil.  I filled it with D38 Blue Eyes Dazzlers, concentrating on the wide open areas, and pushed it down very well.  Then, I brushed it hard with my large stencil brush.  This broke off some of the excess from those big flakes.  These flakes leave lots of untouched adhesive.  I covered the whole thing with Art Institute Ultrafine Transparent 85 Crystal and filled in many of the gaps.  After removing the stencil, I covered the now exposed adhesive with Ultrafine Opaque 24 Royal Wink and then a little Microfine Opaque 504 Blue Diadem. 
For the fish, I used stencil LG 613 Koi.  The fish were created using D54 Roman Coin Dazzlers and D51 October Dazzlers. I tried to keep the individual colors in their own wells and away from the tips of the fins to the best of my ability, but some crossover was fine. Both colors are Hexi Dazzlers, which means a lot of bare space around them.  It looked like dots at this stage.  I needed to fill in the blank spaces, so I used a color that appears in both of the multicolored Dazzlers.  I used one of my absolute favorites--Ultrafine Opaque 62 Copper Canyon (itself a blended color).  Then, I placed Microfine Opaque 501 Monarch on top of the stencil and pushed it into the wells.  This created a sharper edge than I would normally have had with the Ultrafine, and added a little extra depth of color to the fish.  You can see the look most distinctly in the tail of this fish.  Finally, I used Ultrafine Transparent 85 Crystal on the exposed areas.  The eyes are sequins from Dazzlers D15 Sea Nymph and were glued on with Art Glitter Designer Dries Clear.
This twist on the technique was so much fun!  I would love you to give it a try.  The great news?  For the month of June Art Glitter is selling all 1 oz jars of glitter for $5.98 regular price $7.32! This INCLUDES Dazzlers!  The 1 oz size includes a lot of glitter.  Hope even if you don't play along with the challenge you will take advantage of the great price of glitter in June! http://artglitter.com/

Thursday, June 14, 2012

Dreamweaver and Art Glitter Month!


AND


ARE TEAMING UP THE ENTIRE MONTH OF JUNE TO BRING YOU AN AMAZING CREATIVE COLLABORATION MIXING DREAMWEAVER STENCILS AND ART GLITTER. COME ALONG FOR THE RIDE...WE PROMISE IT WILL BE A SPARKLING ONE!

Visit the Art Glitter blog and the Dream It Up! blog for fabulous inspiration from both talented design teams. We are encouraging all of you to play along with the challenge of creating with Dreamweaver Stencils and Art Glitter*, preferably using the Double-Glitter Technique with a wedding theme. Just link your creation to the Mr. Linky on the Dream It Up! blog, or email pics to lynell@dreamweaverstencils.com, for an opportunity to win one of four fabulous glitter and stencil prize packages. One winner will be chosen each week. (US and Canada only, please).

For more inspiration from the Art Glitter design team, please visit their blog for a complete list of players throughout the month.
Here is my project for the week.
I imagined this to be more of a Silver Anniversary card than a wedding card.  I created it with the Double Glitter Technique and stencil LG 745 Tree Line.  I really love this new stencil and have seen it used so many ways already that I know it is extremely versatile.  This time, I used it with Transparent Glitters 145 Blue Boy, 270 Chesapeake, and 172 Calypso in the background.  I put a little of each color directly on the adhesive paper and spread it around with my finger, blending the colors.  I used the lightest color near the top and the darkest near the bottom.  After I brushed the excess off and removed the paper from the stencil, I did the same thing with three Opaque Glitters:  84 Shiney Silver, 354 Hematite and 77 Pewter.  This time, I used the lightest color at the bottom of the leaves.  I took many pictures of this one.  This picture is fairly true to the colors, but just as an interesting side note, I have included the outdoor picture as well.  It shows how blue the colors appear when glitter reflects outdoor light.  I found it pretty, too, just not at all true to the color.
I hope you have been inspired this week with my very quick and easy card.

For more inspiration from the Dream Team, here's the blog list for this week:


Laura Drahozal--This is me!


*For the month of June, Art Glitter is selling 1 oz jars of glitter for $5.98 (regular price $7.32)! Get the deets HERE!

Thursday, June 7, 2012

Dreamweaver and Art Glitter Month!


AND

ARE TEAMING UP THE ENTIRE MONTH OF JUNE TO BRING YOU AN AMAZING CREATIVE COLLABORATION MIXING DREAMWEAVER STENCILS AND ART GLITTER. COME ALONG FOR THE RIDE...WE PROMISE IT WILL BE A SPARKLING ONE!
So, here is my creation for the week.  As you can see, I have created a double glitter wedding card, but it could also be congratulations card for some other event.  I used the beautiful LG 644 Cherry Blossom Stencil and LS 22 Congratulations Stencil.  Obviously, I used the featured Double Glitter Technique.  The white glitter on both parts (the flowers and the Congratulations background) is Art Glitter Ultrafine #85 Crystal.  The blue on the background of the flowers is Ultrafine Opaque #32 True Blue.  I used almost the same color on the Congratulations word, but wanted it to be very clear.  Therefore, I used the Microfine Opaque #512 Bahaman Blue on the word.  For more information on how Microfine Glitter is different than the Ultrafine, check out my Art Glitter Blog post Here.


Visit the Art Glitter blog and the Dream It Up! blog for fabulous inspiration from both talented design teams. We are encouraging all of you to play along with the challenge of creating with Dreamweaver Stencils and Art Glitter*, preferably using the Double-Glitter Technique with a wedding theme. Just link your creation to the Mr. Linky on the Dream It Up! blog, or email pics to lynell@dreamweaverstencils.com, for an opportunity to win one of four fabulous glitter and stencil prize packages. One winner will be chosen each week. (US and Canada only, please).


For more inspiration from the Art Glitter design team, please visit their blog for a complete list of players throughout the month.

For more inspiration from the Dream Team, here's the blog list for this week:


Laura Drahozal--This is me!


*For the month of June Art Glitter is selling 1 oz jars of glitter for $5.98 (regular price $7.32)! Get the deets HERE!