Showing posts with label Dreamweaver Color Solutions. Show all posts

Thursday, May 1, 2014

Dreamweaver Flora and Fauna

It's May! The Dream Team members are challenging you this month to a "Flora and Fauna"theme! Considering most of the Dreamweaver designs incorporate these themes, you should have no problem playing along with our challenge this month! As usual, link your creations at the end of theDream It Up! blog post.  As the challenge gets underway, you'll see thumbnails of others who are playing along as inspirations for your own creations! Speaking of inspirations...the month of April was our Inspirations month, and we had many that linked with us! So exciting! Our randomly chosen winner for April is...JULIE STAVES! Check out two of her creations...
 
Congrats, Julie! Be sure to email lynell@dreamweaverstencils.com with your choice of stencil, and your address!
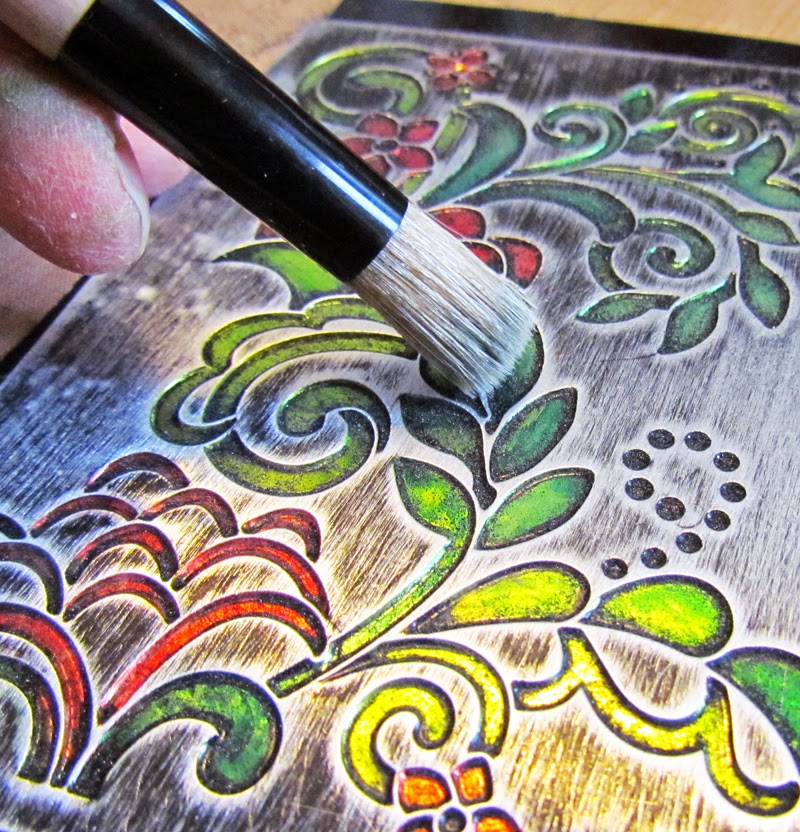
Now here is my creation for this week:
 It was pretty simple to make, and I took lots of pictures, so here is my tutorial:

MATERIALS:
Dreamweaver Stencil LJ 927 Floral With Dots
Black Coated Mercart Aluminum
Stamping Details Rubber Embossing Mat
Color Solutions Thinner
Color Solutions in these colors: Mojito, Pine Bough, Paprika Red and Winter Red
Mercart Deerfoot Teflon Tool (in Beginner Kit)
Large Stencil Brush
Scissors
Manual Die Cut Machine
Q Tips
Sanding Block
Adhesive
Hole Punch
May Arts Ribbon
Card Stock

DIRECTIONS:
1)  Place the stencil on top of the metal and trim around the outside with scissors.  Leave just a little extra metal.

 
 2)  Place the stencil on the manual die cut platform and then add the stencil, face up, the metal, face up, the rubber mat and your normal embossing top mats.  I use a Cuttlebug, so my "sandwich" is A Plate, stencil, metal, rubber mat and two B Plates. 

 
3)  Run through the machine.  Do NOT remove the stencil from behind the metal.

4)  Use the pointed end of the Teflon tool to further define the wells created by the stencil.  You can see in this picture how the bottom of the well appears sharper than the top part.  I accomplished this by pressing the metal up against the edge of the metal stencil.

 
 5)  Place a single drop of the Color Solutions Thinner in each well when necessary and clean out the black with a Q Tip.  Do not worry about going outside the stencil well, as the sanding step will hide all mistakes.

 
 This is what it looks like when it is cleaned out.

 
 6)  Place a drop of Color Solutions Alcohol Ink on the tip of a Q Tip and rub into the clean wells to color them.  The Color Solutions are nice and vibrant and should only take one coat to make a nice color, but feel free to add additional coats if you would like to.  Also, do not worry about mistakes on this one because, once again, the sanding should take care of it.

 
 This is what mine looked like colored.

 
 7)  Sand off some of the black.  if you want to leave some "scratchy" black marks like I did, be sure to always go in the same direction.

 
 8)  Use a large stencil brush to brush off the dust you created with the sanding.


9)  Trim any extra metal and assemble the card.


Thanks for stopping by.  I hope you enjoyed the tutorial.
Please welcome our new "A" team, officially posting for the first time!


Thursday, March 20, 2014

More March Madness

Welcome to the Dreamweaver "March Madness" challenge! Anything goes, and the more outside-of-the-box, the better. So, break out all of your I-never-quite-knew-what-to-do-with-these-products stash, look at your Dreamweaver stencils in a whole new creative light, and get crafting! Oh, and don't forget to link those creations to the linkytool on the Dream It Up! blog for one of THREE chances to win the stencil of your choice!
Here is my Mad Creation:

It is a gift for my friend, Georgia, who is currently playing along with our team. I met her as a Dreamweaver Designer and am so glad that I did!  This is a picture of her on the teacup ride at Disneyland.  What is crazier (or harder to get) than a teacup ride frame?  To quote Alice in Wonderland, "We're all mad here", further adding to the March Madness theme.
This is how I created the Madness:

MATERIALS:
Dreamweaver Stencil LJ896 Large Flourish
Dreamweaver Stencil LS96 Hello
Dreamweaver Stencil LL493 Teacups Vertical
Dreamweaver Stencil LL 550 Party Lanterns
Any Small Print Dreamweaver Stencil
Stencil Brush 
Palette Knife
Removable Tape
Dreamweaver Glossy White Embossing Paste
Color Solutions in Aquarius, Red Pepper, Mojito, Cosmo Pink and Lemoncello
Color Solutions Thinner
Art Glitter Ultrafine Transparent in 85 Crystal
Corron Swabs
Blue Acrylic Paint
White Acrylic Paint
Paintbrush
Plain Wooden Frame

 DIRECTIONS:
1) Paint the frame with your background color.  I used blue.  Let it dry.
2)  Position the Large Flourish Stencil over the corners and paint with the stencil brush.


3)  Position the hello stencil on the bottom of the frame and tape down with the removable tape.
4)  Using the palette knife, spread the glossy paste across the top of the stencil.
5)  Remove the stencil.
6)  For the Hello Stencil, cover with clear glitter immediately.


 7)  Repeat steps 3-5 with the teacups on the sides and the lanterns across the top.  You won't always be able to get the whole stencil on the frame.  When that is the case, you can use your finger to remove any excess embossing paste.

8)  Let dry.


9)  Brush off excess glitter.
10)  You can test the Color Solutions ink colors.  Use cotton swabs to test the colors on plain paper and see which colors you want to use.


11)  Add color to the glossy paste with cotton swabs.  You can use stencils with simple patterns as masks to put on the Color Solutions Ink.


12)  Use a little of the Color Solutions Ink Thinner on a cotton swab to perfect the inks.


 Need some more crazy ideas? Check our "A" team first, and our very special guest designer and Certified Dreamweaver teacher..

Thursday, February 6, 2014

February Flutters

Are you ready for the new Dreamweaver challenge for the month of February? It will be a short month of posts for the Dream Team, but we're pretty excited to share with you our versions of "February Flutters", meaning anything that flutters. Heart flutters, wings that flutter, breezes, sails, etc. So, come along for the ride and link your own "flutterings" to the Dream It Up! blog for a chance to win the stencil of your choice. Meanwhile, here's my "fluttering" for the week:
Here is how it was done:

MATERIALS:
A Piece of Suede to Work On
May Arts Ribbon
Sanding Block or Sand Paper
Cotton Swab
Card Sock
Adhesive
Manual Die Cut Machine with Cutting Mats

DIRECTIONS:
1)  Run the gold coated aluminum through your manual die cut machine with the background stencil and the rubber embossing mat.  The "sandwich" for the Cuttlebug is A Plate, stencil (face UP), metal (face UP), rubber embossing mat, and two B Plates.  This is technically debossed, because the metal is being pressed into the stencil.  Leave the metal on the stencil.
2)  With the metal still over the stencil, sand lightly to uncover the silver color where the stencil remains.
3)  Remove the stencil.
4)  Run the metal through the manual die cut machine again.  This time, use the butterfly stencil and place the "sandwich" this way:  A Plate, stencil  (face DOWN),  metal (gold side DOWN), rubber embossing mat and to B Plates.  This way, the metal is pushed down into the back of the stencil, as if the color is being pushed out and through.  This is embossing.
5)  Place the metal face down on the suede and use the ball tool to press the metal out and give the butterfly dimension.
6)  When the butterfly is nice and "poufy", place right side up on a hard, smooth surface.  Go around the edges of the design with the Teflon Tool and refine them.  Also make sure to use the "deerfoot" side of the tool to flatten out where the metal bent around the edges of the butterfly stencil.

7)  When you have the effect you want on the butterfly, flip it gold side down and full the cavities with the MercartUSA Filling Paste.  You just squeeze it into the holes and let it dry a couple of hours.
8)  When the butterfly is dry and hard, flip it back to the front and use a cotton swab to gently apply color to the raised area.  I used Blue Velvet and Sugar Plum on the wings and Black Beauty on the body and antennae.
9)  Run the Blue Coated Aluminum through the machine with the words.  You will be debossing, so put the stencil and the metal both face UP before you run it through.  Leave the metal on the stencil.
10)  With the metal still on the stencil, use the Teflon Tool to push the metal into the letters a little further. 
11)  Add a little Sugar Plum Color Solutions in the letters if desired.
12)  With the metal still on the stencil, vigorously sand the blue and purple off of the areas over the stencil.
13)  Remove the stencil.
14)  Assemble the card.


Be sure to leave me some encouragement before flitting over to the "A" team blogs: 

Thursday, May 2, 2013

Tiny Treats Box

Welcome to a new month and a new challenge with Dreamweaver Stencils.  For the month of May, the challenge is "Tiny Treats".  The thought is that you can create a small token for teacher appreciation, graduation, party favors and the like.  Here is my take:

 MATERIALS:
Dreamweaver Stencil LX 7017 Stars
Stamping Details Rubber Embossing Mat
Mercart Metal (One sheet, any color aluminum)
Mercart Teflon Tool (in the Beginning Kit--optional)
Color Solutions Alcohol Ink in Lemoncello, Aquarius, Mojito Green, Iceberg and Cosmo Pink
Double-Sided Mounting Paper
Manual Die Cut Machine
Box (mine was $1 at Michael's)
Black Paint
Paint Brush
Sharp Scissors
Craft Knife
Sandpaper

DIRECTIONS:
1)  Paint the bottom and inside of the box.
2)  Run the metal with the stencil through the manual die cut machine.  You will be debossing the silver side of the metal.  You also need the Stamping Details Mat.  The sandwich for the Cuttlebug is A plate, stencil face up, metal color side down, rubber embossing mat and two B plates.
3)  Repeat step 2
4)  If desired, use the Mercart Teflon Tool to sharpen and deepen the "wells" you have created by using the stencil.  You can do that by running the tool around the edges of the shapes against the stencil.
5)  Drip Color Solution colors into the wells as desired.  Let dry.
6)  Sand the metal to remove any color that got outside the wells.
7)  Use the scissors to cut the Double Sided Mounting Paper to fit each of the sides of the box.  Be sure to cut out spaces for the hinge and the clasp.
8)  Decide on which portion of the metal pieces you want on the side.
9)  Remove one side of the coating on the paper and adhere to the back of the metal.
10)  Trim the metal to fit the adhesive paper, leaving just a little extra all the way around.
11)  Remove the backing of the adhesive paper and attach the metal to the box.
12)  Rub the slight excess metal around the corners, tuck up next to clasp and trim with scissors or craft knife where necessary.
13)  For the top, select two areas that you would like to feature.
14)  Place mounting paper on the back of the metal parts.
15)  Trim around the stars if desired, always making sure that the metal will cover the top.
16)  Remove backing and place on the top.
I hope you enjoyed this post today.  If you create a "Tiny Treat", be sure to send the picture to Lynell@dreamweaverstencils.com and you could win a wonderful prize!  In the meantime, you can find some more inspiration by visiting my fellow teammates.

Dream It up!

Laura Drahozal

Lyn Bernatovich

Pam Hornschu

Heidi Erickson 


Louise Healy

Jessica Griffin

Cyndi Bundy

Thursday, February 14, 2013

A Dreamweaver Birdhouse

This month's theme is CAS Love and Friendship and this birdhouse was very easy.  I made it for a friend, Lynell, the queen of Dreamweaver Stencils.
I used three Dreamweaver Stencils:  LX 7015 Art Nouveau Background, LJ 899 Petals Background and LG 745 Tree Line.
If you are interested in how to make this birdhouse, check out my complete tutorial on Paper Craft Planet.
Thanks for stopping by.  Be sure and check out the rest of the blogs, and don't forget to enter the monthy competition.  Also, we have a Dreamweaver Stencil Team Call going on until the end of February--so get inspired!

Thursday, February 7, 2013

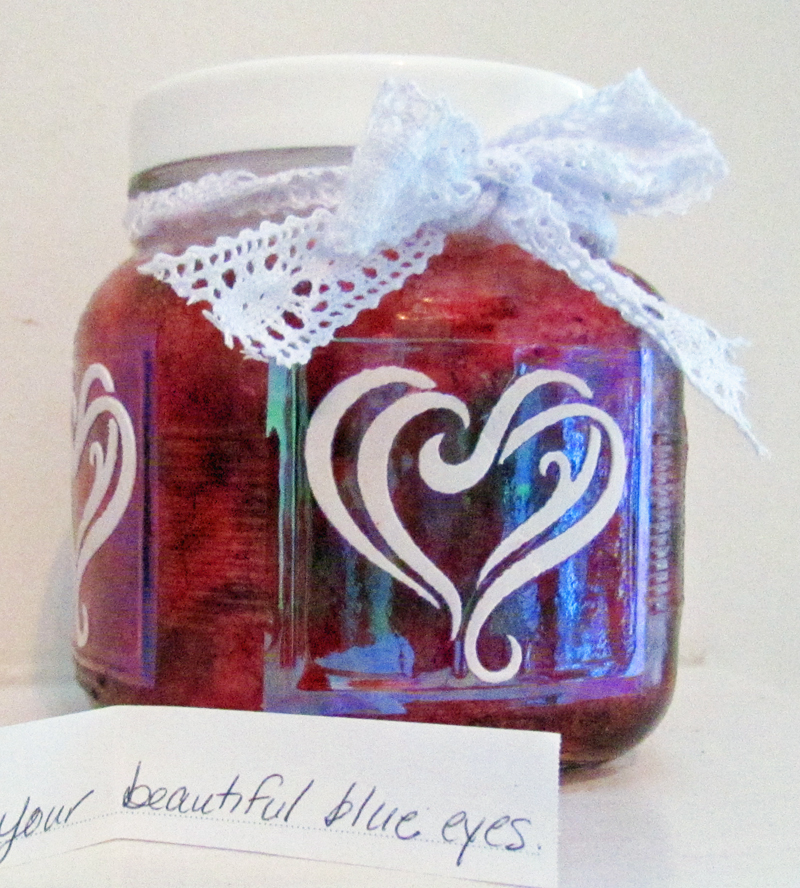
The Love Jar

This month's challenge is CAS Love and Friendship.  I know this challenge is open to a lot of interpretations beyond Valentine's Day, but being that next week is the big day, I have decided to share a CAS Valentine gift idea--a Love Jar.  It is full of  365 "Reasons I Love You", a full year of daily love affirmations for my husband.
MATERIALS:
Dreamweaver Stencil LM 287 Heart Flourish
Dreamweaver Regular Embossing Paste
Dreamweaver Alcohol Ink in Cosmo Pink
Dreamweaver Alcohol Ink in Sugar Plum
Dreamweaver Alcohol Ink in Paprika Red
Dreamweaver Alcohol Ink in Sizzling Silver
Alcohol Ink Aplicator
Removable Tape
Palette Knife
Art Glitter Fantasy Film in Strawberry
Xyron 510 With Permanent Adhesive
Jar (I bought mine at the Dollar Store)
Ribbon
Scissors
Pencil
Pen
Paper

DIRECTIONS:
1)  Use alcohol ink applicator to apply alcohol inks all around the outside of the jar.  I used three drops of each of the colors and one drop of silver for each time I loaded the color on the applicator.
2)  Trim Fantasy Film to a little larger than the stencil.  Make four pieces.
3)  Send the Fantasy Film through the Xyron machine.  Rub the resulting adhesive "sandwich" and remove only the top layer of cellophane.
4)  Use embossing paste and stencil to add hearts to all four pieces.  Do this by taping stencil down onto film and using the palette knife to "squeegee" on the paste.  Let dry.
5)  Replace stencil and trace around it with the pencil.
6)  Trim just inside the tracing with scissors.
7)  Remove backing and adhere hearts to jar.

8)  Tie ribbon around the jar.
9)  Use pen and paper to write 365 (or whatever amount suits you) notes to your loved one.

There you have it, a Love Jar!  I hope you get the chance to make this very personal project for your loved ones.
Meanwhile, February is full of opportunities for you.  Challenge yourself to participate this month with a CAS project of your own!  Send a picture to Lynell@Dreamweaverstencils.com for your chance to win.  Better yet, apply for the Dreamweaver Design Team today!  That is right, there is a call out for a new team.  Take it from me, it is a fabulous opportunity.

Thursday, October 11, 2012

More Festively Fall Fun!

If you follow my blog, you had to know that metals would be showing up again soon!  For my festively fall project this week, I have made a very simple card (that I will be teaching this month at Altered Art Addicts in Jackson, MI). 

MATERIALS:
Manual Die Cut Machine (I used the Cuttlebug)
Stamping Details Embossing Mat
Dreamweaver Stencils Falling Leaves LL 3004
Teal Mercart Metal
Dreamweaver Color Solutions Cleaner
Dreamweaver Color Solutions Lemoncello
Dreamweaver Color Solutions Pumpkin
Dreamweaver Color Solutions Aspen Leaf
Dreamweaver Color Solutions Paprika Red
Dreamweaver Color Solutions Pine Bough
Dreamweaver Color Solutions Aquarius
Sandpaper
Precision Q Tips (I got them at Target)
Cardstock
Adhesive
Scrapper's Floss

DIRECTIONS:
1)  Run the stencil through the die cut machine with the metal and embossing mat.  For the Cuttlebug, I used the A Plate, the stencil (face down), the metal (teal side down), the embossing mat, and two B Plates.
2)  Sand the embossed metal.  This defines the embossing by removing the teal color from the edges.
3)  Using the precision Q Tips and the thinner, strip off the extra teal color from inside the leaves.  Press down a little in the center to make a sort of well for the color.
4)  Apply Color Solutions Ink to the leaves to add color.  Squeeze the color onto the Q Tip and tap into place.  The color will spread a little, so try to keep it towards the center of those leaves, in the wells you have created.
5)  If the color runs off of the edge, you can correct it a little by first removing the extra color with a little thinner.  Then, gently tap just a little of the Aquarius Color Solutions over the now silver area. 
6)  Sand a little more to define the edges.
7)  Assemble card.

So, that was my easy, festively fall card.  Festively fall is the Dreamweaver Theme of the Month.  Take a chance and make a card of your own.  Then, take a picture and email it to Lynell@Dreamweaverstencils.com.  You could win the stencil of your choice!  Check out the other team member blogs for inspiration.  They are listed on the left.  Come join us and be festive this fall!

Thursday, September 13, 2012

More Stencil Inkiness

This month's challenge is "Getting Inky With Stencils".  If you play along, you can win the stencil of your choice.  That's right--any stencil you want!  But, how do you play?  You use ink with stencils.  Any ink, any way.  Then, take a digital photo and email it to Lynell at Lynell@dreamweaverstencils.com. She will put it online for you so that everyone can see it.  If you have a blog, a gallery, or even a photo account, you can put it online yourself and link it to the Mr. Linky at the bottom of the Dreamweaver Stencils Blog.
Last week, I showed you alcohol inks on metals.  This week, lets see what they can do on Glossy White Paste. 

 
MATERIALS
Pink Vellum
Cardstock
Patterned Paper
Adhesive
 
DIRECTIONS
1)  Use removable tape to tape the stencil down to cardstock.  Be sure to tape all the way around the stencil.
2)  Put White Glossy Paste on spreader.  Pull it down across the stencil.  Think of it like a squeegee.
3)  Remove tape from 3 of the 4 sides of the cardstock and lift stencil as if it were on a hinge. 
4)  Remove stencil.  Let paste dry.
5)  Replace stencil.
6)  Use applicator to daub color on the stems and leaves.  You can also thin the color a little and daub onto the bottom of the petals.
7)  Remove stencil. 
8)  Assemble card.