Showing posts with label Halloween. Show all posts

Thursday, July 21, 2016

Tando Creative Blog Hop--a Halloween Project


Welcome to the Stampendous and Tando Creative Mixed Media Blog Hop.  This collaboration is really taking me out of my proverbial "box" with the chance to try something really different.  Today, I am using the Triple Arch Layered Frame by Tando Creative.  Who is Tando Creative?  They are a UK based company that sells various interesting chipboard products, Andy Skinner stamps, Nathalie Kalbach stamps and Stampendous Essential Kits.  But, I get way ahead of myself.  What everyone REALLY wants to know is, "Are there prizes?"  Why, yes there are!


To be eligible, leave a comment and where you live on the Stampendous blog, Tando Creative blog and the designers blogs. Each comment is an entry to win one of THREE terrific prize packages. This is open to all commenters with either a US or UK mailing address.
Each prize package includes a Tando Creative Mini Heart Printer Tray plus Stampendous NK Studio Fiesta Stamp Set.

Now that we know what the prizes are, it is back to my post.  My project today is Halloween themed, and was wickedly fun to make.  Here it is:
I used the Triple Arch Layered Frame, the Haunted Mansion Rubber Stamp,  Owl on Oak Stencil, Long Pumpkins Stencil, Regular Embossing Paste, and some Graphic 45 Rare Oddities paper.  All the coloring was done with the humble 24 pack of Crayola Crayons.  The distressing was done with Deco Art Media Fluid Acrylics in Carbon Black.  The picture on the right shows a little more detail on the Haunted Mansion stamped image.  It was colored first with crayons and then wrinkled and painted over with the black paint.  I removed the paint with a damp cloth.

 The owl was pasted on brown paper.  When the paste was COMPLETELY dry, I colored over it.  Yes, with crayons, believe it or not.  I did a couple of layers just to be sure it was thick. Then, I painted over it with the black paint and wiped of the excess with a damp cloth.


The pumkins were made by running white card stock through a manual die cut machine with the stencil that was sprayed on the back with Burlap Glimmer Mists.  Then, they were colored with crayons, and distressed in the same manner as the other two parts.  All the rest of the project was fancy cutting and gluing on various layers of the frame to create depth.

Thanks for stopping by today.  Be sure to leave a comment for your chance to win.  Check out (and comment on) the rest of the posts, too.  Here they are:

Friday, October 30, 2015

More Fun With Glue Dots


STM_GD_banner


As our fans know we love a contest while we hop so three lucky commenters will win a prize package that includes:
Glue Dots® Craft Dots 3/8”
Glue Dots® Mini Dots 3/16”
Glue Dots® Removable Dots 3/8”
CRS5080 Cling Create Christmas Stamp Set by Stampendous®
DCS5080 Create Christmas Die Set by Stampendous®
MGK02 Christmas Micro Glitter Kit by Stampendous®
STM_GD_prize

Just comment on both company blogs and all the design team posts for our hop with Glue Dots. Commenting is open until Sunday, November 1st at 11:59 pm and winners will be announced sometime on Monday, November 2nd. See Official Contest Rules.
My post for today is:
A little more Halloween fun, that uses more Glue Dots than you think.
MATERIALS:
Prismacolor Pencils in Imperial Violet, Copenhagen Blue, Cool Grey 30%, Cool Grey 20%, White, Black, Metallic Silver, Chartruese, Neon Green, Orange, Dark Brown, Yellow Ochre
Black Twine
Black Embroidery Floss
Tapestry Needle
Small, Die Cut Skull  (I used my Silhouette to cut a file I purchased from their store)
Black Card Stock
White Card Stock Base
Craft Knife
Heat Gun
Nonstick Craft Sheet

DIRECTIONS:
1)  Stamp the image on Mixed Media Paper
2)  Color the image with pencils.  The background was colored first with Imperial Purple for the top and Copenhagen Blue for the bottom.   Then, it was burnished with Cool Grey 30%.  The crow was colored with Black first and then burnished on parts with Metallic Silver.  His beak is Yelllow Ochre.  The skull was Black and Cool Grey 20% and burnished with white.  The leaves were Orange, Neon Green, Chartruese and Dark Brown.
3)  Use the tapestry needle to poke a hole in the top of the die cut skull.
4)  Use the Removable Glue Dots to adhere the die cut skull to the craft sheet.  (Otherwise, the little skull will get blown all over the place when you try to heat emboss it.)
5)  Tap the skull with Clear Embossing Ink.
6)  Cover with Opaque White Embossing Powder.
7)  Carefully remove the skull with the craft knife and move it to another location on the craft sheet, gently shaking it to remove any excess powder.
8)  Heat emboss the powder.
9)  Repeat steps 5-8.
10)  Cut the twine into two pieces and adhere one end of each piece around the back of the project with Craft Glue Dots.
11)  Adhere the image to the black card stock.
12)  Apply one Craft Glue Dot under the area where the bow will be and press the twine into it, leaving a 3-4 inch length of twine on either side.
13)  Tie the twine into a knot.
14)  Remove the skull from the craft sheet and use the tapestry needle to thread it onto a small piece of embroidery floss.
15)  Tie the embroidery floss around the knot.
16)  Tie the twine into a bow.
17)  Place Mini Glue Dots in several spots under the bow and twine to attach to the background and press down.
18)  Use Mini Glue dots to press the skull down onto the background.

19)  Attach the card top to the base with Glue Dots.

Here are all the posts for today:


Thursday, October 25, 2012

Festively Fall Ranger Fun and a Little Trick (or Treat!)


Welcome back to week two of our amazing collaboration between Ranger's Tim Holtz line of Distress Powders, and our beautiful Dreamweaver Stencils & Products! If you missed last week's event, start HERE.

Last week, we were totally blown away by the awesome response we received from those of you who hopped over from Tim Holtz's blog and the Ranger blog to check us out! We've been doing the "happy dance" ever since! Hopefully, you will continue to check us out, especially over the next few weeks as we continue our play-time in Tim's sandbox. (It is rather an appropriate metaphor considering the cool texture of his Distress Powders.)
Apparently, Tim and the wonderful people at Ranger were also excited by the response, and they've decided to "up the ante" in the form of an additional prize package(s) which will include TWELVE Distress Powders each, and a handful of Dreamweaver Stencils to go with! Wow! Just one teeny-tiny detail...to win one of these packages from their blog, you need to create something with Tim Holtz's Distress Powders and Dreamweaver Stencils and attach it to the inlinkz on the Ranger blog. Winners will be selected randomly. For more details, head over to the Ranger blog.

Once again, this week we are offering another fall prize package as shown here. Just leave us all some love as you visit, for an opportunity to be the one random winner we select. Curious as to who won from last week? It could be YOU! Visit the Dream It Up! blog for the announcement of the lucky commenter.


This week, I have two creations for you.  The first is festively fall.  The second, in honor of Halloween, is a little trick (or treat--up to you) of a Halloween decoration.  The main part of both is done in the same, easy way.  Here is the fall card:


MATERIALS:
Vagabond, or another manual die cut machine
Sanding Block
Core'dinations Kraft Core Cardstock in fall colors
Core'dinations Color Core Cardstock in two teals
Adhesive
 
DIRECTIONS:
1)  Tape leaf stencil over teal cardstock with removable tape onto craft sheet.  You will be taping all the way around the stencil, with the first piece being a "hinge" you can use while removing the stencil.  Dog ear the other edges to make them easier to remove and try to get each side in a single pass.  Check out the picture below.
 

2)  Use the paste spreader to remove embossing paste from the jar and lay a strip across the top of the stencil.
3)  Use the back of the paste spreader like a squeegee to spread paste all the way down the stencil.  You can put the excess paste back into the container.  Try doing this in one sweep if possible.
4)  Remove the tape from all the sides EXCEPT for your hinge side. 
5)  Carefully lift the stencil, using that last piece of tape as a hinge.  See the picture.
6)  Clean the paste spreader quickly and dry thoroughly.  You can then use it to spread the Distress Embossing Powders across the pasted surface.  You don't have to worry about completely covering the area, that is why I used the red (in case I missed some spots).
 
 
7)  When the powders are the way you like them, flick off the excess and let dry.  I love the way the colors come out on the red paste--and they don't need to be heat set with this method.
8)  Use die cut machine to cut leaves from the kraft core paper.
9)  Use sanding block to sand and distress leaves.
10)  Use Distressing Tool to distress the edges of the leaves and the paper.
11)  Assemble card.

 
HAPPY HALLOWEEN PROJECT
I am sorry, but I just couldn't resist, as I love Halloween.  This project was inspired by the Haunted Mansion in Walt Disney World.  There is a scene where a skeleton hand is trying to push open a coffin.  It is nailed shut (well, almost) where mine is chained shut.  Both have a glow coming from the inside.......
 
MATERIALS:
Vagabond or another manual die cut machine
Tim Holtz Alterations Movers and Shapers Mini Lock and Key
Alterations Movers and Shapers Magnetic Tray
Small Coffin Shaped Box (I bought it for one dollar at Michael's)
Small Plastic Skeleton (I bought a set of 4 at the Dollar Tree)
Small Paint Brush
Paper Towel
One Glow Bracelet
Chain
Jump Ring
 
DIRECTIONS:
1)  Stain the box using one layer of Tea Dye Distress Stain and then one layer of Vintage Photo.  Let dry.  (I used two different colors to add more depth of color--you can use one).
2)  Paint the inside of the box with gold to reflect the color.  You can uncap the paint and dip with the small brush to get into the corners.  Let dry.
3)  Place spider web stencil where you would like the image.  Stencil, dipping the large stencil brush into the Snow Cap paint, brushing it off on paper towel, and then brushing it in circles over the stencil.  Let dry.  (I moved the stencil down to get the bottom of the coffin).

This is with the webbing finished
4)  When web is finished, position the spider stencil onto the web and, using the same techinique as the leaf card, paste it with the black glossy paste.  Sprinkle with the red and black embossing powders.  Let dry.
 
 
5)  Cut up foil and add it to the front and the back of a piece of grungeboard.
6)  Use the Vagabond, the tray and the mini lock die to cut a lock from the foil covered grunge board.
7)  Use alchohol inks and applicator to distress the metal lock and all the metal pieces on the coffin.
8)  Use small stencil brush to cover areas of metal with the Distress Embossing Ink and emboss with Walnut Stain and then Vintage Photo Distress Embossing Powders.  This makes the metal look rusted.
9)  Use the Picket Fence Distress Marker to enhance any webbing that is not white enough.
10)  Use paste spreader to add black paste against the coffin opening and make an "ooze" down.
11)  Cover with Peeled Paint Embossing Powder and use heat gun to set.  This will make it bubble and change colors a little.
12)  Add skeleton (make sure to leave the hand sticking out) and cracked glow stick.
13)  Wrap with chain and close it and the lock with a large (easy to open) jump ring.  DONE!
 
 
Aren't you excited to see what's next? Check out the Dream Team players for today:


You already know where to find Ranger's/Tim Holtz' products, but if you are having difficulty finding Dreamweaver, encourage your local stamp/paper-craft store to carry the line of fabulous stencil designs, pastes, and other products to mix with all of your stash of Tim's crafty goodness. You can also purchase our products on-line at Stencil with Style.

We'd love to see you come back regularly and play along with our monthly challenges (and more opportunities to win stencils) by linking your creations to the mr. linky on the Dream It Up! blog, or emailing pics of your creations to lynell@dreamweaverstencils.com. Since you're on the computer already, head on over and like us on Facebook as well. Just another location for dreamy and distressed inspiration!

Tuesday, October 23, 2012

A Scary Treat Tray

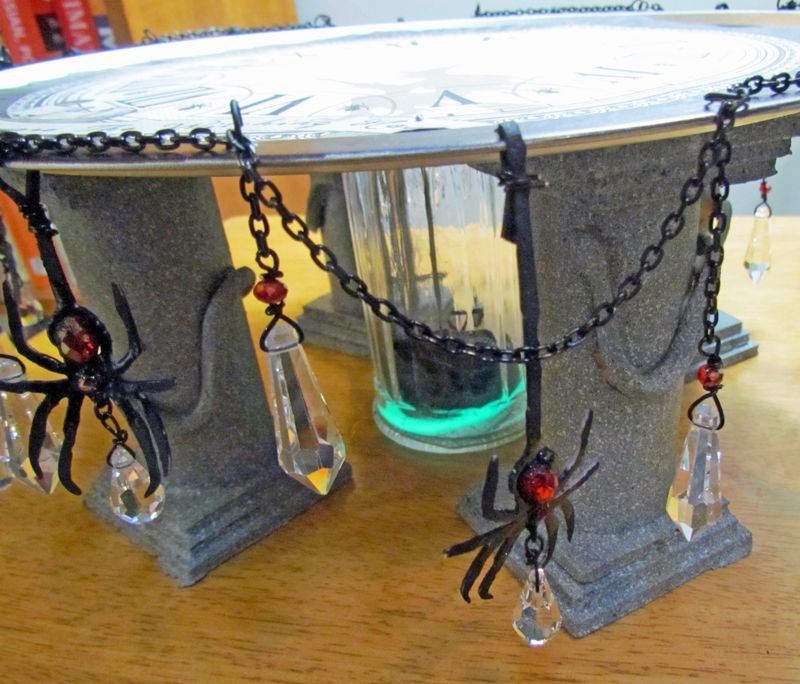
For this Connie Crystal Tombow Collaboration, I am featuring a Halloween Cake Stand.  It has a LOT of parts. I break it down for you on the Connie Crystal Blog here. I have included lots of step by step photos, too.  Come on over and check it out!


Tuesday, October 16, 2012

Art Glitter and Globecraft Love Charms Book


We are having a collaboration between Art Glitter and Globecraft Memories, and I am in a Halloween mood!  This time, I have a Love Charms book to share.

MATERIALS
Book (I used a spiral bound journal)
Enough crushed panne fabric to cover book, front and back
Foam packaging scrap large enough to cover book, if desired
8" by 10" Muslin Fabric
Xyron Creatopia
Xyron Fabric Adhesive
One Sheet White Cardstock
Silhouette Machine
Silhouette Machine Clean Cut Fabric Interfacing
One Globecraft Memories Piccolo Delicate Hearts Earrings Set
Two Globecraft Memories Vintage Heart Charm Sets
Globecraft Memories Card Decor Set #4
Globecraft Memories Enamel Powder Adhesive
Globecraft Memories Piccolo Powders in Vintage Silver
Globecraft Memories Piccolo Powders in Siam Silver
Globecraft Memories Piccolo Powders in Vintage Gold
Globecraft Memories Piccolo Powders in 24K Gold
Globecraft Memories Cool-Set Enameling Gel in Purple Mist
Globecraft Memories Glastique
Art Glitter Designer Dries Clear Adhesive with Fine Tip
Art Glitter Dries Clear Fabric Adhesive with Fine Tip
Art Glitter Microfine Opaque 516 Gold Tone
Art Glitter Microfine Opaque 508 Silver Moon
Art Glitter Vintage Glass Glitter 903 Alexandrite
Small White Heart Shaped Brads
One Large Silver Brad
Heat Gun
Iron
Big Bite
Scissors
Craft Knife
Large Stencil Brush
2" 22 Gauge Wire
Tape Roller

DIRECTIONS:
1)  Cut panne fabric about 1" larger than the book both vertically and horizontally.  You will be cutting one piece for the whole thing, so be sure to open the book and measure it all the way around before you cut.
2)  Cut foam packaging to fit over covers and spiral binding, if desired.  Apply with Designer Dries Clear.  I felt that I needed the foam to cover the spiral edge.  I would not recommend this step unless you have the same circumstances.
3)  Use the Embossing Fluid and the 24K Gold Powder to emboss the heart shape.
4)  Use Designer Dries Clear to adhere the heart shape to white cardstock.  Let dry.
5)  Use Glastique on the outer portion of the heart.  Fill with Vintage Glass Glitter.  Let dry.
6)  Use Cool-Set Enameling Gel in the center heart.  Let Dry.
7)  Cover the Vintage Glass with Glastique.  Let Dry.

8)  Iron the Clean Cut Fabric Interfacing on muslin.
9)  In Silhouette Studio Program, create the words and cut.  I used the font Bradley Gratis.  This step can be skipped if you have another way to cut out the muslin--either by hand or another machine.
10)  Set the cut out muslin in position on panne and iron on.
11)  Use your Art Glitter Fabric Adhesive to add the Goldtone Microfine Glitter to the words.  Set aside to dry.
12)  Use Microfine Silver Moon Glitter around the edges of words.  Let dry.
13)  Cut two straps from the cardstock.  They will wrap around the binding and onto the back.
14)  Using the Globecraft Embossing Fluid and your heat gun, emboss the straps, and all the remaining Globecraft Memories Elements EXCEPT the keys with Vintage Gold or Vintage Silver Embossing Powder.
15)  Emboss the keys with 24K Gold and Siam Silver Embossing Powder.  We switched the embossing powder because this one is more detailed, which suits the detailed keys better.
16)  Make sure that all the glue is dry before you proceed.  Send the leather through the Xyron Creatopia with the fabric adhesive.
17) Be very careful while removing from the background paper and covering the book.  Use the extra fabric to wrap under the edges.  Panne does stretch and can cling to itself.  If this happens, carefully pry it off of itself and carefully press on the book.  It will NOT be perfect.
18)  Use the Art Glitter Fabric Adhesive to attach all of the embossed pieces except the keys.
20)  Use Big Bite to create holes for brads. 
21)  Attach brads, leaving one just a little loose to attach the key.
22)  Use Cool-Set Enamel to cover the heart shaped brads.  Let dry.
23)  Use wire to attach the keys from a brad.
24)  Brush off any extra glitter with stencil brush and remove remnants with tape roller.
I realize that this project is a little intense, but it can be modified in any way that you like.  It is your book, so enjoy its creation.  I loved making it so much, that I have created a second one, pictured here.

If you want to see how I did the second one, check out my the Art Glitter blog at  http://artglitterblog.blogspot.com/ See you later, glitter on!

Saturday, October 6, 2012

A Glam Witch Hat

Here is a quick, glamorous decoration for Halloween. 

MATERIALS:
A Witch Hat Decoration.  Mine was purchased at a craft store, and cost only one dollar.
18 Gauge Black Wire
20 Gauge Black Wire
1 Large Purple Jump Ring
2 Purple Connie Crystal Suncatchers
One Star Shaped Connie Crystal
2 Octagonal AB Connie Crystals
1 Oval AB Connie Crystal
Sheer Ribbon
Jewelry Making Round Pliers
Wire Cutters
Scissors


DIRECTIONS:
1)  Cut an about 18" long piece of 18 gauge black wire.
2)  "Sew" wire around decoration.  You are reinforcing it.  I used the preexisting swirled seam as a guide.
3)  Determine the placement of the center row of beads.  Doing one complete bead at a time, make hole for it with your finger.

4)  Cut black 20 gauge wire and either string bead on it or make "S" shaped hook and pass through end depending on the hole in the bead.
5)  Hook wire into decoration and secure.  For center beads, make sure that the top of the bead is hooked over the support wire.  Also try and include that wire when possible in the other beads.
6)  Cut a 2-3" piece of black 20 gauge wire.  Make a loop in one end and close by twisting.
7)  Put a purple bead on wire next to loop.
8)  Place on top of hat, push into tip and make sure that you use the extra wire to twist around and secure.
9)  Cut another 2-3" piece of wire.  Pass through star and secure.
10)  Thread a couple more beads on wire and secure, leaving a large loop on the end.
11)  Use large purple jump ring to attach the last two pieces through those large loops.

12)  Place ribbon and tie.

So, that was a fun and easy Halloween decor project to add a little sparkle to your season.  While I am all into something scary, sometimes a girl needs a little glam.  So, get your sparkle going with Connie Crystal!

Sunday, September 23, 2012

A Crystal Fairy Princess Wand

Here is my latest post for Connie Crystal.  It is a crystal fairy wand, well in advance of Halloween.  for more pictures and directions, go check it out at the Connie Crystal Blog
I will show you how to dye your own crystals for a truly personalized project of any kind.  Check it out!

Sunday, September 9, 2012

Vampire Necklace

Today, I am sharing an idea for Halloween Costume Jewelry.  Why?  Well, those who know me understand that I am a Disney Maniac.  One of the things that makes Disney so special is their attention to detail.  Every light post, building detail and costume detail reflects the theming of the ride or area that it belongs.  It enhances the beauty and mood.  So, why should we be content to rummage through the bins of generic, plastic accessories at Halloween, when we can easily make something gorgeous and personal?
I answer this question with we shouldn't.  I used Connie Crystals to make this Vampire Necklace.
If you want to see how, and more pictures, head on over to the Connie Crystal Blog.  Meanwhile, come back tonight to see how I made the matching earrings!  Hope to see you then!

Tuesday, September 4, 2012

Just One (Glittering) Bite.......


Too early for Halloween?  I sure hope not!  Honestly, this apple was inspired by Snow White.  I have been thinking about making something to honor that story for a long time.  Since I decided to make an elegant apple for the first day of school, which you can see here, I thought I would make and post this at the same time. 
Here are the simple instructions:
MATERIALS:
One Plastic Apple
Spray Adhesive
Assorted Gemstones.  I used purples, green, black and orange gems and light greenish pearls.
Silhouette Machine, or some other way to cut letters
Cardstock
Xyron X Machine with Permanent Adhesive
Art Institute Designer Dries Clear Glue
Ultrafine Metal Tip for Glue
Art Glitter Microfine 519 Reed
Art Glitter Microfine 507 Black Wing
Art Glitter Ultrafine Opaque 256 Purple Passion
Art Glitter Ultrafine Pearlescent 309 Canary
Art Glitter Ultrafine Opaque Neon 223 Fishnet

DIRECTIONS:
1)  Spray apple with adhesive
2)  Cover with Reed glitter.  I did not get mine perfect, which was fine, because it was a Halloween project.

3)  Cut out phrase from Cardstock.  I used my Silhouette, the Bradley Gratis font and the phrase "Just One Bite"
4)  Place the letters into the X upside down.  The adhesive will be on the top of the letters.
5)  Put letters into the Black Wing Glitter and press down hard.  Use the Designer Dries Clear to touch up any areas that you might have missed.  Let dry.
6)  Put letters face up into the X to get adhesive on the back.
7)  Make a "label" area on the apple where you might want the words and glitter with Canary.  Let dry.
8)  Adhere the letters in place.
9)  Adhere gemstones around the apple in no particular pattern. 
10) Starting with the top of the apple, surround some of the gemstones with Designer Dries Clear and the fine tip.  Expand the sections of glue until they look like drips.  This is freehand and should look a little messy.  Cover with Canary.  Let dry.
11)  Repeat step 10 a little further down, but use Purple Passion.  Also, use Purple Passion around the "label" section.  Let dry.
12)  Repeat step 10 a little further down with Fishnet.  Let dry.


13) Brush off any excess glitter.  You are done!
Here are a couple more pictures:


So, whether you want a head start on Halloween, or just really like Snow White, I am glad you came by the blog today.  Don't forget to check out the Art Glitter Blog, too.  It has another of my apples.  Sparkle On!