Tuesday, October 23, 2012

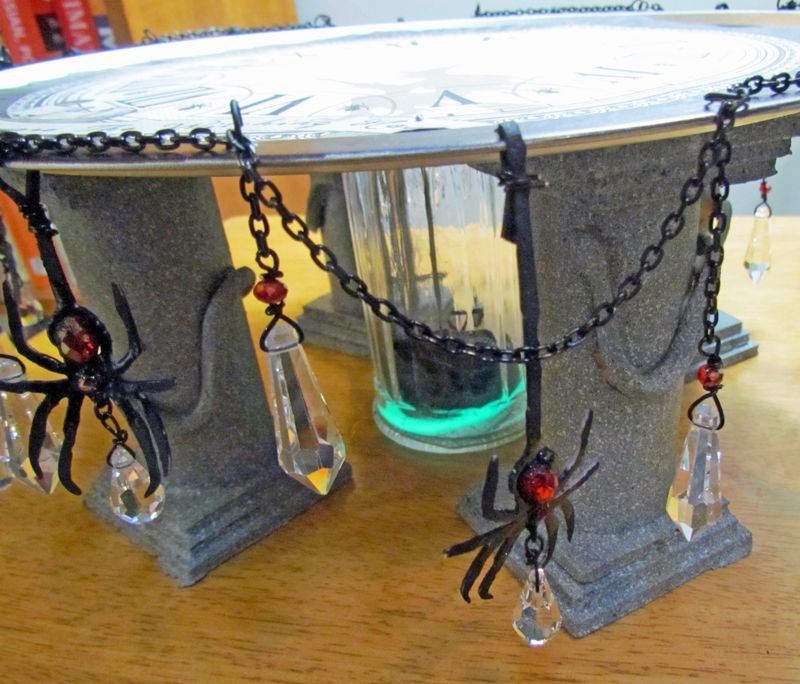
A Scary Treat Tray

For this Connie Crystal Tombow Collaboration, I am featuring a Halloween Cake Stand.  It has a LOT of parts. I break it down for you on the Connie Crystal Blog here. I have included lots of step by step photos, too.  Come on over and check it out!


Thursday, October 18, 2012

Working with Ranger Embossing Powders!

 
For the next four weeks, the Dreamweaver Team is working with Ranger Distress powders, so get ready for some fun!  The Dreamweaver challenge is still Festively Fall, so don't forget to enter that competition for your chance to win any stencil you want.  Meanwhile, take a look at my fall card.


MATERIALS

Dreamweaver Stencil LL 515
Dreamweaver Stencil LJ 905
Stamping Details Rubber Mat
Ranger Inkssentials Surfaces Metal Foil Tape Sheets
Vagabond or another manual die cut machine
Mercart Metal Teflon Deerfoot Tool  (in basic tool kit)
Alcohol Ink Applicator Tool
Alcohol Inks in Stream
Alcohol Inks in Pool
Alcohol Inks in Espresso
Alcohol Ink Blending Solution
QTips
Sanding Block
Inkssentials Non Stick Craft Sheet
Ranger Perfect Medium Pen
Distress Embossing Powder Vintage Photo
Distress Embossing Powder Spiced Marmalade
Distress Embossing Powder Peeled Paint
Ranger Heat It Craft Tool
Craft Knife
Tim Holtz Paper (mine was from the seasonal pad)
Removable Tape
Three Stencil Brushes
Distress Ink in Mustard Seed
Distress Ink in Forest Moss
Distress Ink in Peeled Paint
Distress Ink in Vintage Photo
Core'dinations Cardstock
Adhesive
Floss

DIRECTIONS
1)  Run the pumpkin stencil and the foil tape sheet through the Vagabond with the rubber mat.  You will be setting up as if you are cutting a Cuttlebug Die, but also include the rubber mat.  Make sure that you have the stencil face up, the metal face up and the rubber mat in the middle of your "sandwich".
2)  Use the Mercart tool to push the metal into the edges of the stencil.  You are creating "wells" to put your embossing powders in.  Be gentle with the tool to avoid ripping the metal.


3)  Use the blending tool and the alcohol inks to color the metal.


 4)  Use your Perfect Pearls Pen to place the shadows and cover with Vintage Photo Distress Embossing Powders.

5)  Heat.  BE CAREFUL not to overheat and burn. 


6)  Add the Spiced Marmalade Powders and heat.  Then, add the Peeled Paint and heat.
 
7)  To brighten up the color a little, add additional layers of Spiced Marmalade.

8)  When all the embossing is finished, use a craft knife to scrape out the lines in the pumpkin.

 
9)  Use removable tape to attach the sunflower stencil to the Tim Holtz paper. 

10)  Use the stencil brushes and Distress Ink to stencil the image onto the paper.


11)  Use QTips with Blending Solution to remove any excess alcohol ink.
 

11)  Assemble card.

So, did you know you could win just for commenting on our collaboration?  Here is a look at the fabulous prize package:

So, comment today!
Also, be sure and check out the other bloggers and leave comments for them, too.  The more places you comment, the better your chances to win!
 
Cyndi Bundy

Tuesday, October 16, 2012

Art Glitter and Globecraft Love Charms Book


We are having a collaboration between Art Glitter and Globecraft Memories, and I am in a Halloween mood!  This time, I have a Love Charms book to share.

MATERIALS
Book (I used a spiral bound journal)
Enough crushed panne fabric to cover book, front and back
Foam packaging scrap large enough to cover book, if desired
8" by 10" Muslin Fabric
Xyron Creatopia
Xyron Fabric Adhesive
One Sheet White Cardstock
Silhouette Machine
Silhouette Machine Clean Cut Fabric Interfacing
One Globecraft Memories Piccolo Delicate Hearts Earrings Set
Two Globecraft Memories Vintage Heart Charm Sets
Globecraft Memories Card Decor Set #4
Globecraft Memories Enamel Powder Adhesive
Globecraft Memories Piccolo Powders in Vintage Silver
Globecraft Memories Piccolo Powders in Siam Silver
Globecraft Memories Piccolo Powders in Vintage Gold
Globecraft Memories Piccolo Powders in 24K Gold
Globecraft Memories Cool-Set Enameling Gel in Purple Mist
Globecraft Memories Glastique
Art Glitter Designer Dries Clear Adhesive with Fine Tip
Art Glitter Dries Clear Fabric Adhesive with Fine Tip
Art Glitter Microfine Opaque 516 Gold Tone
Art Glitter Microfine Opaque 508 Silver Moon
Art Glitter Vintage Glass Glitter 903 Alexandrite
Small White Heart Shaped Brads
One Large Silver Brad
Heat Gun
Iron
Big Bite
Scissors
Craft Knife
Large Stencil Brush
2" 22 Gauge Wire
Tape Roller

DIRECTIONS:
1)  Cut panne fabric about 1" larger than the book both vertically and horizontally.  You will be cutting one piece for the whole thing, so be sure to open the book and measure it all the way around before you cut.
2)  Cut foam packaging to fit over covers and spiral binding, if desired.  Apply with Designer Dries Clear.  I felt that I needed the foam to cover the spiral edge.  I would not recommend this step unless you have the same circumstances.
3)  Use the Embossing Fluid and the 24K Gold Powder to emboss the heart shape.
4)  Use Designer Dries Clear to adhere the heart shape to white cardstock.  Let dry.
5)  Use Glastique on the outer portion of the heart.  Fill with Vintage Glass Glitter.  Let dry.
6)  Use Cool-Set Enameling Gel in the center heart.  Let Dry.
7)  Cover the Vintage Glass with Glastique.  Let Dry.

8)  Iron the Clean Cut Fabric Interfacing on muslin.
9)  In Silhouette Studio Program, create the words and cut.  I used the font Bradley Gratis.  This step can be skipped if you have another way to cut out the muslin--either by hand or another machine.
10)  Set the cut out muslin in position on panne and iron on.
11)  Use your Art Glitter Fabric Adhesive to add the Goldtone Microfine Glitter to the words.  Set aside to dry.
12)  Use Microfine Silver Moon Glitter around the edges of words.  Let dry.
13)  Cut two straps from the cardstock.  They will wrap around the binding and onto the back.
14)  Using the Globecraft Embossing Fluid and your heat gun, emboss the straps, and all the remaining Globecraft Memories Elements EXCEPT the keys with Vintage Gold or Vintage Silver Embossing Powder.
15)  Emboss the keys with 24K Gold and Siam Silver Embossing Powder.  We switched the embossing powder because this one is more detailed, which suits the detailed keys better.
16)  Make sure that all the glue is dry before you proceed.  Send the leather through the Xyron Creatopia with the fabric adhesive.
17) Be very careful while removing from the background paper and covering the book.  Use the extra fabric to wrap under the edges.  Panne does stretch and can cling to itself.  If this happens, carefully pry it off of itself and carefully press on the book.  It will NOT be perfect.
18)  Use the Art Glitter Fabric Adhesive to attach all of the embossed pieces except the keys.
20)  Use Big Bite to create holes for brads. 
21)  Attach brads, leaving one just a little loose to attach the key.
22)  Use Cool-Set Enamel to cover the heart shaped brads.  Let dry.
23)  Use wire to attach the keys from a brad.
24)  Brush off any extra glitter with stencil brush and remove remnants with tape roller.
I realize that this project is a little intense, but it can be modified in any way that you like.  It is your book, so enjoy its creation.  I loved making it so much, that I have created a second one, pictured here.

If you want to see how I did the second one, check out my the Art Glitter blog at  http://artglitterblog.blogspot.com/ See you later, glitter on!

Thursday, October 11, 2012

More Festively Fall Fun!

If you follow my blog, you had to know that metals would be showing up again soon!  For my festively fall project this week, I have made a very simple card (that I will be teaching this month at Altered Art Addicts in Jackson, MI). 

MATERIALS:
Manual Die Cut Machine (I used the Cuttlebug)
Stamping Details Embossing Mat
Dreamweaver Stencils Falling Leaves LL 3004
Teal Mercart Metal
Dreamweaver Color Solutions Cleaner
Dreamweaver Color Solutions Lemoncello
Dreamweaver Color Solutions Pumpkin
Dreamweaver Color Solutions Aspen Leaf
Dreamweaver Color Solutions Paprika Red
Dreamweaver Color Solutions Pine Bough
Dreamweaver Color Solutions Aquarius
Sandpaper
Precision Q Tips (I got them at Target)
Cardstock
Adhesive
Scrapper's Floss

DIRECTIONS:
1)  Run the stencil through the die cut machine with the metal and embossing mat.  For the Cuttlebug, I used the A Plate, the stencil (face down), the metal (teal side down), the embossing mat, and two B Plates.
2)  Sand the embossed metal.  This defines the embossing by removing the teal color from the edges.
3)  Using the precision Q Tips and the thinner, strip off the extra teal color from inside the leaves.  Press down a little in the center to make a sort of well for the color.
4)  Apply Color Solutions Ink to the leaves to add color.  Squeeze the color onto the Q Tip and tap into place.  The color will spread a little, so try to keep it towards the center of those leaves, in the wells you have created.
5)  If the color runs off of the edge, you can correct it a little by first removing the extra color with a little thinner.  Then, gently tap just a little of the Aquarius Color Solutions over the now silver area. 
6)  Sand a little more to define the edges.
7)  Assemble card.

So, that was my easy, festively fall card.  Festively fall is the Dreamweaver Theme of the Month.  Take a chance and make a card of your own.  Then, take a picture and email it to Lynell@Dreamweaverstencils.com.  You could win the stencil of your choice!  Check out the other team member blogs for inspiration.  They are listed on the left.  Come join us and be festive this fall!

Saturday, October 6, 2012

A Glam Witch Hat

Here is a quick, glamorous decoration for Halloween. 

MATERIALS:
A Witch Hat Decoration.  Mine was purchased at a craft store, and cost only one dollar.
18 Gauge Black Wire
20 Gauge Black Wire
1 Large Purple Jump Ring
2 Purple Connie Crystal Suncatchers
One Star Shaped Connie Crystal
2 Octagonal AB Connie Crystals
1 Oval AB Connie Crystal
Sheer Ribbon
Jewelry Making Round Pliers
Wire Cutters
Scissors


DIRECTIONS:
1)  Cut an about 18" long piece of 18 gauge black wire.
2)  "Sew" wire around decoration.  You are reinforcing it.  I used the preexisting swirled seam as a guide.
3)  Determine the placement of the center row of beads.  Doing one complete bead at a time, make hole for it with your finger.

4)  Cut black 20 gauge wire and either string bead on it or make "S" shaped hook and pass through end depending on the hole in the bead.
5)  Hook wire into decoration and secure.  For center beads, make sure that the top of the bead is hooked over the support wire.  Also try and include that wire when possible in the other beads.
6)  Cut a 2-3" piece of black 20 gauge wire.  Make a loop in one end and close by twisting.
7)  Put a purple bead on wire next to loop.
8)  Place on top of hat, push into tip and make sure that you use the extra wire to twist around and secure.
9)  Cut another 2-3" piece of wire.  Pass through star and secure.
10)  Thread a couple more beads on wire and secure, leaving a large loop on the end.
11)  Use large purple jump ring to attach the last two pieces through those large loops.

12)  Place ribbon and tie.

So, that was a fun and easy Halloween decor project to add a little sparkle to your season.  While I am all into something scary, sometimes a girl needs a little glam.  So, get your sparkle going with Connie Crystal!

Thursday, October 4, 2012

A Festively Fall October!

This is the first Thursday of October, and it marks a new challenge at Dreamweaver Stencils.  It is "Festively Fall" month!  This first week, I am featuring something I almost never post--a paste project.  Let me show you how it is done.
MATERIALS:
Dreamweaver Stencils LL 3015 Raven Vane
Dreamweaver Stencils LG 616 Leaf Texture
Dreamweaver Matte Black Embossing Paste
Removable Tape
Dreamweaver Paste Spreader LM 2010
Dreamweaver Metallic FX in Purple Satin
Distress Ink in Peeled Paint
Distress Ink in Spiced Marigold
Distress Ink in Mustard Seed
Distress Ink in Barn Door
Distress Ink in Aged Mahogany
Distress Ink in Tea Dye
Three Dreamweaver Gold Handled Brushes
Inkssentials Blending Tool with Foam
Inkssetials Non Stick Craft Sheet
Paper Towel
Cardstock in Ivory, Green, Black and Kraft
DIRECTIONS:
1)  Tape the leaf texture background stencil onto the ivory cardstock and the craft sheet.  You only need one piece of removable tape for this.
2)  Use your gold handled brushes to stencil the color from the Distress Ink onto the cardstock.  You will pick up color with the brush from the ink, tap a little off on the paper towel, and swirl it over the leaves.  I love Distress Ink here because it blends well and comes out of the brushes easily.  I suggest three brushes, because one should be used in the yellow, one in the reds and the last in the green.
3)  After you get the leaves the way you like them, remove the stencil.
4)  Now, use your blending tool and the Tea Dye Distress Ink to distress the leaf cardstock.  You will have the foam pad on the blending tool.  Tap it into the ink and, starting on the craft sheet, blend the color into the cardstock, moving the tool in a circular motion.
5)  You can flick water onto the cardstock if you like, to make an even more distressed look.  Wait until it is completely dry before proceeding to the next step.
6)  Place the raven vane on top of the background and tape with the removable tape all the way around.
7)  Place the Matte Black Embossing Paste onto the spreader.
8)  Put the spreader on top of the stencil and pull down, as if you are squeegeeing the stencil.
9)  Carefully remove the stencil, using the last piece of tape as a hinge to lift the stencil.
10)  Let dry.
11)  Dip a finger into the Metallic FX and rub around the bird to create highlights.
12)  Assemble card.

Okay, I am done, now it is your turn.  Make something "Festively Fall", upload it and link it to the Dream It Up! blog OR you can email a photo to Lynell@dreamweaverstencils.com.  Join in the fun for a chance to win your choice of stencil!

Tuesday, October 2, 2012

A Simple Art Glitter Card

Today, in honor of the leaves beginning to turn color and fall outside my window, I have created a simple, fun and colorful card.
If you would like to see how it was done, check out the Art Glitter Blog.  Keep glittering on!