Showing posts with label Art Glitter. Show all posts

Thursday, December 18, 2014

Quick and Cute Revisited

In a flurry of a hurry? This month the Dream Team are all about the Quick and Cute...whether that be cards, gifts, wrapping, or tags...we have sleigh-loads of ideas! Play along by posting your creations using the Inlinkz tool on the Dream It Up! blog, for a chance to win the stencil of your choice, and a possible bonus stencil for using Dreamweaver products in your Quick and Cute project! Here's what fun I've been up to this week:

This is actually a three year old project, but it was very popular in classes, and I don't think I have ever posted it.  This card was so simple, that many of my students used it as their Christmas card! 
It was created with one of my favorite stencils, LL3009 Christmas Script.  I also needed Double Sided Mounting PaperCoconut Soap and a Large Stencil Brush.  I used the Double Glitter Technique with Microfine Opaque Art Glitter in Rouge and Ultrafine Transparent Art Glitter in Lion's Mane.  The striped paper is My Mind's Eye Lost & Found Christmas collection, but you could use any paper that appeals to you.  Also, you could match the glitter and ribbon to that paper.
Thanks for stopping by.  It really isn't too late to make a last minute Double Glitter card for someone special!
Now, check out the other members of the team to see what fun they have been up to.  Here is this week's link list:
 

Thursday, April 17, 2014

A Little Inspiration!

This April, the Dream Team has a spectacular month planned for you...filled with exciting news and inspiration for all of your crafting dreams! The exciting news will be announced in the Dream It Up! post TODAY, but the "April Inspirations" challenge will run for the entire month. Each team member will post what inspires them in their creative life...maybe a Pinterest pic, a magazine pic, a quote, a book, a place, an artist, a crafter friend...along with their creation. We are hoping that you will feel inspired as well, and link your projects (and inspiration) to the inlinkz tool on the Dream It Up! blog. Check out what our Guest Designer and the "A" team has been inspired by for this week...
 
 
This was my inspiration.  A beautiful opal cameo.  Mine was fun to make and a lot cheaper.
 
 
This was created using the Dreamweaver Cameo Stencil LL3017.  The edges were created using the Double Glitter Technique.  The silhouette was pasted with Glossy White Embossing Paste and glittered.  The sparkling "opal" like background was created with layers of Art Institute Glitter and Ultra Thick Embossing Enamel.
 
 
Here is how it sparkles in the sun.  It isn't a real opal, to be sure, but  it is pretty and fun.
 
Now, check out the other links for the week....Did you notice a couple of extra?  They are part of the new Dreamweaver Design Team.  Everyone is listed on the Dream It Up Blog.  I am happy to announce that Dreamweaver has chosen to allow me to stay on the team!  I am very excited to see what sort of inspiration lays in store this year!
 

Thursday, April 3, 2014

April Inspirations!

We're already into April, and no foolin', the Dream Team has a spectacular month planned for you...filled with exciting news and inspiration for all of your crafting dreams! The exciting news will be announced in the Dream It Up! post on April 17th, but the "April Inspirations" challenge will run for the entire month. Each team member will post what inspires them in their creative life...maybe a Pinterest pic, a magazine pic, a quote, a book, a place, an artist, a crafter friend...along with their creation. We are hoping that you will feel inspired as well, and link your projects (and inspiration) to the inlinkz tool on the Dream It Up! blog. Check out what our Guest Designer and the "A" team has been inspired by for this week...


Here is my inspiration:
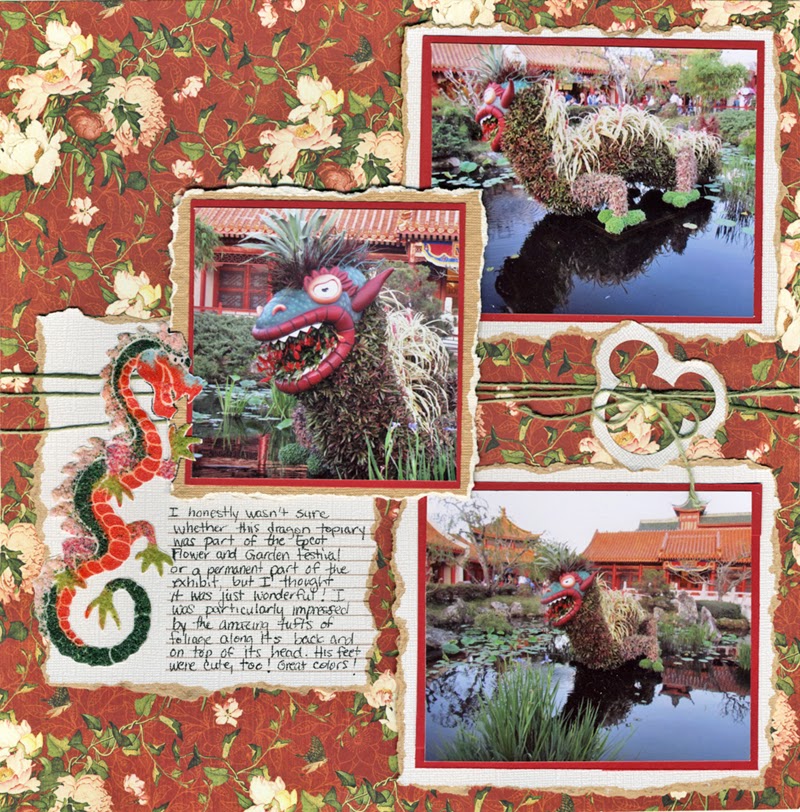
Yes, it is actually a photo that I took at Epcot.  I always look to my pictures to inspire my embellishments, and this time was no exception.  
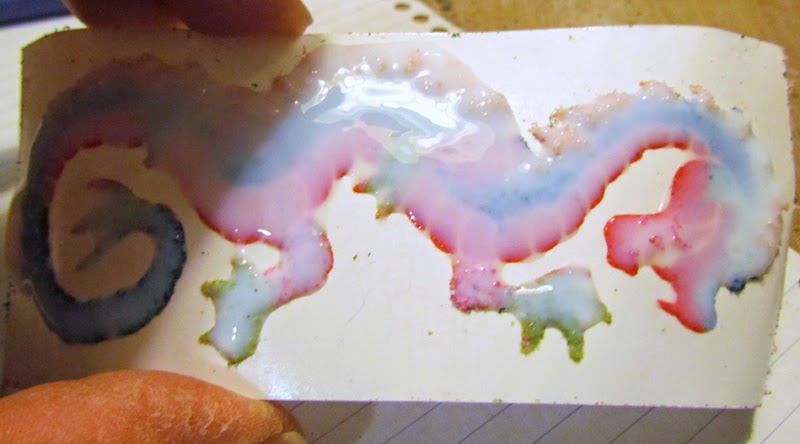
Here is the embellishment that I created using Dreamweaver Stencils:


See how I tried to match the topiary in the picture?
Here is how it fits on my scrapbook page:


I have a quick (mostly visual) tutorial of the embellishment.

MATERIALS:

Art Glitter Ultrafine Pearlescent 188 Black Vinyl
Ultra Fine Flower Soft in Sage, Pine, and Raspberry Fizz
Flower Soft in Baby Pink
Globecraft Glastique in Matte (or some other finishing glaze)
Pointed Scissors

DIRECTIONS:

1)  Rub the soap on the back of the stencil.  You will see a light filmy coating over the metal.  This will help to get the stencil off of the paper later.

2)  Use the large stencil to brush the "crumblies" of soap off of the stencil.


 3)  "Crack" open one side of the mounting paper covering and peel it off.


 4)  Place the stencil on the paper, soap side down.


5)  Carefully place the embossing powder into place.


 6)  Rub the embossing powder into place with your finger.


7)  Repeat steps 5 and 6 with the rest of the powder, glitter (in eyes), and Flower Soft.


8)  Press down all the material one last time.


9)  Brush off the excess material with the large stencil brush.


 10)  Place the project stencil side down on a smooth, flat surface and carefully peel the paper off of the stencil.


 11)  Cover the entire project with Glastique.  (In retrospect, I could have trimmed the project before this step.) Then, let it dry over night.


12)  Trim around the embellishment.  You can get very close and nothing should fall off.  The great thing about this project is that you can still see the textures you created with the Flower Soft.  Also, the embellishment is a sticker!


I hope you enjoyed my "inspired by" project.  I am not sure it is what our Fearless Team Leader Pam had in mind with this challenge, but, honestly, when I scrapbook I take all of my inspiration from the pictures!  Of course, with stencils I can make the perfect embellishment for any situation!  Don't forget to check out the links above to see what inspires the rest of the team.  Here's wishing you a month full of inspiration!

Thursday, March 6, 2014

Dreamweaver March Madness Challenge

MAD I tell you! We're all going MAD! That is...MAD for Dreamweaver Stencils! Welcome to our "March Madness" challenge! Anything goes, and the more outside-of-the-box, the better. This year, we're aiming to play with non-traditional challenges whenever possible. So, break out all of your I-never-quite-knew-what-to-do-with-these-products stash, look at your Dreamweaver stencils in a whole new creative light, and get crafting! Oh, and don't forget to link those creations to the linkytool on the Dream It Up! blog for one of THREE chances to win the stencil of your choice! Need some crazy ideas? Check our "A" team first, and our very special guest designer and Certified Dreamweaver teacher...

 
Here's my personal act of madness:

I used two different stencils to create this embellishment:  LJ844 Dragon and LJ 903 Lg Open Fan.  First, I traced the inside of the fan on Double Sided Mounting Paper.  I cut around the image and set it aside. Then, I soaped up the back of the dragon stencil using Handmade Hawaiian Coconut Soap.  I brushed off the excess soap crumbles with a large stencil brush.  I put the stencil soap side down on the fan shaped Double Sided Mounting Paper.  I used Stampee Foil on the dragon copying the colors from the dragon fan in the photo.  I pressed the foil down with my finger and ran an embossing tool around the edges.  After I had the colors the way I wanted them, poured crystal glitter over the top of the dragon.  I brushed off the excess glitter.  Placing the stencil face down on a flat surface, I carefully peeled off the paper and covered it with black glitter.
Then, it was time to soap up the back of the fan stencil.  I placed it, soap side down, on another piece of Double Sided Mounting Paper.  I positioned the dragon fan paper inside the open fan on the stencil.  I covered it with black glitter.  Then, I placed the project stencil side down on a flat surface and carefully peeled the paper off.  I covered the remaining paper with crystal glitter and cut around the shape.  Viola!  I had an embellishment.
I hope you enjoyed the project today.  I just wanted to show how you could use Dreamweaver Stencils to create a unique scrapbook page.  Don't be afraid to break away from the card and see what you can do!

Thursday, October 17, 2013

Mysterious and Magical October

Are you ready to be spooked, mystified and magically transported to the land of Halloween and holidays? Hop on board the Dream Team train as we journey through all things Mysterious and Magical through the month of October. Our guest "engineer" is Miss Eerie herself, Alison Heikkila. October promises to be a very bumpy ride...

Okay, okay....I DO realize that this was supposed to be the month of spooky creations, but I was experimenting with a new technique and I loved it.  How could I not show you this card?

 I used the new LL3036 Great Pumpkin Stencil and the LM 295 Autumn Stencil.  First, I did the Double Glitter Technique using Handmade Hawaiian Coconut Soap, a large stencil brush, and Double Sided Mounting Paper.  I used Art Glitter for the whole project.  For the Autumn stencil, I used Microfine Opaque Glitter in Monarch.  The Microfine Glitter made the word appear crisp.  When I removed it and applied Ultrafine Transparent Crystal Glitter, I was finished with the word.
 The "new" technique was used with the pumpkin.  I also used the Double Glitter Technique on this one.  I used a much larger glitter first--Dazzlers in Peppa and Clover Leaf.  Before removing the stencil, I added Ultrafine Opaque Glitter in Copper Canyon and Jungle.  Then, I used Microfine in Monarch and Bavarian Forest.  I removed the stencil and added the Crystal Glitter to the background.  Then, I replaced the stencil and pasted it with Translucent Embossing Paste.  I needed the Removable Tape and the Palette Knife for this.  While the paste was still wet, I tossed a little Transparent Ultrafine Glitter in Melone and Ensalada on it.
What makes the new technique interesting?  Layers of colors and depth.  If you have lots of glitter and a little time, you should give it a try.  It is addicting.

Meanwhile, visit the other blogs for today:


Saturday, September 21, 2013

Dreamweaver and Quietfire Blog Hop Final Day


Get ready for an amazing week of Awesome in Autumn! This week we are playing with the Quietfire Design team, and are so excited to play with their amazing images and sentiments. In their beautiful calligraphic style, their quotes and thoughts are the perfect addition to our Dreamweaver designs. Follow along with us, and leave your comments for an opportunity to win one of two wonderful prize packages:

Here's what I've created for today's post:
One of the little joys of the fall season for me is the frosted autumn leaves in the morning.  The frost on the bright colors is so beautiful!
And here are the instructions:
MATERIALS:
Dreamweaver Stencil LJ 906 Maple Branch
Dreamweaver Stencil Paste Spreader LM 2010
Dreamweaver Palette Knife
Dreamweaver Handmade Hawaiian Soap
Dreamweaver Large Stencil Brush
Dreamweaver Double Stick Mounting Paper
Removable Scotch Tape
Dreamweaver Translucent Embossing Paste
Distress Embossing Powder in Broken China
Quietfire Designs Take Time to Delight #6270 sed
Distress Ink in Black Soot
Art Glitter Black Night Embossing Powder
Art Glitter D94 The Big Apple Opaque Art Hexis
Art Glitter Ultrafine Opaque 278 Poppy
Art Glitter Microfine 500 Ruby Red
Art Glitter Ultrafine Transparent 85 Crystal
DCWV Patterned Paper
White and Black Card Stock
Scissors
Heat Gun

DIRECTIONS:
1)  Soap the back of the stencil.

2)  See the soap residue around the holes?  Brush it off with the large brush.

3)  Pour the Dazzlers on the stencil and push into place with your finger.


4)  Add additional glitter to fill in the areas left blank by the larger flakes--first ultrafine, then microfine.
5)  Brush off the excess glitter.
6)  Place project stencil side down and carefully remove the paper.
7)  Pour the Distress Embossing Powder over the background and push in with your finger.
8)  Clean and completely dry the stencil.
9)  Replace the stencil and tape in place all the way around the edge with removable tape.
10) Use the palette knife to place the embossing paste on the edge of the paste spreader.
11)  Pull the embossing paste across the stencil.
12)  Remove the stencil.
13)  While the paste is still wet, sprinkle clear glitter across the edges of the leaves.
14)  Let dry.
15)  Stamp the sentiment with Distress Ink on white card stock.
16)  Sprinkle with embossing powder.
17)  Flick off excess powder and heat set.
18)  Assemble the card.
When you see it close up, it is easy to see the dazzlers.

See how the project looks like frosted leaves?
And now, check out all the posts for this wonderful hop.  Don't forget, you have a chance to win!

Thursday, September 19, 2013

Dreamweaver and Quiet Fire Blog Hop


Get ready for an amazing week of Awesome in Autumn! This week we are playing with the Quietfire Design team, and are so excited to play with their amazing images and sentiments. In their beautiful calligraphic style, their quotes and thoughts are the perfect addition to our Dreamweaver designs. Follow along with us, and leave your comments for an opportunity to win one of two wonderful prize packages:

Here's what I've created for today's post:
To me, this lovely saying really fits with fall.  It is so gorgeous, but just a fleeting moment!  You need to really experience it.

MATERIALS:
Dreamweaver Stencil  LL 3004 Falling Leaves
Dreamweaver Double Stick Mounting Paper
Dreamweaver Handmade Hawaiian Soap
Dreamweaver Large Stencil Brush
BP Bonding Powder
Quietfire Stamp Live in the Moment  #6142 
Distress Ink Barn Door
Art Glitter Ultrafine Opaque 62 Copper Canyon
Art Glitter Ultrafine Opaque 278 Poppy
Art Glitter Chunky Hologram Opaque 332 Red Rocket
Art Glitter Chunky Hologram Opaque 344 Trucy
Art Glitter Ultrafine Hologram Opaque 331 Sunburst
Art Glitter Microfine Opaque 79 Black
Art Glitter Ultrafine Transparent 85 Crystal
Art Glitter Microfine Opaque 523 Red Rock
Heat Gun
May Arts Ribbon
DCWV Paper
Brown and White Card Stock
Adhesive

DIRECTIONS:
1)  Soap up the back of the stencil with the Handmade Hawaiian Soap.
2)  Brush off the excess soap that gathers around the stencil holes.
3)  Place stencil, soap side down, on the Double Sided Adhesive Paper.
4)  Use the glitter to color the leaves any way you like.  Don't be afraid to use more than one color on a leaf.
5)  Brush off the excess glitter.
6)  Place project stencil side down on a flat surface and carefully remove the paper from the stencil.
7)  Cover the adhesive paper with crystal glitter.
8)  Stamp the image with Distress Ink and cover with the adhesive powder.
9)  Heat with the heat gun.
10)  Pour the Microfine Red Rock Glitter over the sticky glue.
11)  Brush off excess and assemble the card.

See how the holographic glitter adds a real punch of sparkle?
Now, check out all the other blogs for today.  Leave a comment for your chance to win!

Quietfire Design Members...
and
Dream Team members...
and the
and

Thursday, September 5, 2013

Art Glitter and Dreamweaver Present an Awesome Autumn


Welcome to the Art Glitter and Dreamweaver Collaboration!  (So, I guess I am collaborating with myself!)  The theme this month is Awesome Autumn.  Here is my first post:
It is a birthday card for a friend.  The technique used is Double Glitter.  Here are the materials that I used:
Dreamweaver Stencil LL 429 Long Sunflower
Dreamweaver Stencil LS 1010 Small Happy Birthday
Double Sided Mounting Paper
Handmade Hawaiian Soap
Large Stencil Brush
Art Glitter Ultrafine Opaque 357 Wintergreen
Art Glitter Ultrafine Opaque 109 Cavalado
Art Glitter Ultrafine Opaque 114 Leaf
Art Glitter Ultrafine Opaque Neon 222 Electric Light
Art Glitter Microfine Opaque 521 Cayman
Art Glitter Ultrafine Opaque 350 Butterscotch
Art Glitter Ultrafine Transparent 206 Wildwood
Art Glitter Ultrafine Opaque 59 Teak
Art Glitter Ultrafine Opaque 231 Copper Canyon
Art Glitter Ultrafine Transparent 197 Flax
Graphic 45 Printed Paper
Card Stock
Raffia

I used multiple colors in each part of the sunflower.  You really don't need to do the same if you don't want to.
This month features the Art Glitter lead Kristi Parker as the Dreamweaver Guest Designer.  As if that weren't enough, Art Glitter is featuring a 20% off sale on all regular retail items!  Use the code DW20.  Stencil with Style is ALSO offering a 20% off sale. Their coupon code is SWS20.
Check out the other players this week, get inspired and send a photo of your Awesome Autumn project to Lynell@Dreamweaverstencils.com.  You could win a wonderful prize!