 I am posting this Thank You card as a thanks for attending the Dreamweaver Sneak Peek Week. I hope you have had a great time. I know I have enjoyed showing off these stencils. This is what I did today. The new background stencil is LX7012 Waves and Dots and the Thank You stencil is LL3022 Festive Thank You. I ran each stencil through my Cuttlebug with the Details Embossing Mat and white cardstock. I misted the back with Isopropyl Alcohol first to loosen up the fibers and make a good impression. I left the stencil on the cardstock and used a stencil brush to quickly color it with Adirondack Pigment Ink. I then removed the stencil and covered the ink with Stampee Bonding Powder and shook it off. I heated it with my heat gun until it melted. I put clear Stampee Foil over the top of the whole thing and put it inside a folded piece of regular copy paper. Then, it all went through my laminating machine. When it was out, I quickly pulled off the foil in one movement. Then, I mounted everything and was done. The actual card is much shinier and more holographic than the picture. Don't forget, these stencils will be released at CHA next week, so if you like it, let someone at your local shop know so that they can order it. Meanwhile, check some more new ones out with the rest of the team (links on the left). Get inspired and make something Valentine's Day to link to the Dreamweaver blog. You could win one of two fabulous prizes, so get to work! I will see you next Thursday for the reveal of the new February Challenge.
Friday, January 27, 2012
CHA Sneak Peek Week Day 5--The Final Peek
I am posting this Thank You card as a thanks for attending the Dreamweaver Sneak Peek Week. I hope you have had a great time. I know I have enjoyed showing off these stencils. This is what I did today. The new background stencil is LX7012 Waves and Dots and the Thank You stencil is LL3022 Festive Thank You. I ran each stencil through my Cuttlebug with the Details Embossing Mat and white cardstock. I misted the back with Isopropyl Alcohol first to loosen up the fibers and make a good impression. I left the stencil on the cardstock and used a stencil brush to quickly color it with Adirondack Pigment Ink. I then removed the stencil and covered the ink with Stampee Bonding Powder and shook it off. I heated it with my heat gun until it melted. I put clear Stampee Foil over the top of the whole thing and put it inside a folded piece of regular copy paper. Then, it all went through my laminating machine. When it was out, I quickly pulled off the foil in one movement. Then, I mounted everything and was done. The actual card is much shinier and more holographic than the picture. Don't forget, these stencils will be released at CHA next week, so if you like it, let someone at your local shop know so that they can order it. Meanwhile, check some more new ones out with the rest of the team (links on the left). Get inspired and make something Valentine's Day to link to the Dreamweaver blog. You could win one of two fabulous prizes, so get to work! I will see you next Thursday for the reveal of the new February Challenge.Thursday, January 26, 2012
CHA Sneak Peek Week Day 4
 Welcome to day four in the CHA Sneak Peek Week for Dreamweaver Stencils. You say you didn't know that it was Sneak Peek Week? That's okay. Just go look at the three previous posts, too. Don't forget to come back tomorrow for the finale. Anyway, back to today. I will start with the easy background. I ran aluminum through my Cuttlebug with a Details Embossing Mat and the new LX7011 Big Dots Stencil. I then covered the whole thing with Color Solutions Ink in Sugar Plum and Blue Velvet. I lightly sanded to show only the edges of those big dots. The cat is my reaction to the Zentangle fad. I have done Zentangle before, but it never really held my interest until I did it with typography. First, I lightly traced the inside of the new LL3020 Retro Sitting Cat stencil. Then, I lightly drew the words to the song "Everybody Wants to be a Cat" in the spaces. I colored around the words with my Zig Millenium Pen. I trimmed around the outside, mounted it on black (which I also trimmed) and popped it up on the background. The words "Cool Cat" are from the new LG741 Kitty Words stencil. I did it with the Double Glitter Technique in Art Glitter. Don't forget, these stencils have not been released yet. If you see something you like, call your local scrapbook store and let them know. Don't forget to check out the other team members' blogs. Also, create a little something Valentine-y and link it to the Dreamweaver blog for a chance to win a prize. I will see you for the last peek tomorrow.
 Wednesday, January 25, 2012
CHA Sneak Peek Week Day 3
 Well, it is day 3 of our CHA Sneak Peek Week for Dreamweaver Stencils. Today, I feature both an old and new stencil. The old one, which I did with the Double Glitter Technique and Art Glitter, is LJ 905 Rain. The new stencil is LL3025 Mushrooms. I think I am going to have a LOT of fun with this stencil. It reminds me of mushrooms from Alice in Wonderland or something from a story about fairies. I could use it with crazy colored spots all over it or even glitter. Of course, this one is a little more traditional. I pasted it with the Original Embossing Paste right over the glittered adhesive paper that I used with the rain. I let it dry, replaced the stencil and colored it quickly with Adirondack Pigment Ink. I removed the stencil and covered the inked paste with Ultra Thick Embossing Enamel. I heated the powder until it was melted and glossy. I adhered it to the cardstock and was done. I hope you are enjoying all of the sneak peaks so far. We are only half way through! Check out everyone else's blog today, and I will see you back here tomorrow. Don't forget to enter the January Valentine's Challenge for your chance to win!
Tuesday, January 24, 2012
CHA Sneak Peek Week Day 2
 It is the second day of the CHA Sneak Peek Week, so here is a little more of what we have coming. This post features two stencils: the flower is a rerelease of LM 219 Plum Blossom Shape and the gorgeous LJ 919 Art Nouveau Flourish (Art Nouveau again--see the theme with me?). I used a slightly mottled green background paper. I pasted the flourish with Glossy Green Embossing Paste. Then, while it was still wet, I sprinkled Art Glitter in two different shades of transparent green over the top. The lighter green is on the right. As I let that dry, I used my embossing stylus to hand emboss some multishaded pink vellum. There really aren't very many lines to emboss and of course, vellum is transparent, so it was extremely easy to do. I just love the way that vellum embosses because it creates a completely different color when embossed. I stuck it on with a couple of small Glue Dots. Then, I added a brad in the center. That's it. Another simple card. Take a look at everyone's blogs (listed on the left) and if you see something you like, let your local scrapbook store owner know so that they can order it at CHA. In the meantime, make a little something that says "Valentine's Day" to you and link it to the Dreamweaver Blog. It could win one of two fabulous prizes this month. Give it a try--what do you have to lose?
Monday, January 23, 2012
CHA Sneak Peek Week Day 1
 WELCOME to the Dreamweaver Stencils Sneak Peek Week! These designs will not be available until CHA next week, but if you like them, let your local retailer know so they can decide what to buy. I promise that most of my posts this week will include more than one stencil, but I wanted to kick off the week with one of my favorites--LL3023 Tall Poppy. I have always been a huge fan of the Art Nouveau movement and the Arts and Crafts style that this stencil reflects. Copper was often used during the time period, so it was copper that I chose to use on this card. This particular copper was a thicker mil than I am used to working with, so it gave my hands a real workout. I used Mercart tools to do the tooling. When I was finished, I filled the back with Backing Paste and let it dry. I have always loved the look of blue with copper, so I used some blue alcohol inks over the copper to bring out the details. I sanded when I was done to remove any excess color. Then, I used the "brass brush" end of one of the tools to brush sections of the copper, creating a softer, yet more textural look. I know that the Arts and Crafts Style also featured many textures, so I tried to include a couple of extras here. I put the copper on navy mulberry and Creative Imaginations Wood Paper. Then I attached it with brads. I adhered it all to cork paper. Not my usual crazy style, I know, but I just loved its simplicity. Sometimes it is best to just let a great stencil do all the work! (Of course, sometimes you just can't resist using lots of techniques and bling.....) If you would like to get more involved with stencils, be sure to enter this month's challenge. There is still time to show us what you've got! The theme is Valentine's Day, so get busy! There are two prizes. (Maybe even a new stencil?) Don't forget to check out everyone else's posts and get inspired......See you TOMORROW!!
Thursday, January 19, 2012
More Valentine Inspiration and Classes

 Dreamweaver Stencils is still running the Valentine Card Challenge through the end of the month, so I am hoping that this post will give you a little extra inspiration.
  Don't forget, there are TWO prizes at stake, and you need to post your creation online and link it to the Dreamweaver Stencils blog by the end of the month. This post features the remaining cards from my upcoming classes. The two above are from the Stamp Peddler class in Northville, Michigan this Saturday. They employ a Metal Technique and a Double Glitter Technique. The metal card uses the stencil LL 540 Heartweave. The one on the top right, the glittered card, uses the LL 3010 Swooshy Heart Stencil. The card on the right is also from Saturday and features Shrink Plastic. I used Adirondack Pigment Ink and the LM 287 Heart Flourish Stencil. This class also features the purple and silver card from last week's post.
 These next two cards will be taught on Saturday, February 4th at Altered Art Addicts in Jackson, Michigan. That class will also include the double glitter card from last week and a thistle card, that I won't be showing until February. The card on the left here also features that Heartweave and metals. The background was created by running plain cardstock through my Cuttlebug with the Plaid Stencil LX 7002. The card on the right features pasting, hand embossing and debossing. The stencil that I used is discontinued and only available as a free giveaway in this class.
The last class cards that I am showing are from the class on  February 5th at Capture A Memory in Flint, Michigan. This class also includes the gray and black oil stick heart from last week.
 February 5th at Capture A Memory in Flint, Michigan. This class also includes the gray and black oil stick heart from last week.
 This first card features metal embossing, both by machine and by hand. The background is created by machine and features the Snowflakes Stencil LJ 819. The single snowflake is the Antler Snowflake Stencil LL 399. It was hand embossed. Both were inked with alcohol inks and sanded. The next card is an altered version of the double glitter technique. I used double glitter with a transparent neutral Art Glitter color to fill in all of the words and shadowed areas. The rest was filled in with Crystal Art Glitter. I then used pigment ink to color in the individual hearts. I went right over the ent ire heart, including the shadow and the crystal glitter. This allowed the hearts to be individual colors while still seeing all of the detail. The stencil used on this one is discontinued and only available as a free giveaway for taking the class. The background is the Plaid stencil through the machine with cardstock. The last card that I feature here is pasted with Pearlescent Paste.I used one of my favorite heart stencils, LG 724 Heart Flower. After it was
  pasted and dried, I added a little glue to select areas and brushed on Metallic FX in Purple Satin, Ivy Garden and Kiwi . The rose itself was painted with Liquid Pearls watered down a little and brushed on.
 ire heart, including the shadow and the crystal glitter. This allowed the hearts to be individual colors while still seeing all of the detail. The stencil used on this one is discontinued and only available as a free giveaway for taking the class. The background is the Plaid stencil through the machine with cardstock. The last card that I feature here is pasted with Pearlescent Paste.I used one of my favorite heart stencils, LG 724 Heart Flower. After it was
  pasted and dried, I added a little glue to select areas and brushed on Metallic FX in Purple Satin, Ivy Garden and Kiwi . The rose itself was painted with Liquid Pearls watered down a little and brushed on.
I know that this post includes a LOT of pictures. All of these pictures were initially going to
be spread out to two different posts, but the Team is doing something a little different next week. Starting Monday, the Dreamweaver Design Team is posting CHA Sneek Peeks every day. That's right folks, EVERY day. There are a lot of gorgeous new stencils to see, so be sure to let your local store owners know which ones you like. Also, don't forget to enter the January Dreamweaver Challenge and win some great prizes! Look around at all the team's posts and get inspired. Come back and visit on Monday, okay?
be spread out to two different posts, but the Team is doing something a little different next week. Starting Monday, the Dreamweaver Design Team is posting CHA Sneek Peeks every day. That's right folks, EVERY day. There are a lot of gorgeous new stencils to see, so be sure to let your local store owners know which ones you like. Also, don't forget to enter the January Dreamweaver Challenge and win some great prizes! Look around at all the team's posts and get inspired. Come back and visit on Monday, okay?
Thursday, January 12, 2012
Valentine Challenge and One Stencil Four Ways
This year, we have new, monthly challenges. This month, the challenge is Valentine's Day. YOU have the whole month to come up with an answer to that challenge (a card, a decor object, a scrapbook page, or anything else that your heart can imagine) and link it to the Dream It Up! blog. There is a Mr. Linky on the bottom, so you should post your creation somewhere (blog, gallery, Snapfish, whatever), copy that site into the Mr. Linky and you are done! The best part? We are giving away TWO prizes--one for the most creative project (which may or may not be Dreamweaver related) and the other for the best use of Dreamweaver products. You have until January 31st at 11:59 PM EST, so get busy! The winners will be announced Feb 2nd.
So, about now you are thinking, geez, I would love to enter, but I only have one or two stencils, and I have used those before. I say, "No excuse!" I offer to you four different ways to use one (or two) stencils. These are in classes of I am teaching, and they feature LL 567 Heart Swirls.
EXAMPLE 1: Easy Metals
This one you have seen before. It was part of last week's post. The heart was created by running the stencil through my Cuttlebug with a Details Mat and Black Coated Aluminum. Then, it was sanded so that the silver color showed through. The background was created almost the same way, but instead of aluminum, I used Core'dinations cardstock. I spritzed the back with a little rubbing alcohol before I ran it through to sort of loosen the fibers of the paper. I used the large LX 7001 Damask Stencil. I distressed the edges of the paper and mounted it all. That was it. This card is part of my class at My Craft Room in Troy, MI this Saturday morning.
EXAMPLE 2: Double Glitter
This is a very easy, quick and fun technique. First, I soaped the back of the stencil to create a slight resist. (This makes it easy to remove fro m the Adhesive Paper later). I brushed off the "crumblies" created by the soap. I then removed one side of the backing on the Double Sided Adhesive Paper. I placed the stencil soap side down on the sticky side of the adhesive paper. I covered the entire thing with gold Art Glitter. (It doesn't have to be Art Glitter, but that is my favorite.) I tapped and then brushed the excess glitter off very well. I placed the whole thing stencil side down and carefully removed the paper, keeping the stencil flat on the table by "walking" my fingers along it. I poured crystal glitter over the whole thing. Then, I added the gems. The background on this one was made the same way as the last--I ran it through the Cuttlebug after spritzing the paper with a little alcohol. I didn't sand this one. I used the Plaid Stencil LX 7002. I am teaching this card in Jackson at Altered Art Addicts on Saturday, February 4th. (Of course, there are a few more cards with this, and I will post them later this month.)
EXAMPLE 3: Shiva Oil Sticks
For this example, I used black cardstock and Silver Shiva Oil Stick. These sticks are pure oil paint, so you have to remove the film with your fingernail before you begin. I did that, and then rubbed the newly exposed section on waxed paper to create a palette. I taped the stencil down with removable tape. Then, I used a stencil brush to pick up paint from the palette. I rubbed it around over the stencil to create the color on the black background. When it was all colored, I gently wiped the top of the stencil. Then, I used transluscent paste and a spatula to paste over the oil colors. Without the paste, the oil colors would take a long time to dry. The paste creates a barrier when it dries, which allows you to touch those colors. The bonus? While the paste is still wet, you can put the gems in it and they will stick. I am teaching this card in a class in Flint at Capture a Memory on Sunday, February 5th.
EXAMPLE 4: Double Glitter with Foil and Flock
The technique on this card is almost identical to that on the Double Glitter Card. I soaped up the back of the stencil. Then, I attached it to the Double Sided Adhesive Paper. This time, I used silver foil instead of just glitter. The foil that I used is NOT the Gold Leaf Foil, which is gorgeous, but must be used a little differently. This is the Stampee type foil, with the acetate backing. You use this foil by rubbing it, dull side down on something really sticky. You can use a glue pad, glue pen, glue powder or, as in this case, Double Sided Adhesive Paper. I put this foil (dull side down) on the open spaces of the stencil. First, I rubbed a little with my finger, and then I pushed it down the best I could with an Embossing Stylus. I pulled the foil backing up. Then, I used silver glitter to fill in the blanks. I brushed off the excess, turned the whole thing over and carefully peeled the paper off of the stencil. Then, instead of flooding the it with glitter, I used Stampendous Fun Flock in dark purple. The only tricky bit with the fun flock is to make sure that you use PLENTY ( Its okay, the stuff multiplies). Push down hard when you apply it to make it very plush. That's it. Easy, really. I am teaching this card as part of a class at the Stamp Peddler in Northville, MI on Saturday, January 21st.
So, now that you have seen a few different ways to use a single stencil, perhaps you should get that one you own out and create something for our challenge. Not enough inspiration? Well, take a look at the other Dreamweaver Team names on the left side of my blog. Visit them, too, and get inspired! I'll see you next week.....
So, about now you are thinking, geez, I would love to enter, but I only have one or two stencils, and I have used those before. I say, "No excuse!" I offer to you four different ways to use one (or two) stencils. These are in classes of I am teaching, and they feature LL 567 Heart Swirls.
EXAMPLE 1: Easy Metals

This one you have seen before. It was part of last week's post. The heart was created by running the stencil through my Cuttlebug with a Details Mat and Black Coated Aluminum. Then, it was sanded so that the silver color showed through. The background was created almost the same way, but instead of aluminum, I used Core'dinations cardstock. I spritzed the back with a little rubbing alcohol before I ran it through to sort of loosen the fibers of the paper. I used the large LX 7001 Damask Stencil. I distressed the edges of the paper and mounted it all. That was it. This card is part of my class at My Craft Room in Troy, MI this Saturday morning.
EXAMPLE 2: Double Glitter
This is a very easy, quick and fun technique. First, I soaped the back of the stencil to create a slight resist. (This makes it easy to remove fro
m the Adhesive Paper later). I brushed off the "crumblies" created by the soap. I then removed one side of the backing on the Double Sided Adhesive Paper. I placed the stencil soap side down on the sticky side of the adhesive paper. I covered the entire thing with gold Art Glitter. (It doesn't have to be Art Glitter, but that is my favorite.) I tapped and then brushed the excess glitter off very well. I placed the whole thing stencil side down and carefully removed the paper, keeping the stencil flat on the table by "walking" my fingers along it. I poured crystal glitter over the whole thing. Then, I added the gems. The background on this one was made the same way as the last--I ran it through the Cuttlebug after spritzing the paper with a little alcohol. I didn't sand this one. I used the Plaid Stencil LX 7002. I am teaching this card in Jackson at Altered Art Addicts on Saturday, February 4th. (Of course, there are a few more cards with this, and I will post them later this month.)EXAMPLE 3: Shiva Oil Sticks

For this example, I used black cardstock and Silver Shiva Oil Stick. These sticks are pure oil paint, so you have to remove the film with your fingernail before you begin. I did that, and then rubbed the newly exposed section on waxed paper to create a palette. I taped the stencil down with removable tape. Then, I used a stencil brush to pick up paint from the palette. I rubbed it around over the stencil to create the color on the black background. When it was all colored, I gently wiped the top of the stencil. Then, I used transluscent paste and a spatula to paste over the oil colors. Without the paste, the oil colors would take a long time to dry. The paste creates a barrier when it dries, which allows you to touch those colors. The bonus? While the paste is still wet, you can put the gems in it and they will stick. I am teaching this card in a class in Flint at Capture a Memory on Sunday, February 5th.
EXAMPLE 4: Double Glitter with Foil and Flock
The technique on this card is almost identical to that on the Double Glitter Card. I soaped up the back of the stencil. Then, I attached
 it to the Double Sided Adhesive Paper. This time, I used silver foil instead of just glitter. The foil that I used is NOT the Gold Leaf Foil, which is gorgeous, but must be used a little differently. This is the Stampee type foil, with the acetate backing. You use this foil by rubbing it, dull side down on something really sticky. You can use a glue pad, glue pen, glue powder or, as in this case, Double Sided Adhesive Paper. I put this foil (dull side down) on the open spaces of the stencil. First, I rubbed a little with my finger, and then I pushed it down the best I could with an Embossing Stylus. I pulled the foil backing up. Then, I used silver glitter to fill in the blanks. I brushed off the excess, turned the whole thing over and carefully peeled the paper off of the stencil. Then, instead of flooding the it with glitter, I used Stampendous Fun Flock in dark purple. The only tricky bit with the fun flock is to make sure that you use PLENTY ( Its okay, the stuff multiplies). Push down hard when you apply it to make it very plush. That's it. Easy, really. I am teaching this card as part of a class at the Stamp Peddler in Northville, MI on Saturday, January 21st.
So, now that you have seen a few different ways to use a single stencil, perhaps you should get that one you own out and create something for our challenge. Not enough inspiration? Well, take a look at the other Dreamweaver Team names on the left side of my blog. Visit them, too, and get inspired! I'll see you next week.....
Tuesday, January 10, 2012
And Now For Something a Little Different.....
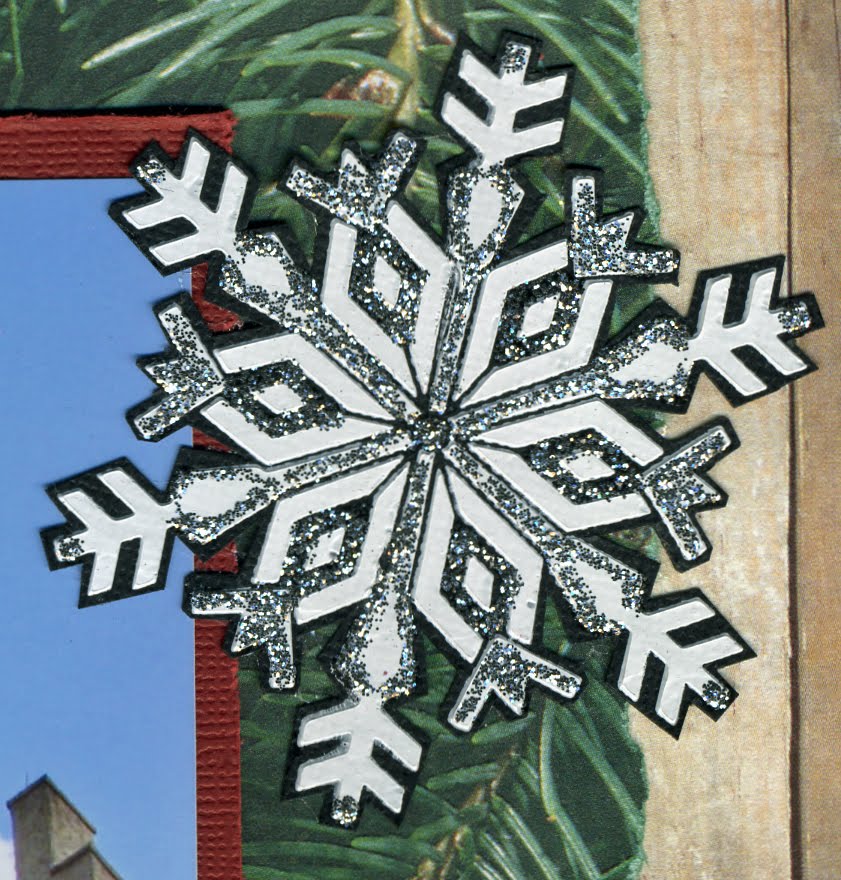
 It may come as a surprise to my followers that I have always considered myself a scrapbooker, NOT a card maker. Recently, I have joined a great group of online scrappers. The Disney Scrappers, as they call themselves, have reinvigorated my scrapbooking. Here it is, a layout that combines four of my passions: Disney, scrapbooking, the Silhouette Machine and Dreamweaver Stencils. These photos were from a trip to Epcot in November, just as the Christmas Decorations were being put up. I decided to reflect some of the decorations in the embellishments: snowflakes and ice skates.
The first st
 encil that I used was the Ice Skates Stencil LL 3016. I taped it down on top of black cardstock and right onto my craft sheet with removable tape. I actually taped it upside down because I wanted the skates to face in. I then got out my Dreamweaver Spatula and the original embossing paste. I placed some of the embossing paste above the stencil. I laid my spatula at a 45 degree angle from the table and pulled the paste over the stencil toward me. I made sure that the spatula was in contact with the stencil at all times. I tried to cover it all in one stroke. The remaining paste went right back into the container. After the paste was dry (about a half an hour) I colored the heels with a Copic marker and the blades and lace accents with a silver paint pen. The original paste takes all sorts of techniques. I trimmed around the edge, attached it to the page and added a brad.
The snowflakes used almost the same technique. Instead of the Original Embossing Paste, I used the Glossy White Embossing P
 aste.
aste.

It is more o
 paque (obviously shinier), and a little thinner in consistency. I always make sure that I work just a little quicker with the glossy paste because I find that it has more of a tendency to try and "bleed" under the stencil than the original. I pasted these stencils: LL 399 Antler Snowflake, LL 396 Gothic Snowflake, LL 398 Southwest Snowflake, and LS 26 Snowflake (which I pasted twice). When these were dry, I used silver Stickles to sparkle them up. You can see that I had fun using the stencilled snowflake with different patterns of Stickles.
 Oh, and I mentioned the Silhouette Machine (the best die cutting machine in the world). Well, that title? It was cut on my Silhouette. The font is a dingbat font called Prototype Community. It contains the original logos of everything in Epcot. If you are a Disney fan and a Silhouette user, you DEFINITELY need this font. I was also surprised that the Silhouette cut the mirror paper that I wanted to use. The top layer ripped just a little on some of the finer corners, but I think that may have been due to a slightly duller blade. I just fixed it up with a little gold paint pen.
So, I am hoping that you like my extra posting this week. I sure had fun with it. Don't worry, regular cardmaking fans, I am still going to post my usual on Thursday with the rest of the Dreamweaver Stencil Design Team. It is already scheduled, in fact. If anyone is visiting from Disney Scrappers, you can expect to see me A LOT more active in the near future. I love both groups--you inspire me. Here's hoping I inspired someone else. See you Thursday!
Wednesday, January 4, 2012
A Few Changes for 2012--January Challenge
Welcome to the first posting of the Dreamweaver Stencils' Dream Team 2012 ! We're changing things up a bit for this year, and YOU can help. The first Thursday of every month will feature our new challenge and will extend through the entire month. This means that YOU have ALL month to play along with the one challenge, as many times as you want. Sometimes it will be a color challenge, sometimes a theme, and sometimes a technique. We are hoping that an entire month will give you plenty of time to be inspired, create, and link to the Dream It Up! blog . Each month we are offering TWO prizes...one for the most creative version of the challenge (does not have to be Dreamweaver Stencils ' product, but we sure are happy when it is!), and the second for the best use of Dreamweaver Stencils ' product in the challenge. This could be stencils (of course), Embossing Pastes , Metallic F/X , the new Color Solutions , etc., anything you find on the Dreamweaver Stencils' web site , or in your local store. Don't know where your local store is? The list can be found on the web site . Not near any of the stores listed? There is also an online site to purchase from, Stencil with Style !For the month of January, we challenge you to create something for Valentine's Day! You have until January 31st, 11:59 PM EST, to post and link your creation(s) to the Dream It Up! Blog Mr. Linky. The winners will be announced February 2nd, along with the February challenge.
This month's challenge is Valentine's Day.
Here is my version of this month's challenge:
Wendy Jordan
Terrece Siddoway
Kristi Van Doren
Georgia Sommers
Lee Kellogg
Liz Martin
Cyndi Bundy
Cherylynn Moser
Jessie Hurley
This month's challenge is Valentine's Day.
Here is my version of this month's challenge:
 I chose to feature the cards that I am teaching in a January 14th class at My Craft Room in Troy, Michigan. While my focus is on the metals, I have a couple of extra techniques thrown in. Lets start on the left, shall we? For this card, I used two stencils. One, the candy hearts, can only be obtained by taking the class. I ran that stencil through my Cuttlebug with plain metal, dripped alcohol inks on it, and sanded it. The other was the Plaid Stencil LX 7002. I used that one with Adirondack Dye Inks to create the plaid on the background. The middle card also features that Plaid Stencil, this time run through the Cuttlebug with SEI Velvet Paper. It is difficult to see how beautiful it looks because velvet paper does not photograph well. Then, I used the Cuttlebug with the Cathedral Windows Small Stencil LJ 909 and fuschia coated aluminum. I sanded the metal and put it back through the Cuttlebug without a stencil to flatten it out. I put the metal face down on top of the Heart Swans Stencil LM 2000. I used the Mercart metal tools with the stencil to create the 3D swans. Then, I filled the back with Mercart Backing Paste and let it dry. Once dry, I pounced some alcohol ink right over the swan area to enhance and seperate them from the background. I then sanded the swans well, using the Mercart Fiberglass Tool when I had to get it very shiny in little areas.The final card in the row was the easiest. The background was created with Damask LX 7001 run through the Cuttlebug with Core'dinations Color Core paper and sanded. The Heart Swirls Stencil LL 567 was also run through the Cuttlebug, but with black coated aluminum. It, too was sanded. That was it. Simple, right?
Need more inspiration? Please visit the rest of our fabulous team listed here:
Pam Hornschu (our fearless leader)
Laura Drahozal (me)
Louise HealyWendy Jordan
Terrece Siddoway
Kristi Van Doren
Georgia Sommers
Lee Kellogg
Liz Martin
Cyndi Bundy
Cherylynn Moser
Jessie Hurley
Subscribe to:
Posts (Atom)


