Showing posts with label Double Glitter Technique. Show all posts

Thursday, January 14, 2016

A Dragonfly Birthday Card


Materials:
My Colors Card Stock in Cloak GreyHeidi Swapp Minc Foil in Holographic and Teal
Tombow Foam Tape
Heat Embossing Tool

Instructions:
1)  Fold your base 5 ½” by 8 ½ ” card stock, creating a top fold card.
2)  Either soap the back of all three stencils or cover them with Versamark.  You need to create a light film across the back that makes the stencils easy to remove from the adhesive on the mounting paper.
3)  Cut the mounting paper to match the sizes of each of the stencils.
4)  Remove one side of the coverings on the double sided mounting paper and place the stencils, soap or Versamark side down, on the paper.
5)  For the Happy Birthday and the Dragonfly stencils, place the Minc foil, dull side down, over the open places on the stencils and rub lightly.
6)  Use the embossing tool to rub over the top of the foil, pressing it down into the wells of the stencils.
7)  Remove the foil, and rub a little of the Micro Black Glitter over the foiled sections.
8)  Use the stencil brush to brush off the excess glitter.  Do this thoroughly.
9)  Place the foiled projects upside down on a flat surface and carefully peel the mounting paper off of the stencil.
10)  Cover the newly revealed sticky paper with Crystal Multi Glitter.
11)  Push the Aged Aqua Embossing Enamel into the wells on the Mosaic Swirls Stencil.  Do not brush off the excess.
12)  Carefully place the project upside down on a flat surface and remove the double sided mounting paper.
13)  Use the heat gun to emboss the Aqua Enamel.
14)  After the embossing has cooled, pour the Detail Black Embossing Powder over the exposed sticky surfaces.
15)  Heat Emboss
16)  Assemble the card, using the Tombow Tape to raise the sentiment.

Thanks for stopping by today.  I hope you enjoyed my card.

Check out the rest of the posts for today:

Louise Healy

Alison Heikkila

Kristine Reynolds

Pam Hornschu

Stampendous Blog

Thursday, November 26, 2015

Family Time with Friends Dreamweaver Cardinal Card

This week, the Stampendous team is posting on the theme "Family Time with Friends".  My post might not seem to fit that theme, but I can assure you that it does.  My grandmother always loved cardinals.  I lost her a year and a half ago, but will always think of her any time that I see cardinals, and I created this card with her in mind.  She also loved to sing.  She was asked to sing with the Tommy Dorsey Orchestra when she was only 17, but her father wouldn't allow it.  She still sang throughout her life, and even in the nursing home, she was known as the singing lady.  Me, well I continue the tradition.  Although I have never been a particularly great singer, I sing in a choir.  That is where the friends come in.  I sing with a group of fine men and women that I can call my friends.  Here is how I created my card.

Cardstock by Bazzill Basics Paper®
Double Sided Mounting Paper
Vegetable Based Soap
Scotch 1/2" Adhesive Tape
Glue Stick
Chameleon Markers in Grass Green and Spring Meadow
Manual Die Cut Machine

Instructions:

  1. Cut card base to 8 1/2" by 5 3/4" and fold at the side.
  2. Cut red card stock to 4 1/4" by 5 3/4".
  3. Stamp the red card stock with the Music Score Stamp using VersaMark.
  4. Stamp white card stock with the Sing Noel phrase using VersaFine.
  5. Cut the mounting paper to the size of the Cardinals N Holly Stencil.
  6. Rub the bar of soap directly on the back of the stencil to make it easier to release later.  When you are done, there should be a cloudy layer over the entire back of the stencil.
  7. Use your stencil brush to brush off any crumbly pieces of soap from the stencil.
  8. Peel one side of the mounting paper and lay the Cardinals N Holly stencil on top of it, soap side on the sticky paper.
  9. Carefully lay small piles of glitter next to the stencil wells that you want to color.  For example, the green glitters should be in/next to the holly sections of the stencil.
  10. Gently push the corresponding colors of glitter into the wells.  Remember that only the first color on any sticky section will color that area.  Push the glitter down slightly.
  11. Use your stencil brush to brush off any excess glitter.
  12. Place the project face down on a flat surface.
  13. Carefully peel a corner up from the edge of the stencil and use it to gently remove the mounting paper from the stencil.
  14. Pour the white pearl glitter over the newly exposed sticky paper.
  15. Brush off any excess glitter.
  16. Remove the backing paper and adhere the glittered Cardinals N Holly to black card stock.
  17. Run green card stock through your die cut machine with the Holly Die.
  18. Color the holly leaf with Chameleon Pens.
  19. Use the glue stick on top of the holly leaf and cover with crystal glitter.
  20. Create green and black mats for your main images and adhere them.
  21. Attach the music score to the card base and the images to the music score. Use the die cut holly under the words and overlapping the cardinal mat.
Since this post actually got up very late on Thanksgiving, I am including the links for Thursday AND Friday:

THURSDAY'S POSTS


FRIDAY'S POSTS


Thursday, October 22, 2015

Dreamweaver Thursday and Nathalie Kalbach Stamps

Although I am not technically playing along with the Nathalie Kalbach blog hop today, I was inspired to use one of her stamps on my Dreamweaver Thursday card.  Here it is:


Stampendous:
SSC1190 Say It Today Perfectly Clear Stamps™
NKCRS05 Cling Kaffee Klatsch
SSH57 Jumbo Perfectly Clear™ Acrylic Handle
Sparkle Puff Embossing Powder
Blue Tinsel Embossing Powder
Micro Glitter in Black, Teal and China Blue
Jewel Royal Ultra Fine Glitter
Pearl White Ultra Fine Glitter
Versamark Ink
Plus:
Cardstock by Bazzill Basics Paper®
Double Sided Mounting Paper
Vegetable Based Soap
Scotch by 3M 1/2" Adhesive
Embossing Heat Tool
Scissors
Paper Trimmer

Instructions:

  1. Cut the base 8 1/2" by 5 1/2" and fold in half on the side.
  2. Cut the Double Sided Mounting Paper to fit the Peacock Feather Stencil.  Leave it in a rectangle shape.
  3. Using the Acrylic Handle and Versamark Ink, stamp the Thank You from the Say It Today stamp set onto white paper.
  4. Pour Blue Tinsel Embossing Powder over the Thank You and shake off the excess.
  5. Emboss with the embossing tool.
  6. Using the Acrylic Handle and Versamark Ink, stamp the doily from the Kaffee Klatsch stamp set several times over green paper.
  7. Pour the Sparkle Puff Embossing Powder over the stamped images and shake off the excess.
  8. Heat with the embossing too until the powder turns white and puffs up.
  9. Rub the bar of soap on the back of the Peacock Feather Stencil.  You should have a light film of soap all across the back of the stencil when you are finished.
  10. Use the brush to gently remove the soap "crumbles" off the back of the stencil.
  11. Remove the backing from one side of the mounting paper, revealing the adhesive.
  12. Place the stencil, soap side down, on the adhesive side of the paper.
  13. Pinch some of the black glitter into the "eye" of the peacock feather.
  14. Continue to pinch glitter colors into the wells of the feather stencil.
  15. When all of the stencil wells appear to be covered, rub it in a little with your finger.
  16. Brush off any excess glitter.
  17. Place the project upside down on a hard, flat surface.
  18. Peel a little of the mounting paper from the a corner of the stencil.
  19. Using this piece, slowly remove all of the mounting paper from the Peacock Feather Stencil, while leaving the stencil flat.
  20. Pour the White Pearl Glitter over the top of the feather, brushing off the excess.
  21. Remove the backing from the project and attach it to white card stock.
  22. Use scissors to trim the feather and the Thank You words close to the images.
  23. Assemble the card.

  Here are the other folks posting for the Dreamweaver Thursday today:


Thursday, September 17, 2015

Tombow fun!

Welcome to our Tombow pre-hop event!  I just love the Tombow coloring products.  On today's post, I used a couple of really fun techniques.

For the background, I used the Snowflake Sky rubber stamp.  I stamped it twice with Versamark Ink on watercolor paper.  I then embossed it with Clear Embossing Powder, using my heat tool.  I colored with my Tombow Dual Brush Markers colors 743, 703 and 665 directly onto the color blending palette.  I then used a water brush to pick up the colors and paint them over the embossed surface.  This created that pink snowflake background.
The tree was created by using the Double Glitter Technique with Heidi Swapp Minc foils.  I soaped up the back of my Ornate Christmas Tree Stencil.  You can use any natural soap, but I used the Handmade Hawaiian Soap.  I made sure that the entire stencil back was cloudy looking, and then I brushed off the excess soap bits with my stencil brush.   Then, I placed the stencil on one side of the Double Sided Mounting Paper.  I pressed the foils into the wells of the stencil using my fingers and my small embossing tool.  I used pink, mint green, and gold foils.  When I felt that I had used all the foil I could, I covered the entire project with Micro Silver Glitter.   I brushed off the excess.  Then, I put the project stencil side down on a flat surface.  I carefully peeled the paper off of the stencil, while leaving the stencil flat.  Then, I covered the entire project with Crystal Glitter.  After that, I just assembled the card.
I hope you enjoyed the post today.  Thanks for stopping by.  Check out the other posts for tday:

Thursday, June 25, 2015

Flowers and Fairies Week


This week, the Stampendous Theme is "Flowers and Fairies".  I used one of my favorite stencils, Tall Poppies LL3023.  I did receive this stencil for free, along with many others, while I worked on the Dreamweaver Design team.  However, even if I hadn't, I would have likely purchased this one. 
     For today's post, I used the Double Glitter Technique.  First, I soaped the back of the stencil with Handmade Hawaiian Soap.  Then, I gently brushed off the excess soap pieces with a Large Stencil Brush.  The soap acts as a release agent so that you can get the stencil off later. I removed the covering from one side of the Double Sided Mounting Paper and placed the stencil on it, soap side down.  I carefully laid the glitter on the stencil next to the areas I wanted it to fill and carefully pushed it in.  For the black in the center of the poppy, I used the edge of my craft knife to lay it in the area. I rubbed all the colored glitter in with my fingers and then brushed off the excess glitter.  I laid the project stencil side down on a flat surface and carefully removed the paper from the stencil.  Then, I poured White Pearl Glitter over the top of the whole project and brushed off the excess.  The orange border and "distressing" was created by layering the flower project over a slightly larger piece of mounting paper and covering that edge with Tiger Lily Pearl Glitter.  Because the Tiger Lily was a finer glitter than the white, it crept into some of the empty spaces on the original mounting paper.  The glitter colors I used were:  Red Micro Glitter, Black Micro Glitter, Green Micro Glitter, Lime Micro Glitter, Emerald Pearl Glitter, Tiger Lily Pearl Glitter and White Pearl Glitter.  Then, I assembled the card and added some cord and beads.
     I hope you liked my card today.  Leave a comment if you have a minute. Please go check out the posts from the rest of the group today, too:

Thursday, January 1, 2015

The Birth of a New Year, and a special message

HAPPY BIRTHDAY, LYNELL!

Our theme this month, in honor of the birth of a new year, is "Happy Birthday"!  Since Lynell, the Queen of Stencils has a birthday this week, many of us have decided to use our birthday card to wish her a great year on our blogs.  Here is my Lynell Birthday Card:
 
 
 I used three stencils:  LX 7001 Damask, LJ 916 Butterfly, and LM 150 Happy Birthday. I pasted the Happy Birthday with Glossy Black Embossing Paste and the Damask with Silver Metallic Embossing Paste, which I sprinkled with a microfine teal glitter in spots while the paste was still wet.  When pasting, you need to tape the stencil down with the Removable Tape and use the LM 2010 Paste Spreader to move the paste over the stencil.
The butterfly was created with the Double Glitter Technique.  For this technique, you need Double Sided Mounting Paper, a Large Stencil Brush, a stencil, and, of course, lots and lots of glitter!  It is one of my favorite techniques!  (Aside from metal, of course.....)  You can see how glittery this card turned out in this close up.  The Silver Metallic paste is plain on the left side of the picture and glittered on the right.

 
Well,  I hope I could inspire you to get a head start on all of those birthday cards for the year.  If so, be sure to add a link on the Dream It Up! site for your chance to win!  Using Dreamweaver Stencils will give you an extra chance, so give it a try!  You never know what you could do unless to make the effort.
 

Thursday, December 18, 2014

Quick and Cute Revisited

In a flurry of a hurry? This month the Dream Team are all about the Quick and Cute...whether that be cards, gifts, wrapping, or tags...we have sleigh-loads of ideas! Play along by posting your creations using the Inlinkz tool on the Dream It Up! blog, for a chance to win the stencil of your choice, and a possible bonus stencil for using Dreamweaver products in your Quick and Cute project! Here's what fun I've been up to this week:

This is actually a three year old project, but it was very popular in classes, and I don't think I have ever posted it.  This card was so simple, that many of my students used it as their Christmas card! 
It was created with one of my favorite stencils, LL3009 Christmas Script.  I also needed Double Sided Mounting Paper, Coconut Soap and a Large Stencil Brush.  I used the Double Glitter Technique with Microfine Opaque Art Glitter in Rouge and Ultrafine Transparent Art Glitter in Lion's Mane.  The striped paper is My Mind's Eye Lost & Found Christmas collection, but you could use any paper that appeals to you.  Also, you could match the glitter and ribbon to that paper.
Thanks for stopping by.  It really isn't too late to make a last minute Double Glitter card for someone special!
Now, check out the other members of the team to see what fun they have been up to.  Here is this week's link list:
 

Thursday, December 4, 2014

Quick and Cute Week One

In a flurry of a hurry? This month the Dream Team are all about the Quick and Cute...whether that be cards, gifts, wrapping, or tags...we have sleigh-loads of ideas! Play along by posting your creations using the Inlinkz tool on the Dream It Up! blog, for a chance to win the stencil of your choice, and a possible bonus stencil for using Dreamweaver products in your Quick and Cute project! Here's what fun I've been up to this week:


If you follow the blogs regularly, you might wonder if this is REALLY "Quick and Cute".  After all, I have used four different stencils:  LX 7002 Plaid, LL 3005 Holly and Swirls, LL 589 Musical Christmas and LM 139 Happy Holidays.  It also uses a couple of different techniques:  Double Glitter with a pigment ink enhancement, simple die cut machine embossing with the Stamping Details Rubber Embossing Mat, metals (copper coated aluminum) and Color Solutions Alcohol Inks (in Crème Brulee and Darkest Brown), and paste embossing with Silver Embossing Paste.  Happily, this actually was very quick for me.  You see, I save all the left over pieces from classes and rejected ideas and cards.  I simply had to sand down the metal on the musical piece and cut it with the Dreamweaver Die Cut DD001 Nesting Frames and then trim things up and assemble.  So, I guess what I am saying is that you, too, should save your rejects and extras.  You never know when you can put them to use.  It is quick and cute.
 
I'd love to receive a comment from you before you head on to the rest of the "A" team:


Thursday, April 3, 2014

April Inspirations!

We're already into April, and no foolin', the Dream Team has a spectacular month planned for you...filled with exciting news and inspiration for all of your crafting dreams! The exciting news will be announced in the Dream It Up! post on April 17th, but the "April Inspirations" challenge will run for the entire month. Each team member will post what inspires them in their creative life...maybe a Pinterest pic, a magazine pic, a quote, a book, a place, an artist, a crafter friend...along with their creation. We are hoping that you will feel inspired as well, and link your projects (and inspiration) to the inlinkz tool on the Dream It Up! blog. Check out what our Guest Designer and the "A" team has been inspired by for this week...


Here is my inspiration:
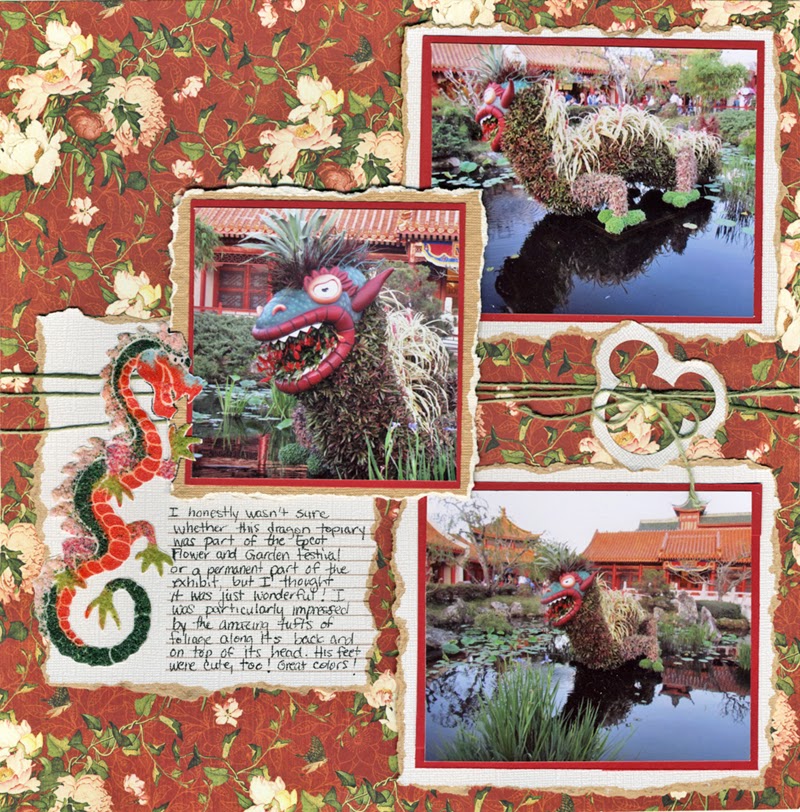
Yes, it is actually a photo that I took at Epcot.  I always look to my pictures to inspire my embellishments, and this time was no exception.  
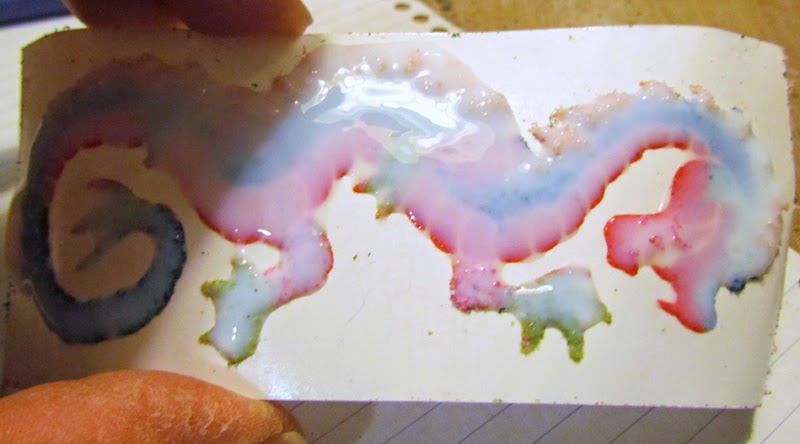
Here is the embellishment that I created using Dreamweaver Stencils:


See how I tried to match the topiary in the picture?
Here is how it fits on my scrapbook page:


I have a quick (mostly visual) tutorial of the embellishment.

MATERIALS:

Art Glitter Ultrafine Pearlescent 188 Black Vinyl
Ultra Fine Flower Soft in Sage, Pine, and Raspberry Fizz
Flower Soft in Baby Pink
Globecraft Glastique in Matte (or some other finishing glaze)
Pointed Scissors

DIRECTIONS:

1)  Rub the soap on the back of the stencil.  You will see a light filmy coating over the metal.  This will help to get the stencil off of the paper later.

2)  Use the large stencil to brush the "crumblies" of soap off of the stencil.


 3)  "Crack" open one side of the mounting paper covering and peel it off.


 4)  Place the stencil on the paper, soap side down.


5)  Carefully place the embossing powder into place.


 6)  Rub the embossing powder into place with your finger.


7)  Repeat steps 5 and 6 with the rest of the powder, glitter (in eyes), and Flower Soft.


8)  Press down all the material one last time.


9)  Brush off the excess material with the large stencil brush.


 10)  Place the project stencil side down on a smooth, flat surface and carefully peel the paper off of the stencil.


 11)  Cover the entire project with Glastique.  (In retrospect, I could have trimmed the project before this step.) Then, let it dry over night.


12)  Trim around the embellishment.  You can get very close and nothing should fall off.  The great thing about this project is that you can still see the textures you created with the Flower Soft.  Also, the embellishment is a sticker!


I hope you enjoyed my "inspired by" project.  I am not sure it is what our Fearless Team Leader Pam had in mind with this challenge, but, honestly, when I scrapbook I take all of my inspiration from the pictures!  Of course, with stencils I can make the perfect embellishment for any situation!  Don't forget to check out the links above to see what inspires the rest of the team.  Here's wishing you a month full of inspiration!

Thursday, October 17, 2013

Mysterious and Magical October

Are you ready to be spooked, mystified and magically transported to the land of Halloween and holidays? Hop on board the Dream Team train as we journey through all things Mysterious and Magical through the month of October. Our guest "engineer" is Miss Eerie herself, Alison Heikkila. October promises to be a very bumpy ride...

Okay, okay....I DO realize that this was supposed to be the month of spooky creations, but I was experimenting with a new technique and I loved it.  How could I not show you this card?

 I used the new LL3036 Great Pumpkin Stencil and the LM 295 Autumn Stencil.  First, I did the Double Glitter Technique using Handmade Hawaiian Coconut Soap, a large stencil brush, and Double Sided Mounting Paper.  I used Art Glitter for the whole project.  For the Autumn stencil, I used Microfine Opaque Glitter in Monarch.  The Microfine Glitter made the word appear crisp.  When I removed it and applied Ultrafine Transparent Crystal Glitter, I was finished with the word.
 The "new" technique was used with the pumpkin.  I also used the Double Glitter Technique on this one.  I used a much larger glitter first--Dazzlers in Peppa and Clover Leaf.  Before removing the stencil, I added Ultrafine Opaque Glitter in Copper Canyon and Jungle.  Then, I used Microfine in Monarch and Bavarian Forest.  I removed the stencil and added the Crystal Glitter to the background.  Then, I replaced the stencil and pasted it with Translucent Embossing Paste.  I needed the Removable Tape and the Palette Knife for this.  While the paste was still wet, I tossed a little Transparent Ultrafine Glitter in Melone and Ensalada on it.
What makes the new technique interesting?  Layers of colors and depth.  If you have lots of glitter and a little time, you should give it a try.  It is addicting.

Meanwhile, visit the other blogs for today: