Today, I am sharing another scrapbook page. This time, it is from my latest trip to Disney World and features the Port Orleans French Quarter Resort Hotel--where it is Mardi Gras all the time! Of course, Mardi Gras paper is sometimes hard to find here in Michigan. What did I do? Well, I used some subtly printed paper from the DCWV Timeless Treasures Pack as a base to create my own. I stenciled with my Dreamweaver Stencils, Stamped with Hero Arts and Stampabilities, and even used my Silhouette auto trace and cut out the title, but the thing that brought it all together was my Globecraft Piccolo Embossing Powders and Embossing Adhesive. Take a look:
And the facing page is here:
The gold is actually the same, but they were photographed under two different lighting situations. To check out how I did any of the parts, go HERE for the tutorial. Thanks for looking!
Showing posts with label Silhouette Machine. Show all posts
Tuesday, June 11, 2013
Tuesday, November 20, 2012
A Globecraft Napkin Ring
This is my first post as a member of the Globecraft Memories Design Team! As with my other design teams, I am sure that it won't be long before you discover which products I truly love the most. I will tell you right now with Globecraft that I just ADORE the 3D Enamel Gels. That what I have chosen to feature first here, and on the Globecraft blog.
MATERIALS:
Globecraft Memories 3D Enamel Gel in Dark Green
Globecraft Memories 3D Enamel Gel in Napthol Red
Globecraft Memories 3D Enamel Gel in Orange
Globecraft Memories 3D Enamel Gel in Bright Yellow
Globecraft Memories Glastique
Globecraft Memories Enamel Powders in Copper Kettle
Globecraft Piccolo Enamel Powder Adhesive
Globecraft Piccolo Maple Leaf Bezel
Adirondack Metallics Acrylic Paint Dabber
Paint Brush
Silhouette Digital Die Cut Machine
Samantha Walker Leaf Border Design
Kraft Paper
Craft Knife
Ruler
Pencil
Scissors
Inkessentials Craft Sheet
Manual Die Cut Machine (I used the Cuttlebug)
Texture Folder (I used Tim Holtz Alterations in Regal Flourish)
Toilet Paper Roll
2 Small and 2 Medium Binder Clips
DIRECTIONS:
1) Measure the width that you want the napkin ring to be. I used 1 1/4". Mark toilet paper roll with pencil and cut, first a rough cut with craft knife, and then refine with scissors.
2) Paint the maple leaf bezel and the toiled paper roll piece (will be referred to as napkin ring from here out) with the Copper paint. You will need to unscrew the top and use a brush in the bottle to get the inside of the napkin ring. Let dry.
3) Use manual die cut machine and texture folder with the leaf.
4) Put fall colors of 3D Enamel Gel in stripes on top of leaf.
5) Use finger to blend colors.
6) Wipe off excess color with a finger covered in paper towel and ran gently across project. Let dry.
7) Decide on a pattern that will fit on the napkin ring and cut, using the Silhouette or another digital die cutting machine. Cut from kraft paper.
8) Cover kraft paper with Enamel Embossing Powder Adhesive and embossing powder. Heat set.
9) Use Glastique to glue the border pattern onto the napkin ring. Let dry. You may have to clamp.
10) Add the leaf pattern on the top using Glastique. Clamp with medium sized binder clip.
That's it! A simple little upcycle.
Thanks for stopping by today, I hope you enjoyed my project. The best part? If you don't want to store the napkin rings after the holidays, you can toss the ring section and keep that gorgeous bookboard leaf for another project! Check one out at the Globecraft Blog.
MATERIALS:
Globecraft Memories 3D Enamel Gel in Dark Green
Globecraft Memories 3D Enamel Gel in Napthol Red
Globecraft Memories 3D Enamel Gel in Orange
Globecraft Memories 3D Enamel Gel in Bright Yellow
Globecraft Memories Glastique
Globecraft Memories Enamel Powders in Copper Kettle
Globecraft Piccolo Enamel Powder Adhesive
Globecraft Piccolo Maple Leaf Bezel
Adirondack Metallics Acrylic Paint Dabber
Paint Brush
Silhouette Digital Die Cut Machine
Samantha Walker Leaf Border Design
Kraft Paper
Craft Knife
Ruler
Pencil
Scissors
Inkessentials Craft Sheet
Manual Die Cut Machine (I used the Cuttlebug)
Texture Folder (I used Tim Holtz Alterations in Regal Flourish)
Toilet Paper Roll
2 Small and 2 Medium Binder Clips
DIRECTIONS:
1) Measure the width that you want the napkin ring to be. I used 1 1/4". Mark toilet paper roll with pencil and cut, first a rough cut with craft knife, and then refine with scissors.
2) Paint the maple leaf bezel and the toiled paper roll piece (will be referred to as napkin ring from here out) with the Copper paint. You will need to unscrew the top and use a brush in the bottle to get the inside of the napkin ring. Let dry.
3) Use manual die cut machine and texture folder with the leaf.
4) Put fall colors of 3D Enamel Gel in stripes on top of leaf.
5) Use finger to blend colors.
6) Wipe off excess color with a finger covered in paper towel and ran gently across project. Let dry.
8) Cover kraft paper with Enamel Embossing Powder Adhesive and embossing powder. Heat set.
9) Use Glastique to glue the border pattern onto the napkin ring. Let dry. You may have to clamp.
10) Add the leaf pattern on the top using Glastique. Clamp with medium sized binder clip.
That's it! A simple little upcycle.
Thanks for stopping by today, I hope you enjoyed my project. The best part? If you don't want to store the napkin rings after the holidays, you can toss the ring section and keep that gorgeous bookboard leaf for another project! Check one out at the Globecraft Blog.
Tuesday, November 6, 2012
Placecards and a Mini Gratitude Album
Here I have a dual project--a set of Thanksgiving placecards and a Mini Gratitude Album. Here are the placecards, and there will be an image and a link to where you can find the album at the end of the post.
MATERIALS:
Art Glitter Designer Dries Clear with Fine Metal Tip
Art Glitter Ultrafine Opaque 55 Hot Lava
Art Glitter Ultrafine Opaque 347 Golden Orange
Art Glitter Microfine Opaque 514 Bavarian Forest
Part of a Mat Stack (I used DCWV Autumn Melody)
White Cardstock
Manual Die Cut Machine
Placecard Die from Lifestyle Crafts
Oval Die from Lifestyle Crafts
Silhouette Machine with Pumpkin Pattern (any decorative pattern and die cut machine would work)
Decorative Die or Silhouette pattern for edging
Xyron Machine--any size
Archival Ink in Coffee Brown
Journalling (lined) stamp (mine was from Stampabilities)
Scissors
Repositional Adhesive (optional)
DIRECTIONS:
1) Cut the required number of placecards out of white cardstock
2) Cut ovals out of white--be sure and have a few extra
3) Cut half of a placecard from enough prints of mat stack so that each placecard will have a print over half of it. Be sure and line this up so that the pattern will be vertical when applied to the placecard. Also, cut one large enough piece that you have an extra circle.
4) Cut extra circle from the placecard it is attached to.
5) Put repositional adhesive on the back of the circle. Open a placecard and glue circle over the center circle on the placecard. If you are not using glue, just carefully position the circle.
6) Use Archival Ink to stamp the lines over the inside of the placecard.
7) Repeat steps 5 and 6 with all your placecards.
8) Close the placecard.
9) Glue the print half over the correct place on the white cards.
10) Cut out the pumpkin and decorative edge patterns from white cardstock. The decorative edge that I used was from Samantha Walker in the Silhouette Store and had scoring on the center line to make it easier to fold.
11) Place decorative items face down into Xyron machine.
12) Remove edging and cover with Golden Orange Glitter
13) Remove pumkins and place stems before covering with Hot Lava Glitter.
14) Use Designer Dries Clear to write names on ovals and cover with Bavarian Forest Microfine Glitter. Microfine will retain the tiny details. Push down just a little after it is applied to make sure that it is secure. Let dry.
15) Use Designer Dries Clear to add green to stems of pumpkins. Let dry.
16) Cut the decorative edging to fit the placecards and use Designer Dries Clear to attach it.
17) Place pumpkins face up into Xyron. Attach to circle.
18) Use Designer Dries Clear to make an edging on the oval and the circle in Goldilocks. Let dry.
19) Attach oval in place.
The intent of these placecards is that the person will fill in what they are grateful for and at the end of the night, they are placed in a mini album where they can be read over and over. A picture would be added to the other side. Here is a photo of my mini album.
You can find my whole post on the album at the Art Glitter Blog.
MATERIALS:
Art Glitter Designer Dries Clear with Fine Metal Tip
Art Glitter Ultrafine Opaque 55 Hot Lava
Art Glitter Ultrafine Opaque 347 Golden Orange
Art Glitter Microfine Opaque 514 Bavarian Forest
Part of a Mat Stack (I used DCWV Autumn Melody)
White Cardstock
Manual Die Cut Machine
Placecard Die from Lifestyle Crafts
Oval Die from Lifestyle Crafts
Silhouette Machine with Pumpkin Pattern (any decorative pattern and die cut machine would work)
Decorative Die or Silhouette pattern for edging
Xyron Machine--any size
Archival Ink in Coffee Brown
Journalling (lined) stamp (mine was from Stampabilities)
Scissors
Repositional Adhesive (optional)
DIRECTIONS:
1) Cut the required number of placecards out of white cardstock
2) Cut ovals out of white--be sure and have a few extra
3) Cut half of a placecard from enough prints of mat stack so that each placecard will have a print over half of it. Be sure and line this up so that the pattern will be vertical when applied to the placecard. Also, cut one large enough piece that you have an extra circle.
4) Cut extra circle from the placecard it is attached to.
5) Put repositional adhesive on the back of the circle. Open a placecard and glue circle over the center circle on the placecard. If you are not using glue, just carefully position the circle.
6) Use Archival Ink to stamp the lines over the inside of the placecard.
7) Repeat steps 5 and 6 with all your placecards.
8) Close the placecard.
9) Glue the print half over the correct place on the white cards.
10) Cut out the pumpkin and decorative edge patterns from white cardstock. The decorative edge that I used was from Samantha Walker in the Silhouette Store and had scoring on the center line to make it easier to fold.
11) Place decorative items face down into Xyron machine.
12) Remove edging and cover with Golden Orange Glitter
13) Remove pumkins and place stems before covering with Hot Lava Glitter.
14) Use Designer Dries Clear to write names on ovals and cover with Bavarian Forest Microfine Glitter. Microfine will retain the tiny details. Push down just a little after it is applied to make sure that it is secure. Let dry.
15) Use Designer Dries Clear to add green to stems of pumpkins. Let dry.
16) Cut the decorative edging to fit the placecards and use Designer Dries Clear to attach it.
17) Place pumpkins face up into Xyron. Attach to circle.
18) Use Designer Dries Clear to make an edging on the oval and the circle in Goldilocks. Let dry.
19) Attach oval in place.
The intent of these placecards is that the person will fill in what they are grateful for and at the end of the night, they are placed in a mini album where they can be read over and over. A picture would be added to the other side. Here is a photo of my mini album.
You can find my whole post on the album at the Art Glitter Blog.
Tuesday, October 16, 2012
Art Glitter and Globecraft Love Charms Book
MATERIALS
Book (I used a spiral bound journal)
Enough crushed panne fabric to cover book, front and back
Foam packaging scrap large enough to cover book, if desired
8" by 10" Muslin Fabric
Xyron Creatopia
Xyron Fabric Adhesive
One Sheet White Cardstock
Silhouette Machine
Silhouette Machine Clean Cut Fabric Interfacing
One Globecraft Memories Piccolo Delicate Hearts Earrings Set
Two Globecraft Memories Vintage Heart Charm Sets
Globecraft Memories Card Decor Set #4
Globecraft Memories Enamel Powder Adhesive
Globecraft Memories Piccolo Powders in Vintage Silver
Globecraft Memories Piccolo Powders in Siam Silver
Globecraft Memories Piccolo Powders in Vintage Gold
Globecraft Memories Piccolo Powders in 24K Gold
Globecraft Memories Cool-Set Enameling Gel in Purple Mist
Globecraft Memories Glastique
Art Glitter Designer Dries Clear Adhesive with Fine Tip
Art Glitter Dries Clear Fabric Adhesive with Fine Tip
Art Glitter Microfine Opaque 516 Gold Tone
Art Glitter Microfine Opaque 508 Silver Moon
Art Glitter Vintage Glass Glitter 903 Alexandrite
Small White Heart Shaped Brads
One Large Silver Brad
Heat Gun
Iron
Big Bite
Scissors
Craft Knife
Large Stencil Brush
2" 22 Gauge Wire
Tape Roller
DIRECTIONS:
1) Cut panne fabric about 1" larger than the book both vertically and horizontally. You will be cutting one piece for the whole thing, so be sure to open the book and measure it all the way around before you cut.
2) Cut foam packaging to fit over covers and spiral binding, if desired. Apply with Designer Dries Clear. I felt that I needed the foam to cover the spiral edge. I would not recommend this step unless you have the same circumstances.
3) Use the Embossing Fluid and the 24K Gold Powder to emboss the heart shape.
4) Use Designer Dries Clear to adhere the heart shape to white cardstock. Let dry.
5) Use Glastique on the outer portion of the heart. Fill with Vintage Glass Glitter. Let dry.
6) Use Cool-Set Enameling Gel in the center heart. Let Dry.
7) Cover the Vintage Glass with Glastique. Let Dry.
8) Iron the Clean Cut Fabric Interfacing on muslin.
9) In Silhouette Studio Program, create the words and cut. I used the font Bradley Gratis. This step can be skipped if you have another way to cut out the muslin--either by hand or another machine.
10) Set the cut out muslin in position on panne and iron on.
11) Use your Art Glitter Fabric Adhesive to add the Goldtone Microfine Glitter to the words. Set aside to dry.
12) Use Microfine Silver Moon Glitter around the edges of words. Let dry.
13) Cut two straps from the cardstock. They will wrap around the binding and onto the back.
14) Using the Globecraft Embossing Fluid and your heat gun, emboss the straps, and all the remaining Globecraft Memories Elements EXCEPT the keys with Vintage Gold or Vintage Silver Embossing Powder.
15) Emboss the keys with 24K Gold and Siam Silver Embossing Powder. We switched the embossing powder because this one is more detailed, which suits the detailed keys better.
16) Make sure that all the glue is dry before you proceed. Send the leather through the Xyron Creatopia with the fabric adhesive.
17) Be very careful while removing from the background paper and covering the book. Use the extra fabric to wrap under the edges. Panne does stretch and can cling to itself. If this happens, carefully pry it off of itself and carefully press on the book. It will NOT be perfect.
18) Use the Art Glitter Fabric Adhesive to attach all of the embossed pieces except the keys.
20) Use Big Bite to create holes for brads.
21) Attach brads, leaving one just a little loose to attach the key.
22) Use Cool-Set Enamel to cover the heart shaped brads. Let dry.
23) Use wire to attach the keys from a brad.
24) Brush off any extra glitter with stencil brush and remove remnants with tape roller.
I realize that this project is a little intense, but it can be modified in any way that you like. It is your book, so enjoy its creation. I loved making it so much, that I have created a second one, pictured here.
If you want to see how I did the second one, check out my the Art Glitter blog at http://artglitterblog.blogspot.com/ See you later, glitter on!
Tuesday, September 4, 2012
Just One (Glittering) Bite.......
Here are the simple instructions:
MATERIALS:
One Plastic Apple
Spray Adhesive
Assorted Gemstones. I used purples, green, black and orange gems and light greenish pearls.
Silhouette Machine, or some other way to cut letters
Cardstock
Xyron X Machine with Permanent Adhesive
Art Institute Designer Dries Clear Glue
Ultrafine Metal Tip for Glue
Art Glitter Microfine 519 Reed
Art Glitter Microfine 507 Black Wing
Art Glitter Ultrafine Opaque 256 Purple Passion
Art Glitter Ultrafine Pearlescent 309 Canary
Art Glitter Ultrafine Opaque Neon 223 Fishnet
DIRECTIONS:
1) Spray apple with adhesive
2) Cover with Reed glitter. I did not get mine perfect, which was fine, because it was a Halloween project.
4) Place the letters into the X upside down. The adhesive will be on the top of the letters.
5) Put letters into the Black Wing Glitter and press down hard. Use the Designer Dries Clear to touch up any areas that you might have missed. Let dry.
6) Put letters face up into the X to get adhesive on the back.
7) Make a "label" area on the apple where you might want the words and glitter with Canary. Let dry.
8) Adhere the letters in place.
9) Adhere gemstones around the apple in no particular pattern.
10) Starting with the top of the apple, surround some of the gemstones with Designer Dries Clear and the fine tip. Expand the sections of glue until they look like drips. This is freehand and should look a little messy. Cover with Canary. Let dry.
11) Repeat step 10 a little further down, but use Purple Passion. Also, use Purple Passion around the "label" section. Let dry.
12) Repeat step 10 a little further down with Fishnet. Let dry.
13) Brush off any excess glitter. You are done!
Here are a couple more pictures:
Tuesday, January 10, 2012
And Now For Something a Little Different.....
It may come as a surprise to my followers that I have always considered myself a scrapbooker, NOT a card maker. Recently, I have joined a great group of online scrappers. The Disney Scrappers, as they call themselves, have reinvigorated my scrapbooking. Here it is, a layout that combines four of my passions: Disney, scrapbooking, the Silhouette Machine and Dreamweaver Stencils. These photos were from a trip to Epcot in November, just as the Christmas Decorations were being put up. I decided to reflect some of the decorations in the embellishments: snowflakes and ice skates.The first st
encil that I used was the Ice Skates Stencil LL 3016. I taped it down on top of black cardstock and right onto my craft sheet with removable tape. I actually taped it upside down because I wanted the skates to face in. I then got out my Dreamweaver Spatula and the original embossing paste. I placed some of the embossing paste above the stencil. I laid my spatula at a 45 degree angle from the table and pulled the paste over the stencil toward me. I made sure that the spatula was in contact with the stencil at all times. I tried to cover it all in one stroke. The remaining paste went right back into the container. After the paste was dry (about a half an hour) I colored the heels with a Copic marker and the blades and lace accents with a silver paint pen. The original paste takes all sorts of techniques. I trimmed around the edge, attached it to the page and added a brad.The snowflakes used almost the same technique. Instead of the Original Embossing Paste, I used the Glossy White Embossing P
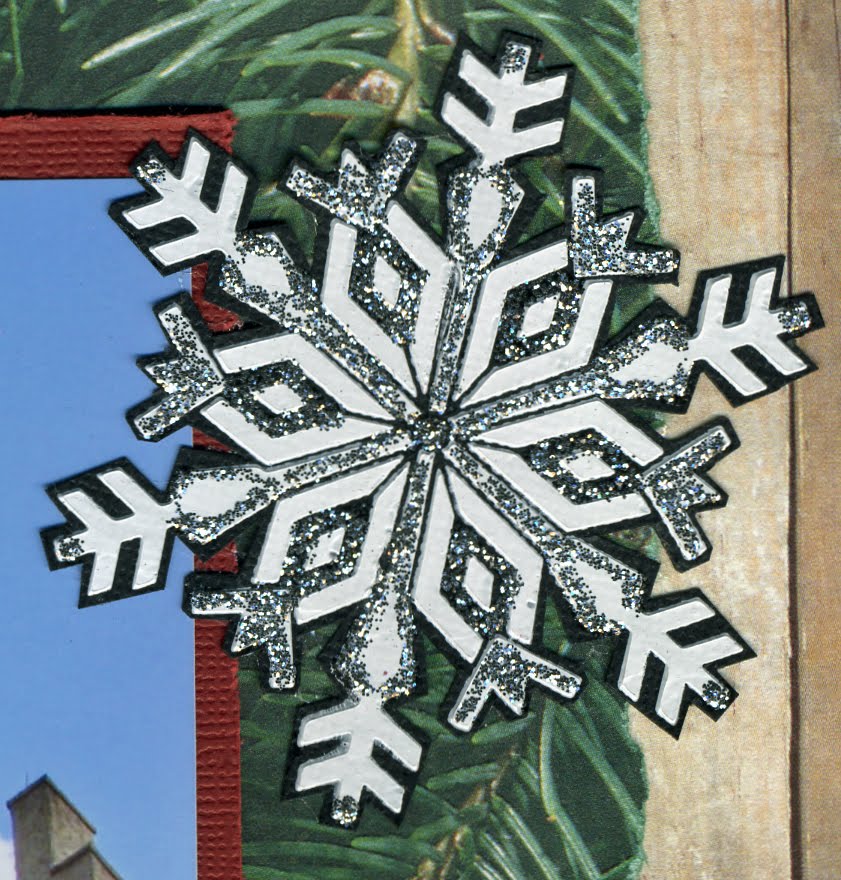
aste.

It is more o
paque (obviously shinier), and a little thinner in consistency. I always make sure that I work just a little quicker with the glossy paste because I find that it has more of a tendency to try and "bleed" under the stencil than the original. I pasted these stencils: LL 399 Antler Snowflake, LL 396 Gothic Snowflake, LL 398 Southwest Snowflake, and LS 26 Snowflake (which I pasted twice). When these were dry, I used silver Stickles to sparkle them up. You can see that I had fun using the stencilled snowflake with different patterns of Stickles. Oh, and I mentioned the Silhouette Machine (the best die cutting machine in the world). Well, that title? It was cut on my Silhouette. The font is a dingbat font called Prototype Community. It contains the original logos of everything in Epcot. If you are a Disney fan and a Silhouette user, you DEFINITELY need this font. I was also surprised that the Silhouette cut the mirror paper that I wanted to use. The top layer ripped just a little on some of the finer corners, but I think that may have been due to a slightly duller blade. I just fixed it up with a little gold paint pen.
So, I am hoping that you like my extra posting this week. I sure had fun with it. Don't worry, regular cardmaking fans, I am still going to post my usual on Thursday with the rest of the Dreamweaver Stencil Design Team. It is already scheduled, in fact. If anyone is visiting from Disney Scrappers, you can expect to see me A LOT more active in the near future. I love both groups--you inspire me. Here's hoping I inspired someone else. See you Thursday!
Subscribe to:
Posts (Atom)


