
Welcome to the Glue Dots Blog Hop!
As our fans know we love a contest while we hop so three lucky commenters will win a prize package that includes:
Glue Dots® Craft Dots 3/8”
Glue Dots® Mini Dots 3/16”
Glue Dots® Removable Dots 3/8”
Glue Dots® Mini Dots 3/16”
Glue Dots® Removable Dots 3/8”
CRS5080 Cling Create Christmas Stamp Set by Stampendous®
DCS5080 Create Christmas Die Set by Stampendous®
MGK02 Christmas Micro Glitter Kit by Stampendous®

Just comment on both company blogs and all the design team posts for our hop with Glue Dots. Commenting is open until Sunday, November 1st at 11:59 pm and winners will be announced sometime on Monday, November 2nd. See Official Contest Rules.
Here is my post for today:


11) Heat emboss the powder on the Glue Dots.

12) Cut the embroidery floss between the Glue Dots.
 13) Using the craft knife, remove the "spiders" from the craft sheet and place carefully in the centers of the Craft Glue Dots.

14) Use the craft knife to seperate the thread "legs" and press them into position on the larger Glue Dots.
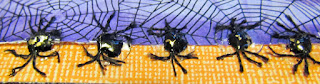
15) Cover the Glue Dots with Lime Micro Glitter, press in gently and brush off the excess.

16) Use the craft knife to gently scrape off any glitter that may have stuck to the bodies of the spiders.

Don 't forget to comment on all the blogs. Here are the posts for today:
DCS5080 Create Christmas Die Set by Stampendous®
MGK02 Christmas Micro Glitter Kit by Stampendous®
Just comment on both company blogs and all the design team posts for our hop with Glue Dots. Commenting is open until Sunday, November 1st at 11:59 pm and winners will be announced sometime on Monday, November 2nd. See Official Contest Rules.
Here is my post for today:

Materials:
Stazon Black Ink
Tombow Dual Marker #606
Water Brush
Prismacolor Pencils in Jasmine, White, Canary Yellow, Orange, Neon Orange, Pale Vermillion, Neon Green, and Marine Green
Core'dinations Card Stock
Black Embroidery Floss
Non Stick Craft Mat
Heat Gun
Scissors
Craft Knife
Directions:
1) Stamp on the mixed media paper and let dry.
2) Color the background using the Tombow Dual Markers and water brush. Let dry.
3) Color the pumpkin, moon and cat eyes with Prismacolor Pencils.
4) Use the Craft Glue Dots to adhere to the orange card stock.

5) Adhere Craft Glue Dots along the edge of the stamped image. I found the easiest way to do this is to place the dispenser where you want the dot and wiggle it back and forth a couple of times before you remove it.
6) Count the dots you laid down in step 5. This is how many "spiders" you need.
7) Cut a 12" piece of the embroidery floss and remove 2 strands of the 6.

8) Lay the floss on the craft sheet and place Mini Glue Dots over the top of the floss at about 1/2" intervals, starting about 1/4" from the end.
9) Cover the first Glue Dot with a good deal of Aged Black Embossing Enamel.

10) Press the embossing enamel into the Glue Dot. Brush the excess down to the second dot. Repeat until all the dots are covered in powder.


12) Cut the embroidery floss between the Glue Dots.


14) Use the craft knife to seperate the thread "legs" and press them into position on the larger Glue Dots.

15) Cover the Glue Dots with Lime Micro Glitter, press in gently and brush off the excess.

16) Use the craft knife to gently scrape off any glitter that may have stuck to the bodies of the spiders.

Don 't forget to comment on all the blogs. Here are the posts for today:


BOO-tiful card Laura :)
ReplyDeleteLOVE your stamped panel and colouring, it adds great dimension, LOVE your COOL spiders too!!! THANK YOU for sharing how to create them!!!
Tracy from Victoria, Australia
The card is so cute. The spiders were a great idea. Very creative. Love it.
ReplyDeleteFabulous card! I love the way you created your spiders (although I hate the creepy little things!), thanks for sharing!
ReplyDeleteSo cute`! Love all the details!
ReplyDeleteCute. Love the spiders (but only on your card and not in real life).
ReplyDeleteSuch a cute card!!
ReplyDeleteAdorable!! LOVE the spiders down the edge!! They are so cute that even my granddaughter and I wouldn't mind them stopping by! LOL TFS!
ReplyDeleteI love your little "spiders". So cute! My first thought when I saw your card was the song Moon Shadow by Cat Stevens. Viki in Kansas
ReplyDeleteLOVE those creepy crawly spiders on this fabby pumpkin cat card. What a fabulous mini tutorial for Halloween. Thank you for sharing today!
ReplyDeleteAdorable card! I love anything with a black cat on it! Great color and so many pretty details too!
ReplyDeleteTake Care!
Michele
Awesome idea - love these 'thready legged' spiders. Great card !
ReplyDeleteThe spiders you made are
ReplyDeleteawesome! Great design to
you card.
Carla from Utah
Great Halloween card! Love the fun spiders and that awesome pumpkin and cat stamp!
ReplyDeleteOMG look at all of those spiders and that scary kitty is great Great job!!
ReplyDeleteWhat a great card! Love all the fun techniques you used on it. Thanks for sharing with us.
ReplyDeleteGreat card.
ReplyDeleteLove the fat pumpkin and the black cat.
thanks for sharing.
amazing card, so creative!
ReplyDeletePerfect colors and I like how you created the spiders.
ReplyDeleteSue in Ohio
So cute.. love the smooshed pumpkin, and especially the spiders. ^_^
ReplyDeleteawesome project love the kitty the webs are great.
ReplyDeleteFantastic.
ReplyDeleteThat is either a very heavy cat or a ticklish pumpkin. Great spiders and use of leftover floss. Another novel way to use those Glue Dots!
ReplyDeleteWOW! Amazing idea.
ReplyDeleteAdorable and fun. Love your color combo. TFS
ReplyDeleteTeresa in California