Showing posts with label contest. Show all posts

Thursday, January 29, 2015

The Fifth Thursday

It is the fifth Thursday of the month, so the whole team is playing this week.  Of course, our theme is still birthdays, but I always prefer a nice, all occasion type card for birthdays.  I feel better when I can write in anything I want.
 
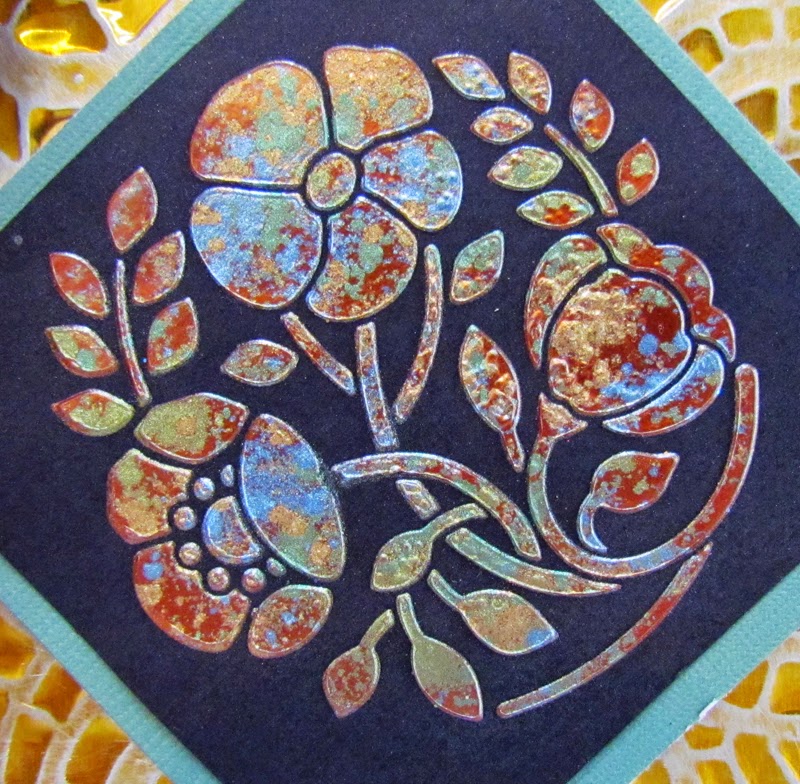
 For this card, I used two different techniques.  First up, I pasted LM2011 Poppy Circle with Metallic Copper Embossing Paste.  While it was still wet, I sprinkled on some Metallic FX in http://www.stencilwithstyle.com/accessories/fxpins.html, FX 10 Kiwi, and FX 17 Navajo Sky.  I let them dry for awhile, but then got a little impatient, and used my heat gun to speed the process.  It caused a few little bubbles on the surface, but I really liked it.  When everything was completely dry, I rubbed off the excess Metallic FX with a Swiffer refill.  Here is a little detail shot:


 While the paste dried, I ran the LJ 901 Mosaic Swirls Stencil through my Cuttlebug with yellow coated aluminum and the Stamping Details Rubber Embossing Mat.  After the embossing, I simply sanded off a little of the gold color.
     With the addition of some May Arts ribbon and a little card stock, I was finished. 
     Thanks for stopping by today. Try making something yourself and upload it to the Dream It Up! Blog for your chance to win a great prize.  For inspiration, be sure and check out the other team members this week at the following links:

Thursday, November 1, 2012

A CAS Christmas With Dreamweaver and Ranger!


Still feeling festive? We hope so! Dreamweaver and Ranger still have two weeks left of our Festively Distressed collaboration, and we are full of distressing ideas...Tim Holtz' Distress Powder ideas, that is. Mixed with our fabulous line of stencil designs and exciting products, your creativity will know no bounds! If you missed the first two weeks, start HERE and HERE!

For our postings this week and next, we are offering you the opportunity to win one of two prize packages, perfectly coordinated for your holiday crafting. Simply leave a comment on each of our Dream Team's posts, and YOU could be one of two randomly selected winners!


The Dream Team have been challenged for the month of November to create something CAS (clean and simple) for the holidays. The extra challenge is mixing the Distress Powders in for the collaboration with Ranger. Think that it's possible? Well...let's see...

Here's what I came up with:

It is VERY clean and simple. 
MATERIALS:
Core'dinations Kraft Core
White Cardstock
Plaid Ribbon

DIRECTIONS:
1)  Soap the back of the stencil
2)  Brush off the excess soap that accumulated around the openings
3)  Remove one side of the Mounting Paper and attach to the soaped side of the stencil
4)  Pinch some of the Mustard Seed powder into the center of the poinsettia and rub in with finger.
5)  Continue filling in the image with the colored distress powders by putting the color on the stencil and pushing in with your finger.  Start with the outermost colors.
6)  Brush off the excess powders.
7)  Place entire project stencil side down on a flat surface.  Carefully remove the adhesive paper from the stencil.
8)  Heat with Heat It Craft Tool until the Distress Powders melt a little.  Let cool.
9)  Cover entire project with Dry Stickles.  Brush off excess.
10)  Assemble card.
11)  Dot Liquid Pearls into "seed" areas.  Let dry.
Easy enough, right?
 
So tell me what you think in your comment below before heading over to the rest of the Dream Team posts:

The Ranger blog is offering another amazing prize opportunity, just for playing along with the Ranger/Tim Holtz Distress Powders and Dreamweaver Stencils and linking your creation on the Ranger blog. The winner of last week's prize AND the winner of last month's Dreamweaver prize can be found HERE.  You can find more details about this week HERE.
 
We hope that you have been inspired by our creations, and will continue to follow the Dream Team through the Dream It Up! blog as well as to like us on our Facebook page. We really encourage you to play along with our monthly challenges for more prize opportunities and creative fun!

Thursday, August 2, 2012

Christmas in August!

Welcome to Christmas in August!  For this new challenge, I am using a brand new stencil.  First released at this Summer CHA, this stencil is bound to become a hit.  Here, I used it with a modified Double Glitter Technique, which I call "Triple Glitter" because it uses different kinds of glitter in the same stencil wells.  Here is a video on the basics of double glitter, by our stencil queen, Lynell.  I soaped up the back of Stencil LJ 921 and Stencil LS 92 Merry Christmas.  I brushed off all the excess soap crumbles.  Then, I placed them soap side down on the Double Sided Adhesive Paper.  For the hearts, I used an Art Glitter Dazzler called D4 Jackpot Funky.  It has a combination of very chunky pieces and ultrafine pieces.  If I had only used this, I would not have super sharp and crispy edges that I wanted. I can get that crispness with Microfine Glitters, so I added #516 Gold Tone Microfine Opaque to the hearts.  I put it on the stencil and pushed it into the wells all around the sides. Since the other openings are so small, I used Microfine on most of the card.  The ornament hangers are #508 Silver Moon Microfine Opaque.  The needles are a combination of #519 Reed Microfine Opaque and #514 Bavarian Forest.  The Bavarian Forest is also used in the words.  I didn't need the branches to be sharp and crispy, so I used Ultrafine Opaque #58 Brown.  Now here is the best tip in this post:  to get the colors of glitter where you want them, put a pinch of glitter on the metal stencil next to the area where you want the color.  Then, gently shove it into place with your finger.  This works especially well with the Microfine glitters, as they need to be "burnished" (rubbed in) anyway.  When the colors are in place, brush the excess off and remove the adhesive paper from the stencil.  The stencil needs to remain flat on a hard surface as you peel the paper off of the it.  After the paper is off, the background adhesive is exposed.  Cover that with a layer of glitter.  I used Ultrafine Transparent Crystal #85.  Then, I just assembled the card.
So, now it is your turn!  Our challenge is Christmas in August, so get a head start on some special cards.  Put them online and link them to the Dreamweaver Blog or just email a picture to Lynell with some brief directions.  Find her email address on the blog.  You could be featured and even win a prize!  Give it a shot.  In the meantime, check out all the blogs (linked on the left) and get inspired with Dreamweaver Stencils.  Merry Christmas in August--see you next week!

Thursday, July 26, 2012

More Summer Fun!

This is the last week of the Summer Fun Challenge for Dreamweaver Stencils!  The weather here in Michigan has been really warm, so I chose a cool blue card to present today.  I made it with three stencils and one of my favorite techniques--metal embossing.  Let me explain:
I started by running my Mosaic Swirls Stencil LJ 901 through my Cuttlebug using a blue cardstock.  The sandwich went like this:  A Plate, Stencil LJ 901 face down, cardstock (with alcohol sprayed on the back), the Details Embossing Mat, and two unwarped B Plates.  This became my background.
Next, I did the same thing with the LM 220 Gecko Stencil and blue coated Mercart aluminum instead of cardstock.  I used a piece that was larger than the stencil.  I placed that aluminum blue side face down on the stencil (which was also face down).
While the Cuttlebug was out, I did almost the same thing with LS 1009 Thank You stencil. I placed the stencil face up and the blue side of the aluminum up as well, because I wanted it to be "debossed". (Debossing is to push the metal into the wells instead of out through the wells.)  I left the metal on the stencil. 
Now that I had the basics done, I put the Cuttlebug aside.  I started with the gecko.  I placed it face down on a piece of suede.  I used the ball end of some Mercart ball end tools to push the metal out and create the three dimensional lizard.  It is sort of like sculpting.  I used the larger ball end in the body of the lizard, ball number 3 in the head, arms. legs and tail,  and the tiny ball from the outliner tool in the feet and toes.  After I thought the lizard looked pretty good, I flipped it over to work from the top on a smooth, flat surface.  I used an acrylic block to work on.  The only tool that can be used on the coated side of the aluminum is the teflon tool.  I used it to "outline" the lizard, pushing down the metals that were raised on my last step while defining the lizard.  I also used this time to flatten the edges of the stencil that were embossed by the Cuttlebug.  When the lizard looked great, I flipped it back over and filled it with the Mercart Metal Backing Paste.  I set the lizard aside to dry.
I then finished the debossing of the thank you.  I set the metal with the stencil still attached on the acrylic block.  I used the fine side of the teflon tool and pushed the metal a little more against the stencil, defining the word.  I then sanded the metal to remove the excess blue before I carefully took the metal off of the stencil. 
When the backing paste was dry (in a couple of hours or so), I placed the lizard on top of the Mosaic Swirls LJ 901 Stencil.  I used a drawing blending stump over the metal behind the lizard, creating the background.  I made sure to get the design over the whole area.  Finally, I sanded the whole thing, paying special attention to the lizard.  I then assembled the card.
As you can tell, I just love working with the metals.  You don't have to work with metals, though, to enter the Summer Fun Challenge this month.  All you have to do is make a card and either get it online and link it to the Dreamweaver Blog or just email it to Lynell. She will put it on her blog for you.  Her email address can be found on the blog.  You could WIN a fantastic stencil prize.  If you need some inspiration, check out all the other blogs (listed on the left of this blog).  Get inspired and come join in the Summer Fun!

Thursday, March 4, 2010

Reminisce Contest Entry


Here are scans of the album I entered in the Reminisce Passports Album Contest

Reminisce Contest


Here are some more scans of the album.