Thursday, February 28, 2013

Embellishing Your Scrapbook Pages Using Stencils

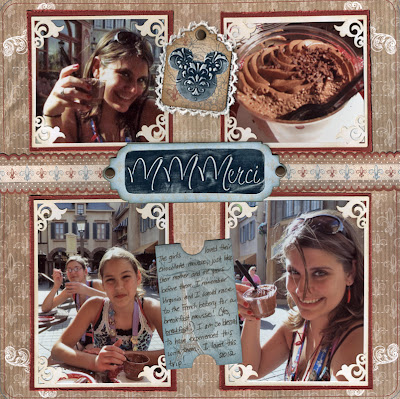
Can you use Dreamweaver Stencils to embellish your scrapbooks?  Absolutely!  I do all the time.  Here are some examples:

I made the Mickey Head, the MMMerci Title and the Fleur De Lis with stencils.  They were all pretty easy.  Let me show you how they were made, in order from the simplest to the hardest.  I will be focusing on the metal parts of the embellishments only.

THE MICKEY TAG    
MATERIALS:
Dreamweaver Stencil LJ 907 Damask
Mercart Metal in Navy Blue
Stamping Details Rubber Embossing Mat
Double Sided Mounting Paper
Mickey Punch
Sanding Block
Manual Die Cut Machine (I used the Cuttlebug)
Chipboard shape
Art Institute Designer Dries Clear Adhesive
Paper (I used Prima En Francais Collection)
Lace
DIRECTIONS:
1)  Lay the stencil face down on the base of the die cut machine (A Plate for the Cuttlebug) and the metal blue side down on top of it.
2)  Cover with the rubber mat, and then the top plates.  (On the Cuttlebug, it is two B Plates).
3)  Run through the machine.
4)  Use the Mickey punch on the Double Sided Mounting paper.
5)  Peel off one side of the mounting paper and place on the back of the metal, centering it over the design.
6)  Use regular scissors to trim around the shape.
7)  Sand the metal to reveal the silver underneath.
8)  Assemble the tag.  Glue the paper to the chipboard and trim.
9)  Remove the backing from the adhesive paper on the metal and attach to tag.
10)  Use the glue to attach the lace around the back.

THE MMMMERCI TITLE
MATERIALS
Acrylic Block
                                                      Drawing Blending Stump No. 6
                                                      Suede
                                                      Sanding Block
DIRECTIONS:
1)  Place the Dreamweaver Stencil face down on the acrylic block and put the metal blue side down on top.
2)  Rub blending stump along the back of the metal to determine where the edges of the letters are.
3)  Use the fine tip end of the teflon tool (in basic kit) to push metal in all the way around the edges of the stencil.
4)  Remove metal from stencil and place further down so that you can add an extra M. 
5)  Repeat steps 2-4 until you have the number of Ms that you want.
6)  Remove the metal from the stencil and place blue side down on the suede.
7)  Use the small ball tool (in the basic tool kit) to push the metal out a little more.
8)  Flip the metal over (blue side up) and place back on the acrylic block.
9)  Use the "deer foot" and the fine tip to refine the edges and flatten the metal outside of the words.
10)  Flip metal back over and fill the wells with Filling Paste.  Let dry.
11)  Sand to reveal the silver aluminum.

THE FLEUR DE LIS
MATERIALS:
Gold Coated Aluminum
Acrylic Block
Suede


DIRECTIONS:
1)  Place the stencil face down on the acrylic block and the metal gold side down on top of it.
2)  Use the Blending Stump on the back of the metal to find the edges of the stencil.
3)  Use the teflon tool (included in the Basic Tool Kit) on the fine side to push the metal against the edges all the way around the stencil.  (You could have replaced these first three steps of this tutorial with 1-3 of the Mickey Head one if you want to.)

This is what it looks like when step 3 is done
4)  Place face down on suede and use the large ball tool (included in basic kit) to press out the larger open areas of the image.
5)  Use the small ball tool (included in basic tool kit) to push out the smaller areas.
6)  Flip over and place on the acrylic block.  Use the teflon tool to refine and flatten the background of the image.
7)  Flip over the metal and fill the wells with Mercart Filling Paste.  Let dry.
Now that you have seen how they are done, here is an extra scrapbook page sample:
This month's theme is CAS Love and Friendship.  I certainly felt the love and friendship on this wonderful trip, and these embellishments were pretty simple.  I hope you get inspired by this and the posts of my teammates to create something special.  If you do, send it to Lynell@Dreamweaverstencils.com for your chance to win!  And look for an all new Dreamweaver Design Team soon.
Thursday, February 21, 2013

A Simple Metal Thank You

In honor of CAS Love and Friendship month on the Dreamweaver Blogs, I am presenting a simple metal Thank You card.
MATERIALS:
Dreamweaver Stencil LJ 841 Fleur De Lis
Dreamweaver Stencil LS 1011 Merci
Navy Blue Coated Mercart Aluminum
Mercart Basic Tools
Mercart Fiberglass Tip Tool
Stamping Details Rubber Embossing Mat
Double Sided Mounting Paper (my adhesive of choice on this one, but you can use something else)
Manual Die Cut Machine (I used a Cuttlebug)
Scissors
Blue Card Stock
Big Bite
3D Foam Squares
Silver Ribbon

DIRECTIONS:
1)  Use scissors to cut the metal to the size of the outside stencil edges.
2)  Run metal through the machine with the stencils (one at a time) and the rubber embossing mat.  This is the Cuttlebug sandwich:  A Plate, stencil face down, metal blue side down, rubber embossing mat, two B Plates.  
3)  With the stencil still in place, place face down (you should see the silver side of the metal and not the stencil) and use the Mercart Teflon Tool to push the metal down a little further wherever the edges do not appear crisp.
4)  With the stencil still in place, flip over.  Use the fiberglass tool to remove all of the blue metal that you see through the openings.  When you are finished, the metal of the stencil will appear a little scratched and buffed.  It will not effect the performance of the stencil.
5)  Use the mounting paper to attach the metal to the card stock.
6)  Use the Big Bite to create holes in the smaller piece.
7)   Use the foam squares to raise the smaller piece and attach into place.
8)  Attach the ribbon.

That is it--a simple Thank You card.  If you create a simple love or friendship card this month, send a photo to Lynell@dreamweaverstencils.com for your chance to win.  If you really love stencils, check out our Design Team Call.  Good luck!

Tuesday, February 19, 2013

A Dazzling Thank You

Dazzlers on a card?  Absolutely!  In fact, Dazzlers create an extra sparkling look.  To see how it was done, check out my post on the Art Glitter Blog.

Friday, February 15, 2013

An Irish Inspiration

I really enjoyed making this Irish themed pendant from my Globecraft and Piccolo products.  Let me tell you how I did it....

MATERIALS:
Globecraft Assorted Tag Bezels
Frames for Assorted Tag Bezels
Piccolo Vintage Hearts Charm Set (need 2)
Piccolo Enamel Embossing Powder Adhesive
Globecraft Copper Kettle Enamel Powder
Globecraft Vintage Silver Enamel Powder
Glastique Gloss Finishing Glaze
Orange 3D Enamel Gel
Dark Green 3D Enamel Gel
Piccolo Silver Bail
Piccolo Easy Grip Tweezers
Small Piece of Acetate
Scissors
Heat Gun
Silver Chain

DIRECTIONS:
1)  Use Enamel Embossing Powder Adhesive on large round bezel.
2)  Cover with Copper Kettle Enamel.
3)  Heat set the enamel.  Use tweezers to hold while heating.
4)  Repeat steps 1-3 alternating front and back until you have 2 coats on each.
5)  Use scissors to remove hanging circles from 3 of the smaller hearts.
6)  Use scissors to cut out a clover stem from the remaining book board on the packaging.
7)  Set hearts, stem and bezel frame in place to determine if you have the right combination.
8)  Emboss front and sides only of stem, bezel frame, hearts and circles from hearts with vintage silver, using the basic procedure from steps 1-3.   You should have 2 coats.
9)  Put Glastique on back of bezel frame, stem and hearts and put into place with tweezers. Clamp with binder clips if necessary. Set aside to dry.
This is what it looks like as it dries.
10)  Put Glastique on back of circles and adhere to acetate.  Let dry.
11)  Fill the holes with orange 3D gel.  Let dry.  The enamel levels down, so you may need up to three layers.
12)  Fill the holes on the newly created shamrock with dark green 3D enamel gels.  Let dry.  It may need as many as 3 layers.
This is what it looks like with the finished green.
13)  Cut the acetate around the orange hole that you will be using as a gemstone.
14)  Attach the "gem" to the pendant with Glastique.
This is what it looks like done.
15)  Cover with a layer of Glastique for protection.  Let dry.

16)  Add the bail and chain to complete.  Note that the bail will have a difficult time fitting over the entire thing, so you may have to dig it into the back of the pendant a little.  If this bothers you, replace the bail with a large, thick jump ring.
I hope you enjoyed this pendant.  I also created another pendant for the season.  Check it out at the Globecraft Blog.
Thanks!  Stop by again.

Thursday, February 14, 2013

A Dreamweaver Birdhouse

This month's theme is CAS Love and Friendship and this birdhouse was very easy.  I made it for a friend, Lynell, the queen of Dreamweaver Stencils.
I used three Dreamweaver Stencils:  LX 7015 Art Nouveau Background, LJ 899 Petals Background and LG 745 Tree Line.
If you are interested in how to make this birdhouse, check out my complete tutorial on Paper Craft Planet.
Thanks for stopping by.  Be sure and check out the rest of the blogs, and don't forget to enter the monthy competition.  Also, we have a Dreamweaver Stencil Team Call going on until the end of February--so get inspired!