Showing posts with label mixed media. Show all posts

Friday, July 22, 2016

Tando Creative Blog Hop--and Now, a Little Christmas Fun


Welcome to the final day of the Mixed Media Blog Hop with Stampendous and Tando Creative! This is the last day for this fun collaboration, and there are tons of blogs to visit, so I will make my info as short and sweet as possible.  Of course, I would be remiss if I did not mention the prizes.


To be eligible, leave a comment and where you live on the Stampendous blog, Tando Creative blog and each designer's blog. Every comment is an entry to win one of THREE terrific prize packages. This is open to commenters with either a US or UK mailing address.
My post today is a little Christmas project.  Here it is:


I used the Tando Creative Mini Printer Tray, Penguins Stencil, Three Deer Stencil, Small Chickadees Stencil, Snowflake StencilRegular Embossing Paste, Matte Black Embossing Paste, Build a Wreath Die Set, Santa Words Rubber Stamp, Holly Background Rubber Stamp, Opaque White Embossing Powder, Winter Wonderland Sparkly Embossing Powder and Micro Glitter in Red and Silver.  I also used some Deco Art Fluid Acrylics in Silver and Graphic 45 paper.  I pasted quite a bit and used the layers of the chipboard to place layers in the project.


Thanks for stopping by.  There are plenty of wonderful posts to look at today.  Be sure to comment on all of them for your chance to win!

Thursday, July 21, 2016

Tando Creative Blog Hop--a Halloween Project


Welcome to the Stampendous and Tando Creative Mixed Media Blog Hop.  This collaboration is really taking me out of my proverbial "box" with the chance to try something really different.  Today, I am using the Triple Arch Layered Frame by Tando Creative.  Who is Tando Creative?  They are a UK based company that sells various interesting chipboard products, Andy Skinner stamps, Nathalie Kalbach stamps and Stampendous Essential Kits.  But, I get way ahead of myself.  What everyone REALLY wants to know is, "Are there prizes?"  Why, yes there are!


To be eligible, leave a comment and where you live on the Stampendous blog, Tando Creative blog and the designers blogs. Each comment is an entry to win one of THREE terrific prize packages. This is open to all commenters with either a US or UK mailing address.
Each prize package includes a Tando Creative Mini Heart Printer Tray plus Stampendous NK Studio Fiesta Stamp Set.

Now that we know what the prizes are, it is back to my post.  My project today is Halloween themed, and was wickedly fun to make.  Here it is:
I used the Triple Arch Layered Frame, the Haunted Mansion Rubber Stamp,  Owl on Oak Stencil, Long Pumpkins Stencil, Regular Embossing Paste, and some Graphic 45 Rare Oddities paper.  All the coloring was done with the humble 24 pack of Crayola Crayons.  The distressing was done with Deco Art Media Fluid Acrylics in Carbon Black.  The picture on the right shows a little more detail on the Haunted Mansion stamped image.  It was colored first with crayons and then wrinkled and painted over with the black paint.  I removed the paint with a damp cloth.

 The owl was pasted on brown paper.  When the paste was COMPLETELY dry, I colored over it.  Yes, with crayons, believe it or not.  I did a couple of layers just to be sure it was thick. Then, I painted over it with the black paint and wiped of the excess with a damp cloth.


The pumkins were made by running white card stock through a manual die cut machine with the stencil that was sprayed on the back with Burlap Glimmer Mists.  Then, they were colored with crayons, and distressed in the same manner as the other two parts.  All the rest of the project was fancy cutting and gluing on various layers of the frame to create depth.

Thanks for stopping by today.  Be sure to leave a comment for your chance to win.  Check out (and comment on) the rest of the posts, too.  Here they are:

Friday, March 11, 2016

The Final Day of the Andy Skinner Blog Hop

Stampendous and Media March 2016 Blog Hop-01
Today is the last day that we play with our friends at DecoArt. Mixed Media Artist and DecoArt International Education Coordinator Andy Skinner has designed some fantastic stamps for Stampendous, and we have shown them off all week long.
Andy joined us with his team of international mixed media artists including Julia Stratford-Wright, Mark Gould, Mel Hookham, and Jools Robertson. There were posts this week on the DecoArt and Stampendous blogs as well. 

Prizes

blog-prize-package
Each comment on a post this week will enter you to win a fabulous prize package! (one comment per post, per person).  The contest open to everyone!!
We have three packages and each has a Fluid Media Starter Kit, all three of Andy Skinner’s new Stampendous Stamp sets, and a Jumbo Acrylic Handle. Look at this great prize!
Here is my post for the day:
Materials: 
  1. Cling Toxic Rubber Stamp Set
  2. Deco Art Media Fluid Acrylics in Carbon Black, Titanium White, Prussian Blue Hue, Primary Cyan, and Metallic Silver
  3. Deco Art White Modeling Paste
  4. Large Nautilus Stencil DWLM104
  5. Waves Stencil DWLJ838
  6. Dreamweaver Palette Knife
  7. Stencil Brush
  8. Stazon in Midnight Blue
  9. Sizzix Scoreboards XL Dies--Canister
  10. Sizzix Little Sizzles 6 x 13 Mat Board Pack Cream
  11. Removable Tape
  12. Paint Brush
  13. Raffia
  14. Zip Dry
  15. Black Card Stock
  16. Small Gems
Directions:
  1. Cut the mat board with the die to create the canister and assemble.
  2. Paint the canister with the blues, white, and a little black.  Let dry.
  3. Use stamps and Stazon ink to create texture in the background.
  4. Use the Waves Stencil, white paint and the stencil brush to create waves in random places around the box.
  5. Tape down the Nautilus Stencil with removable tape.  Use the palette knife to spread the Modeling Paste over the stencil.  Remove it and let the paste dry. Don't worry about the image being perfect.  The imperfect paste makes the project look more interesting and ancient.
  6. Repeat step 4 in various places around the canister.
  7. Paint over the tops of the modeling paste and let dry.

Now that you have seen my post, make a quick comment, and then head over for more inspiration and additional chances to enter prize drawings at the following places:

Thursday, March 10, 2016

An Andy Skinner Blog Hop

Stampendous and Media March 2016 Blog Hop-01

This is an exciting week, as the Stampendous Team has been experimenting with  DecoArt. Mixed Media Artist and DecoArt International Education Coordinator Andy Skinner has designed some fantastic stamps for Stampendous, and we have been showing them off all week long.
Andy and his team of international mixed media artists including Julia Stratford-Wright, Mark Gould, Mel Hookham, and Jools Robertson has been joining with Stampendous and the DecoArt blog. Of course, there are prizes.....

Prizes

blog-prize-package
Each comment on a post this week will enter you to win a fabulous prize package! (one comment per post, per person).  The contest open to everyone!!
We have three packages and each has a Fluid Media Starter Kit, all three of Andy Skinner’s new Stampendous Stamp sets, and a Jumbo Acrylic Handle. Look at this great prize!
Here is my post for the day:
Materials: 
  1. Cling Toxic Rubber Stamp Set
  2. Deco Art Media Fluid Acrylics in Carbon Black, Payne's Gray, Titanium White, Primary Yellow, Primary Cyan, Interference and Metallic Silver
  3. Mixed Media White Paper
  4. Deco Art White Modeling Paste
  5. Deco Art Metallic Lustre Gold Rush
  6. Mosaic Swirls Stencil DWLJ901
  7. Dragonfly Stencil DWLM193
  8. Gears Stencil DWLJ911
  9. Dreamweaver Palette Knife
  10. Stencil Brush
  11. Stazon in Cloudy Sky and Emerald City
  12. Removable Tape
  13. Paint Brush
  14. Raffia
  15. Zip Dry
  16. Black Card Stock
  17. Small Gems

Directions:
  1. Cut the paper to size and paint it, using gray, black and white.  Create splotchy parts by loading up the brush with various colors instead of mixing them first.  Let dry.
  2. Use stamps and Stazon ink to create texture in the background.
  3. Use the Mosaic Swirls Stencil, white and the stencil brush to create the "aged tile" look in random places around the image.
  4. Tape down the Dragonfly Stencil with removable tape.  Use the palette knife to spread the Modeling Paste over the stencil.  Remove it and let the paste dry.
  5. Repeat step 4 with the Gears Stencil.
  6. Paint over the tops of the modeling paste and let dry.
  7. Gently rub in Metallic Lustre over the top of the painted modeling paste.
  8. Add the gems and raffia.
  9. Assemble the card.

Actually, I have two.  The "twin dragonflies".  Really, I couldn't decide which I liked the best.
The differences in this one lie entirely in the color choice of the Metallic Lustre (this time, I used Copper Kettle) and the addition of the green raffia.  Other than that, they are the same.
Now that you have seen my post, make a quick comment, and then head over for more inspiration and additional chances to enter prize drawings at the following places:

Friday, May 29, 2015

A Linnie Blooms Blog Hop

1908142_10203174247272098_6866324387937828000_n

At Linnie Blooms you're going to find oodles of fun projects to really take your mixed media in a new direction. We met this new company at CHA in January, and we immediately had heaps of ideas for using her clever products. What a new dimension to journals, canvases, books, scrapbook pages! We know you're going to love seeing the inspiration from this week's hop!
Plus there are prizes!! Three lucky winners will each win a set of Linnie Blooms Fabric Mini File Folders just like they provide for our team. Plus, you'll receive a Dreamweaver Stencil background, and our Vintage Press Perfectly Clear Stamps™ Set. You'll be creating Mixed Media fabric accents in no time! These winners have to have a U.S. mailing address (official rules here), but Aussie Fans - good news! The Stencil Specialists are sponsoring one Australian prize for this collaboration! You could win a Stampendous stamp, an LL sized Dreamweaver Stencil of your choice, a silicone buttons mould, and a Stampendous Embossing Powder (your color choice)... Wow!! Be sure to let us know you're from Australia in your comments!!

Today, I feature the conclusion of the Disney inspired project that I blogged about yesterday.  This project is really my first adventure with canvas.  I found that the more relaxed I was as I worked, the better the project turned out.  I am posting my favorite three today.  For all of them, I started by painting Gesso on the top of the Linnie Blooms canvas folders.  Then, I painted backgrounds with acrylic paint.  I stencilled with acrylic paint and a stencil brush.  The stencils I used for each are listed under the photos.


 The first one I am featuring today is based on Adventureland.  For it, I used LJ 815 Zebra Texture Stencil, LL 454 Long Bird O' Paradise,  LL 538 Primitive Masks, LG 642 Branch, LG 752 Toucan, and LG 706 Monstera Shape.

For this Liberty Square inspired project, I used  LL 525 Bats,  a retired LG 653 Columns (sorry.  I would have sworn it was still valid....), LG 699 Copperplate Corners, LL 359 Flag and the Stampendous stamp Crowscape Stamp.  I painted acrylic paint on the stamp instead of using ink.

Finally, I present this Tomorrowland inspired project.  Oddly, although I dreaded this one, it turned out to be one of my favorite.  For it, I used LJ 991 Gears, LM 289 Globe, LX 7017 Stars and LX 7029 Spiral Dots.
This project was really a lot of fun.  Pick up some of your favorite stencils and some Linnie Blooms canvas and give it a shot!  Better yet, leave a comment here and on all the other blogs and you could win some great stuff.
Let's take a look at the fun inspiration our design teams have for you today! Be sure to leave your comments for a chance to win!

Thursday, May 28, 2015

A Linnie Blooms Collaboration

1908142_10203174247272098_6866324387937828000_n

At Linnie Blooms you're going to find oodles of fun projects to really take your mixed media in a new direction. We met this new company at CHA in January, and we immediately had heaps of ideas for using her clever products. What a new dimension to journals, canvases, books, scrapbook pages! We know you're going to love seeing the inspiration from this week's hop!
Plus there are prizes!! Three lucky winners will each win a set of Linnie Blooms Fabric Mini File Folders just like they provide for our team. Plus, you'll receive a Dreamweaver Stencil background, and our Vintage Press Perfectly Clear Stamps™ Set. You'll be creating Mixed Media fabric accents in no time! These winners have to have a U.S. mailing address (official rules here), but Aussie Fans - good news! The Stencil Specialists are sponsoring one Australian prize for this collaboration! You could win a Stampendous stamp, an LL sized Dreamweaver Stencil of your choice, a silicone buttons mould, and a Stampendous Embossing Powder (your color choice)... Wow!! Be sure to let us know you're from Australia in your comments!!

Honestly, while I truly appreciate canvas mixed media projects, I have never really made anything like this myself.  I had no idea where to begin.  Finally, I decided that I had to think along the lines of what I loved--scrapbooking.  I created these projects and the ones for tomorrow to eventually insert under titles in my scrapbook.  And what do I like to scrapbook the most?  Disney.

Today, I offer you three of six mini canvases (actually the opened folders) based on lands in the Magic Kingdom.  I created all of the canvases by starting with a layer of gesso, and then adding a background of acrylic paints and stencilling over the top with acrylic paints and a stencil brush.  I added in details with an ordinary ball point pen.  I will list the stencils under each page.


 The first page represents Main Street.  The LL 3017 Cameo stencil represents the silhouettes that I used to get on Main Street as a keepsake.  I also used LG 684 Wrought Iron, LL 431 Sundae,  LG 698 Corner Flourishes, LM 149 Music, and, an apparently discontinued LG 632 Columns (sorry, when I used it, I thought it was still current.)  I pasted the LJ 886 Fireworks stencil with Translucent paste, which I covered in Stampendous glitters.   It took a long time to dry, even after I heated it with a heat gun.  Ultimately, I did not particularly like the look when I  was done, so I did not paste any others.


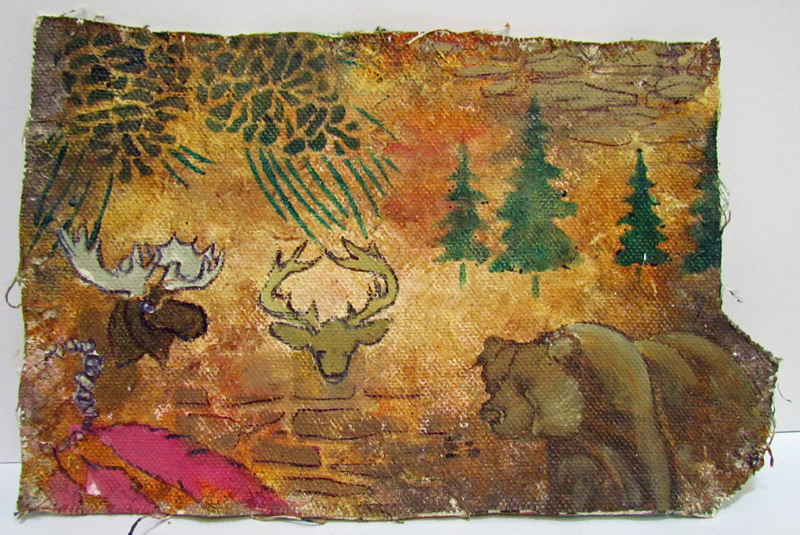
 The second piece represents Frontierland.  I used the LL 394 Feathers stencil, LL 430 Buck, LL 598 Grizzly, LG 715 Moose, LG 611 Stone Wall, LL 570 Pine Trees, and LG 675 Pine Cones.

And on my final project for today, I feature a Fantasyland themed project.  I used LL 493 Teacups Vertical, LS 6 Scallop, LM 186 Chameleon, LR 502 Sun, LJ 806 Hexagons, LJ 838 Waves and LJ 848 Fish Background.

Tomorrow, check back for the other sides of these pieces!  In the meantime, take a look at the fun inspiration our design teams have for you today! Be sure to leave your comments for a chance to win!
If you don’t see the Blog Hop post as soon as you click the link, you may need to click on the header or home button of the blog and scroll a bit to find the post. Some bloggers post for more than one thing each day. If you have trouble commenting on a blog, please let us know at submissions@stampendous.com. Thanks for your patience, designers across several time zones mean every post may not be active immediately.