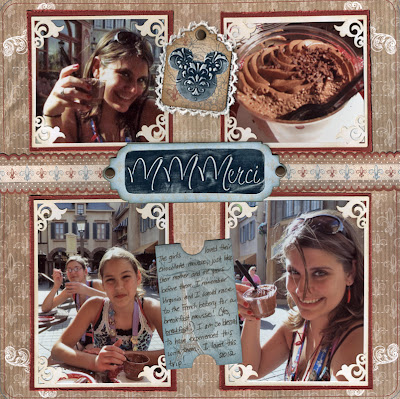
I made the Mickey Head, the MMMerci Title and the Fleur De Lis with stencils. They were all pretty easy. Let me show you how they were made, in order from the simplest to the hardest. I will be focusing on the metal parts of the embellishments only.
THE MICKEY TAG
MATERIALS:
Dreamweaver Stencil LJ 907 DamaskMercart Metal in Navy Blue
Stamping Details Rubber Embossing Mat
Double Sided Mounting Paper
Mickey Punch
Sanding Block
Manual Die Cut Machine (I used the Cuttlebug)
Chipboard shape
Art Institute Designer Dries Clear Adhesive
Paper (I used Prima En Francais Collection)
Lace
DIRECTIONS:
1) Lay the stencil face down on the base of the die cut machine (A Plate for the Cuttlebug) and the metal blue side down on top of it.
3) Run through the machine.
4) Use the Mickey punch on the Double Sided Mounting paper.
5) Peel off one side of the mounting paper and place on the back of the metal, centering it over the design.
6) Use regular scissors to trim around the shape.
7) Sand the metal to reveal the silver underneath.
8) Assemble the tag. Glue the paper to the chipboard and trim.
9) Remove the backing from the adhesive paper on the metal and attach to tag.
10) Use the glue to attach the lace around the back.
THE MMMMERCI TITLE
MATERIALS
Acrylic Block
Suede
Sanding Block
DIRECTIONS:
1) Place the Dreamweaver Stencil face down on the acrylic block and put the metal blue side down on top.
2) Rub blending stump along the back of the metal to determine where the edges of the letters are.
3) Use the fine tip end of the teflon tool (in basic kit) to push metal in all the way around the edges of the stencil.
4) Remove metal from stencil and place further down so that you can add an extra M.
5) Repeat steps 2-4 until you have the number of Ms that you want.
6) Remove the metal from the stencil and place blue side down on the suede.
7) Use the small ball tool (in the basic tool kit) to push the metal out a little more.
8) Flip the metal over (blue side up) and place back on the acrylic block.
9) Use the "deer foot" and the fine tip to refine the edges and flatten the metal outside of the words.
10) Flip metal back over and fill the wells with Filling Paste. Let dry.
11) Sand to reveal the silver aluminum.
THE FLEUR DE LIS
MATERIALS:
Gold Coated Aluminum
Acrylic Block
Suede
DIRECTIONS:
1) Place the stencil face down on the acrylic block and the metal gold side down on top of it.
2) Use the Blending Stump on the back of the metal to find the edges of the stencil.
3) Use the teflon tool (included in the Basic Tool Kit) on the fine side to push the metal against the edges all the way around the stencil. (You could have replaced these first three steps of this tutorial with 1-3 of the Mickey Head one if you want to.)
 |
| This is what it looks like when step 3 is done |
5) Use the small ball tool (included in basic tool kit) to push out the smaller areas.
6) Flip over and place on the acrylic block. Use the teflon tool to refine and flatten the background of the image.
7) Flip over the metal and fill the wells with Mercart Filling Paste. Let dry.
Now that you have seen how they are done, here is an extra scrapbook page sample:
This month's theme is CAS Love and Friendship. I certainly felt the love and friendship on this wonderful trip, and these embellishments were pretty simple. I hope you get inspired by this and the posts of my teammates to create something special. If you do, send it to Lynell@Dreamweaverstencils.com for your chance to win! And look for an all new Dreamweaver Design Team soon.


These pages are lovely, and I really do like the elegant metal embellishments. Thanks for the tutorial too!
ReplyDeleteThe pastries look yummy! Love the metal embellies and playing "where's Micky?"
ReplyDeleteWow, once again you are amazing!
ReplyDeleteVery cool Laura! They add a great touch to your pages!
ReplyDeleteThis is so beautiful!
ReplyDeleteThis is AMAZING! Love it and it is faB.Great job!
ReplyDeleteWOW! I agree with Kristi - Absolutly Amazing!!!
ReplyDeleteLove the detail, the Mickey, the instruction. Truely AMAZING!!!
These are beautiful pages. I love the metal embellies. Great techniques.
ReplyDeleteThanks for the how-to
ReplyDeleteBeautiful pages...great instructions...tfs...
ReplyDeleteThese are such cute scrapbook pages Laura! I love them! Nice tutorial too...I think it is so helpful to see the step by step process.
ReplyDelete